Teacher Stuff: integrating technology

Showing posts with label integrating technology. Show all posts

Create Your Own Listening Library


Did you know that you can easily create your own listening library to use in your classroom or in your school library? If your students have access to an iPad or google classroom, you can create a listening library in just a few steps! Here is what you will need:

1. Choose a book and a read aloud.

There are so many great read alouds out there that are already made! My favorite go-to places for free read alouds are Story Time With Ryan and Craig (they are hilarious!) and Storyline Online. Just copy the link to the video. You can always make your own read aloud too, or ask parent volunteers to create them at home. It's a great way for parents to help at school, even if they can't be there to volunteer in person. You can also have students create read alouds to share with other students! 

2. Make a Safe Link

Many of the read alouds you will find are published on Youtube. Unfortunately, Youtube is not a very kid-friendly place, and it's blocked in many schools. But there is a work-around if you have found a safe video to share! First create a free account with Safe Share (if you don't, your link will only last 1 hour. I found out the hard way! 😔)  Then click 'Add SafeView' and paste your Youtube link. This creates a new link for your video without the ads or commercials that pop up. You will have to check with your school technology or IT department to make sure your Safe Share links are not blocked. Click on the share button (it looks like a less than sign with 3 dots) and copy the new url. You can even share this link to your google classroom if you have older students and want to skip the QR code step. (If you're not using a YouTube link, you can skip this step and move to step 3.)


3. Create a QR Code

Go to QRStuff, choose website link, and paste the link you copied from Safe Share. It will create a QR code that you can download or take a screenshot. (No need to save on qr stuff once you have your QR code.) I use a google slides template with squares that are 3.5x3.5 with the title of my book on it. I add the QR code to my template (either insert picture after you have downloaded the QR code in the step above or take a screenshot of the QR code and slide it onto your template). Now print out the QR codes you made and cut out the 3.5x3.5 squares. Stick a self adhesive label holder on the inside cover of your book and slide your QR code in. Now students can scan the QR code in the book and listen to the read aloud. If you ever want to change the read aloud video, or if the link breaks, you can just slide the paper out of the label holder and add a new one. Now your classroom library or school library can also be a listening library!


0

The Top 5 Things I Can't Wait to Try In My Classroom (ISTE)

This week I got to attend #ISTELive, which is the biggest educational technology conference in the country. This coming year I'm transitioning out of the classroom (again), and I will be a technology teacher and librarian and incorporate a maker space in the library. That's what I had in mind while attending this conference, and I am so FULL of ideas because it's always very inspiring (and overwhelming) at a conference like this! Here are the top 5 things I can't wait to try in my new classroom after attending this conference! 

This post contains some affiliate links, which means that if you purchase something using my link, I get a small stipend, but at no cost to you. It's an easy way to show your support if you like my blog!

5. Digital Citizenship: Cyber Sleuths Book Series 

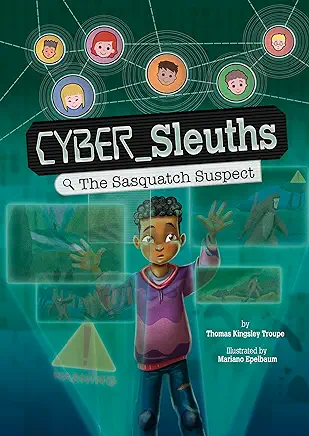
I had a chance to see some early chapter books in the new Cyber Sleuths book series by Thomas Kingsley Troupe. Two books in the series, The Sasquatch Suspect and The Sham City of Atlantis, will be available to buy in August, but I got to buy and read The Sasquatch Suspect this weekend. I am already loving this series! Although it says it's for grades 4 - 6, I would say it's more like a 2nd - 3rd grade reading level. 


In The Sasquatch Suspect, Cliff is on a summer weekend getaway with his parents and his little brother at a Lake in Washington. On the drive to the lake, they see a billboard that says, 'Coming Soon? Sasquatch Shack.' The Malarks are people who claim to have taken the best picture of Bigfoot to date in those woods in Washington, which apparently is the heart of Bigfoot land. They want to build a Sasquatch shack for people to visit and try to get a glimpse of Bigfoot. They later release a sound clip of Bigfoot, then a video too. They have a FastFund Page (like GoFundMe), and they are trying to get 2 million dollars to build their Sasquatch Shack. Cliff's 9 year old brother is scared of the idea that Sasquatch is living in the woods where they are staying, but Cliff isn't sure he believes it. As part of a world-wide group of kids who call themselves the Cyber Sleuths, Cliff does some online investigating to see if the evidence is real. In this story, Cliff gets help from Galina who lives in Ukraine, and Ola from Nigeria (I believe you meet other members of the cyber sleuths in other books). Together they analyze the evidence to see if it is trustworthy. I love how the investigation is done in the book. They are respectful of people's ideas and beliefs, so they don't dismiss the idea of Bigfoot, but they do dig into the evidence to see if it is reliable. That is just what we want students to learn to do with information they find on the internet! In the back of the book, it says how being a cyber sleuth connects to the ISTE standards. I love how it uses modern day problems and technology to thoughtfully investigate the validity of a problem. I think it will be very appealing to 2nd-3rd graders, and I plan on reading it aloud during library, then connecting it to digital citizenship lessons in technology. It lists resources in the back of the book including Be Internet Awesome, which is a free resource from google that was a new resource to me. It has digital citizenship lessons and games that I'm looking forward to trying. This is also a great tie-in to depth and complexity. I always use Bigfoot to introduce the idea of unanswered questions. This definitely raises an ethical question as well when people try to use digital tools to trick other people.


4.  STEM Materials: MakeDo Cardboard Kit and Strawbees

MakeDo may not be new to you because I think they've been around for a little while, but it was new to me. I could not believe how easy it was to cut and screw together cardboard with the MakeDo tools! We use cardboard to create things in my room all the time, and this was so easy and safe. It has no sharp edges to cut kids, but it works like a dream on cardboard. Anyone who has ever tried to cut cardboard with student scissors knows how valuable this is! Since we are creating a maker space in the library, it's going to be a must-have for me. You can get the MakeDo cardboard classroom kit on Amazon, and it has 14 safe-saws, 7 scru-drivers, 7 fold rollers, 240 scrus, 80 scru+, and 12 mini tools to punch holes. You can get smaller kits too, but this is perfect for table groups.

Strawbees were another cool new tool to me! They are straws that have connectors that allow you to build a lot of different things. They can even be moveable which is pretty amazing! There is a free teacher resource called Classroom Strawbees which has lesson plans, webinars and courses for teachers. They are very detailed lesson plans, such as the Boreal Forest Biome lesson written by the Strawbees team. From the lesson plan: The Boreal forest biome, also known as Taiga, is an expansive-forested region situated in the Northern Hemisphere. Distinguished by its coniferous pine and spruce trees, the Boreal forest experiences a prolonged period of cold temperatures lasting for several months. This forest provides habitat for various wildlife species such as bears, moose, moss, and reindeer. The objectives are:

  • Imagine – Discover the characteristics of a boreal forest biome by trees and cold temperatures providing habitat for various wildlife species.
  • Build – Make a moose wandering through the vast boreal forest biome.
It includes vocabulary words to focus on, information, pictures, and a quiz, as well as build instructions with a lot of pictures. It's well put together! There are also some awesome physical science lessons for simple machines, and so much more! Now the STEAM School Kit comes with over 4,000 pieces, but it's pricey. However, the free detailed lesson plan resource makes it worth it in my opinion, and I am going to suggest my school invest in it. 

Another super cool thing about both MakeDo and Strawbees is that you can combine them with things like micro:bit or a Bird Brain Hummingbird Classroom Kit and turn your cardboard and straw creations into animated robots! With the Bird Brain Hummingbird kit, students can use a variety of programming languages to program it too. While some of this can get a little pricey, it's a great way to have a variety of building tools that can be used all the way across grade levels, and it can be used with other materials for endless options!


3. Quizizz: Not just quizzes anymore!

I have been a fan of quizizz for awhile, but their new updates blew me away! If you haven't used quizizz before, it is a game-based quiz, similar to Kahoot. Now, however, they have upped their game! They have interactive lessons (not just quizzes), and there are multiple options for students to answer. There are questions such as drag and drop, open text, reorder, hot spot (i.e. click on the spots on the shape that show a right angle), and so much more! Also, you can use a video you made or a youtube video, a pdf worksheet, or google slides and drop it into your lesson or quiz. Then there is a button where AI will help you generate questions based on the video, worksheet, or presentation you added saving you a ton of time! It's amazing! Better yet, you can make accommodations for students. It can read the questions to students who need it,  it can give extra time, or even assign fewer choices when picking an answer (2 choices instead of 4). No other students know about the accommodations, and all students can participate and be successful on the same quiz or lesson in a way that maybe they couldn't before. I got game changer certified so I could see what all the options were in Quizizz. It's free and it only takes about a half an hour. It takes you through their lessons/quiz to learn what it has to offer. You get to experience it like a student, and I LOVE that if you don't know an answer that there are multiple formats to use that will teach the answer. You can even make it adaptive! I suggest getting game changer certified too. I can't wait to try these with students!


2. Digital Breakout Rooms With Genially + ChatGTP

I had not tried genially before, but basically it's a  much cooler presentation format that includes animation, music, and you can even make digital breakout rooms with their premade templates. Breakout rooms, like Breakout EDU, are game-based adventures where students have to solve puzzles in order to break out of a room or into a lockbox. It's a fun way for them to review and apply skills they've learned. For example, they may have to solve multiple math problems, and the answers to the math problems are the code to open the locks. I've had fun making breakouts with students, but especially when using the physical locks, it can be a lot to undertake. With genially, they have premade templates that are already engaging–just add your content. They solve different puzzles to be able to move on to the next clue, but it doesn't involve any physical locks. The part that really blew my mind was using ChatGTP, a free AI tool, to help me create it! Now if you're new to the AI (artificial intelligence) world like me, I had heard the hype, but I didn't really know what to do with it. The key is being very specific. Since I am teaching library next year, I thought it would be fun to do a breakout in the  library. 

Here is what I typed into chatGTP: Expert Role: You are an instructional strategy and curriculum expert in CO, as well as an experienced K-8 teacher. You are also proficient in designing engaging and educational digital escape rooms using Genially. Task: Create a student-centered digital escape room for second grade library. The escape room should include various interactive challenges that align with the learning objectives and keep students engaged. Each interactive challenge should be laid out explicitly to be created within Genially. Constraints: This digital escape room should take approximately 20 minutes for students to complete. Level: This should be an INTRODUCTION activity. Include: [Student-friendly learning goals: Clearly state what students should achieve by completing the escape room. Student-friendly directions: Provide clear instructions on how to navigate and complete the escape room.

Here is what I got back: 

Title: "Library Adventure: The Quest for Knowledge!"

Student-friendly Learning Goals:

  1. Learn how to navigate the library.
  2. Understand the different sections of the library and what they offer.
  3. Practice using library resources, such as the catalog and book sections.
  4. Develop teamwork and problem-solving skills.

Student-friendly Directions: Welcome to the Library Adventure! In this digital escape room, you will help guide our friend, Lucy the Librarian, through the library. She needs to find special items and solve puzzles to unlock the secret door. Work with your classmates, follow the clues, and use your library skills to complete each challenge. Good luck!

Structure of the Digital Escape Room:

  1. Introduction Scene:

    • Description: A welcoming screen with an image of Lucy the Librarian at the entrance of the library.
    • Interactive Elements: A start button that transitions to the first challenge.
    • Instructions: Click the start button to begin your adventure with Lucy!
  2. Challenge 1: Library Map Puzzle

    • Description: Lucy needs to find the reading area. Students are presented with a jumbled library map.
    • Interactive Elements: Drag-and-drop pieces to complete the map.
    • Learning Objective: Understand the layout of the library.
    • Instructions: Drag the pieces to complete the library map. When you're done, click the check button to see if you're correct.
  3. Challenge 2: Dewey Decimal System Match

    • Description: Lucy needs to find a book on animals. Students must match book topics with their Dewey Decimal numbers.
    • Interactive Elements: Matching pairs game.
    • Learning Objective: Familiarize with the Dewey Decimal System.
    • Instructions: Match the book topic with the correct Dewey Decimal number. Click on the cards to flip them over and find the pairs.
  4. Challenge 3: Catalog Search

    • Description: Lucy is looking for a specific book. Students are shown a catalog search bar and must find the book by title or author.
    • Interactive Elements: Simulated catalog search with dropdown options.
    • Learning Objective: Learn how to use the library catalog.
    • Instructions: Use the catalog to find the book Lucy is looking for. Type the title or author and click search. Choose the correct book from the results.
  5. Challenge 4: Book Sections Sorting

    • Description: Lucy needs to organize books into their correct sections: Fiction, Non-fiction, Biography, and Reference.
    • Interactive Elements: Drag-and-drop books into their corresponding shelves.
    • Learning Objective: Understand different sections of the library.
    • Instructions: Drag each book to the correct section of the library. When all books are sorted, click the done button.
  6. Challenge 5: Secret Code

    • Description: Lucy finds a locked box that requires a secret code. The code is hidden in a riddle.
    • Interactive Elements: Riddle-solving with text input for the code.
    • Learning Objective: Develop critical thinking and problem-solving skills.
    • Instructions: Read the riddle and find the secret code. Type the code into the box and click unlock.
  7. Conclusion Scene:

    • Description: Lucy has unlocked the secret door and found a treasure of knowledge!
    • Interactive Elements: A congratulatory message with a button to finish the escape room.
    • Instructions: Click the finish button to complete the adventure and see your certificate.

Additional Notes for Implementation in Genially:

  • Use engaging visuals and sounds to enhance the experience.
  • Include hints for each challenge to support students who might need extra help.
  • Ensure all interactive elements are easy to use and accessible for second graders.
  • Provide a printable certificate of completion at the end of the escape room.

This digital escape room is designed to be interactive, educational, and fun, keeping second graders engaged while they learn important library skills.


Wow! Now I still have to build the genially escape room, but it saved me a lot of time coming up with the ideas of what to put in my escape room. Feel free to copy and paste my instructions to chatGTP and change the parts that need to fit your lesson. 


1. AI: Padlet, Adobe Express, Adobe Firefly

You can probably guess that AI (artificial intelligence) was a big theme at the technology conference this year. AI is definitely dominating a lot of conversations, not just in education, but world-wide. Before this conference, I knew that I was worried about the ethical implications of AI, even if I didn't know exactly what they were (I've seen iRobot). But truthfully, I didn't know enough about AI or how to use it to really articulate my thoughts about it. Now that I've had a chance to try it and understand what I can do with it, it's pretty awesome! First of all, one important thing to emphasize is that the AI available to us right now, at least what I played with, is not the evil take-over-the-world kind of technology. ChatGTP, Adobe Firefly, Adobe Express, Padlet cannot teach students in my place. It just can't. This type of AI HAS to be driven and implemented by a person. It's a tool, like a toaster. A toaster cannot toast bread unless someone puts the toast in and turns it on. It just can't make breakfast by itself while I'm asleep. This is the same. And like a toaster, microwave, dishwasher, etc., it can save us time! And it opens a whole new door to creativity too. Another concern is, can students use it to cheat? Yes. They could ask chatGTP to write them a paper that was written by a 5th grader about the Civil War (but let's not give them any ideas!). However, did students cheat before AI? Yep. Our tools may be more sophisticated, but the ethical issue is as old as education. Keeping them away from the technology won't teach kids not to cheat. Parents and educators still need to work as a team to teach children right from wrong. Because it doesn't matter if we like it or not, our children exist in a world with AI. We can teach them how to use it ethically and responsibly or they will figure it out on their own.  

  • Padlet: I've always been a fan of padlet! It is like a page of interactive sticky notes that can be shared among a class. You can add words, links, images, add videos, etc. Now you can also add things from your google drive, create a poll, or you can generate images using AI! Just click on the words "I can't draw" in your padlet and tell it what you want. The picture above is something I created in Padlet using AI to share a favorite story. I told AI that I wanted a cartoon elephant with a bird on its head.

  • Adobe Express: This is great for making posters, flyers, social media posts, or videos with still pictures. It has some fun new features, and students can have their own free, secure account. As a get-to-know you activity, try having students create a poster with their name and include things that describe themselves. I used AI to create my name with text effects. I chose a background with mountains because that is my favorite place to get away. I chose elements around the outside of my name that are important things to me, and I picked music with a strong drum sound because my son plays the drums. This can be fun practice using Adobe Express to have students share about themselves. Later in the year this can be an option to create a poster for a book report, a vocabulary word, or an advertisement for a national park (4th grade standard), or your state.


  • Adobe Firefly: This has been the one I've had the most fun playing with! Adobe Firefly is a generative AI program that is free for educators and students. It lets you type words that it will turn into an image, remove images in an existing picture (are there pillars in the way? Just remove them and AI will fill in the missing parts), and more! The power of this tool is that you can create unique images that could not be found anywhere else. Are you writing a story with students that involves a bee that plays the flute and wears little red boots? Just type it in. Does someone in your story fall through a magic portal and land in a purple forest with blue flowers? You can create it. Of course you can always have students draw their unique ideas too–this is just another option. And I learned the hard way that you only get so many credits a month for free, so if you keep tweaking your wording to try again, you'll eventually run out of credits for the month and have to wait for more! One of the ways I'm looking forward to using this is by creating characters and props that I will print and use in a retell center (for my younger students). I will have setting options that they can use like a kinetic sand tray, glass beads, rice, beans, etc. They can add rocks, wood, seashells, insects, etc. and use characters I generate to create scenes where they tell or retell a story. The pictures above can be for retelling a fantasy story, but there can be non-fiction stories as well. Students can share a report with facts they learned by creating a habitat and adding animals and plants that would be included in that biome. They could create stop motion videos or design a zoo. There are so many ways to get creative!
I hope you found some things that you want to play around with and give it a try too! 
0

Classroom Digital Data Tracker Shortcuts in Google Sheets


As a teacher, if I got to pick a super power, I'd have to go with freezing time. Remember those shows from the 80s where a witch could blink or put her two fingers together and freeze time? If I could do that, I'd have more time to grade papers, create lesson plans, workout, or sleep! While I don't yet know how to give myself super powers, I do know how to give you a little bit more time––every teacher's dream!


It's important to collect a lot of data about our students, but trying to sift through it all can be a lot. Here are some shortcuts I learned using google sheets as a digital data tracker to cut down on the time I spend sorting data so I can spend that time analyzing it instead. It makes report card time SO much easier too!  


1. Alternating Colors: 

Format––alternating colors
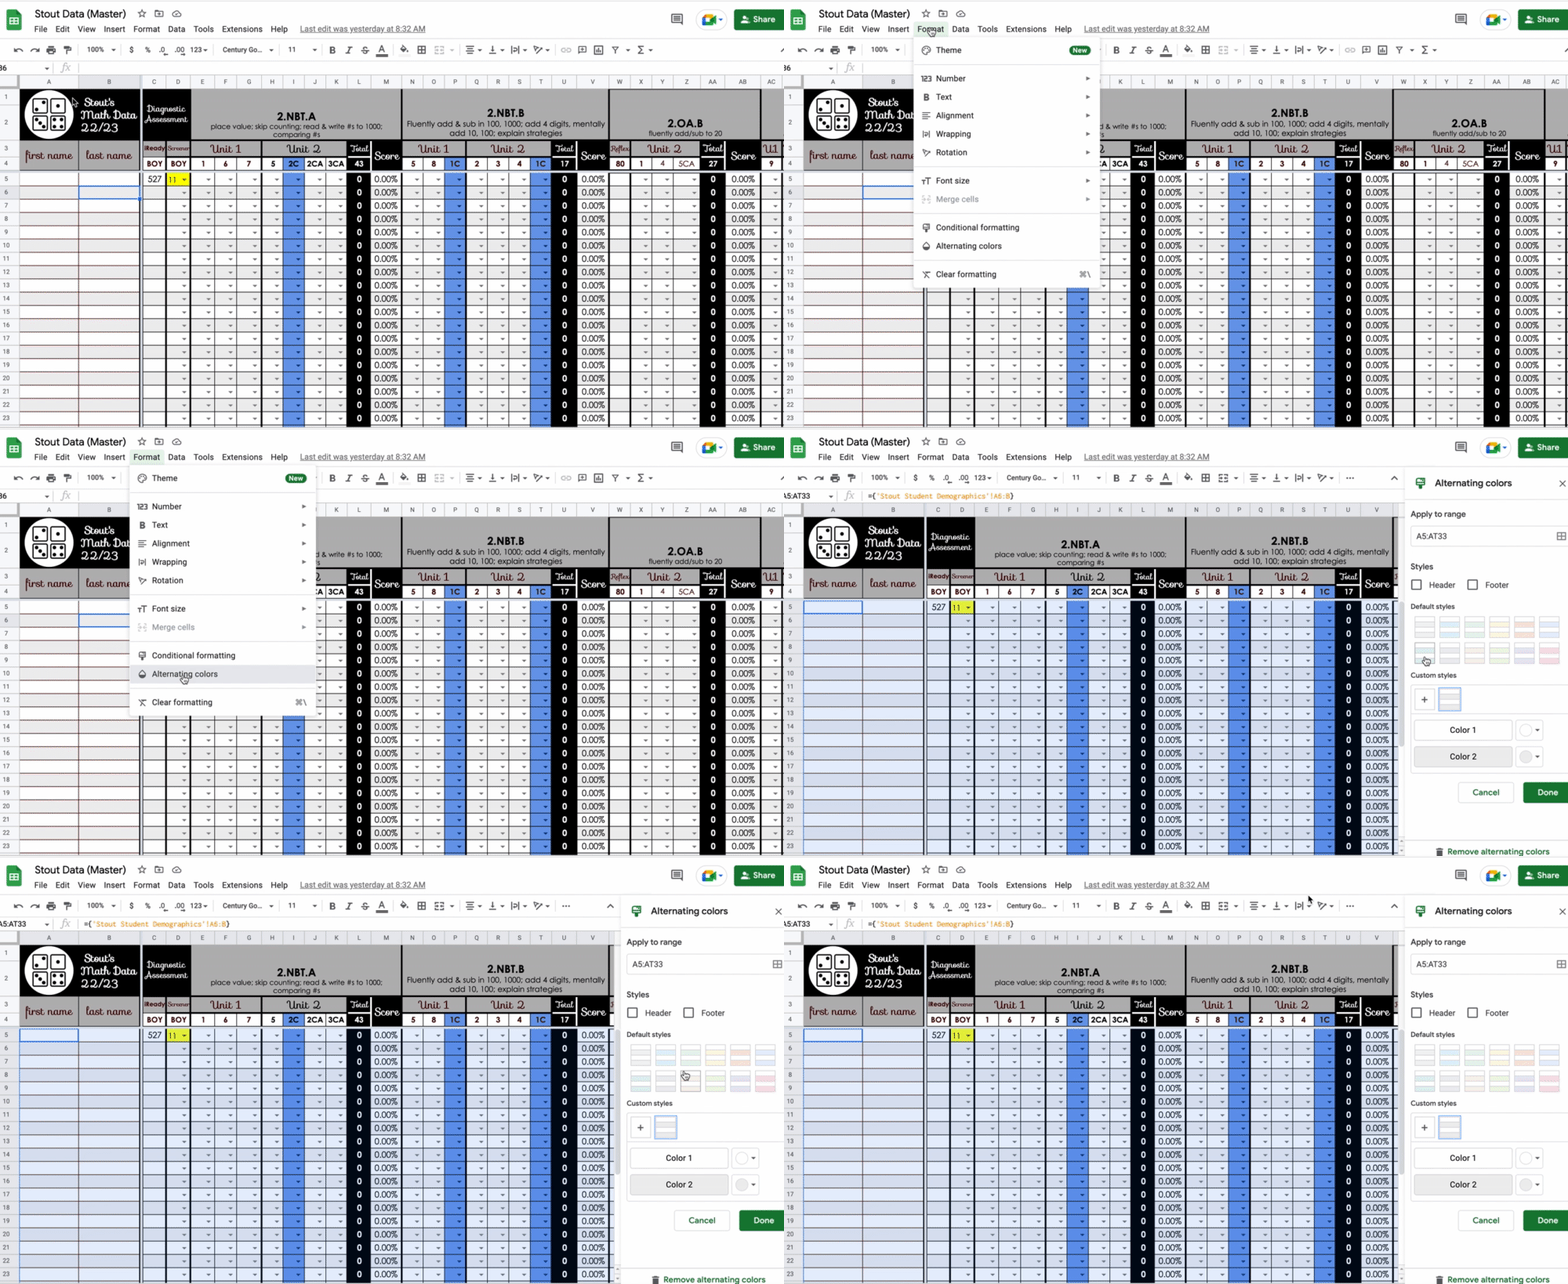
Image from Gyazo

Okay, this is a really simple no-brainer that has been done since the beginning of teaching time, but it really does help! Google Sheets will make every other row an alternating color so it's easier to follow one line across the row. Just go to Format ––alternating colors. You can even pick different color combinations or customize your own. Freezing rows that need to stay in the same place can help with following the line across the row or column too. Check out my post Create Your Own Auto-Filling Data Spreadsheet With These 4 Tips for directions on how to do this. 


2. Drop Down Menus: 

Data––data validation––list of items
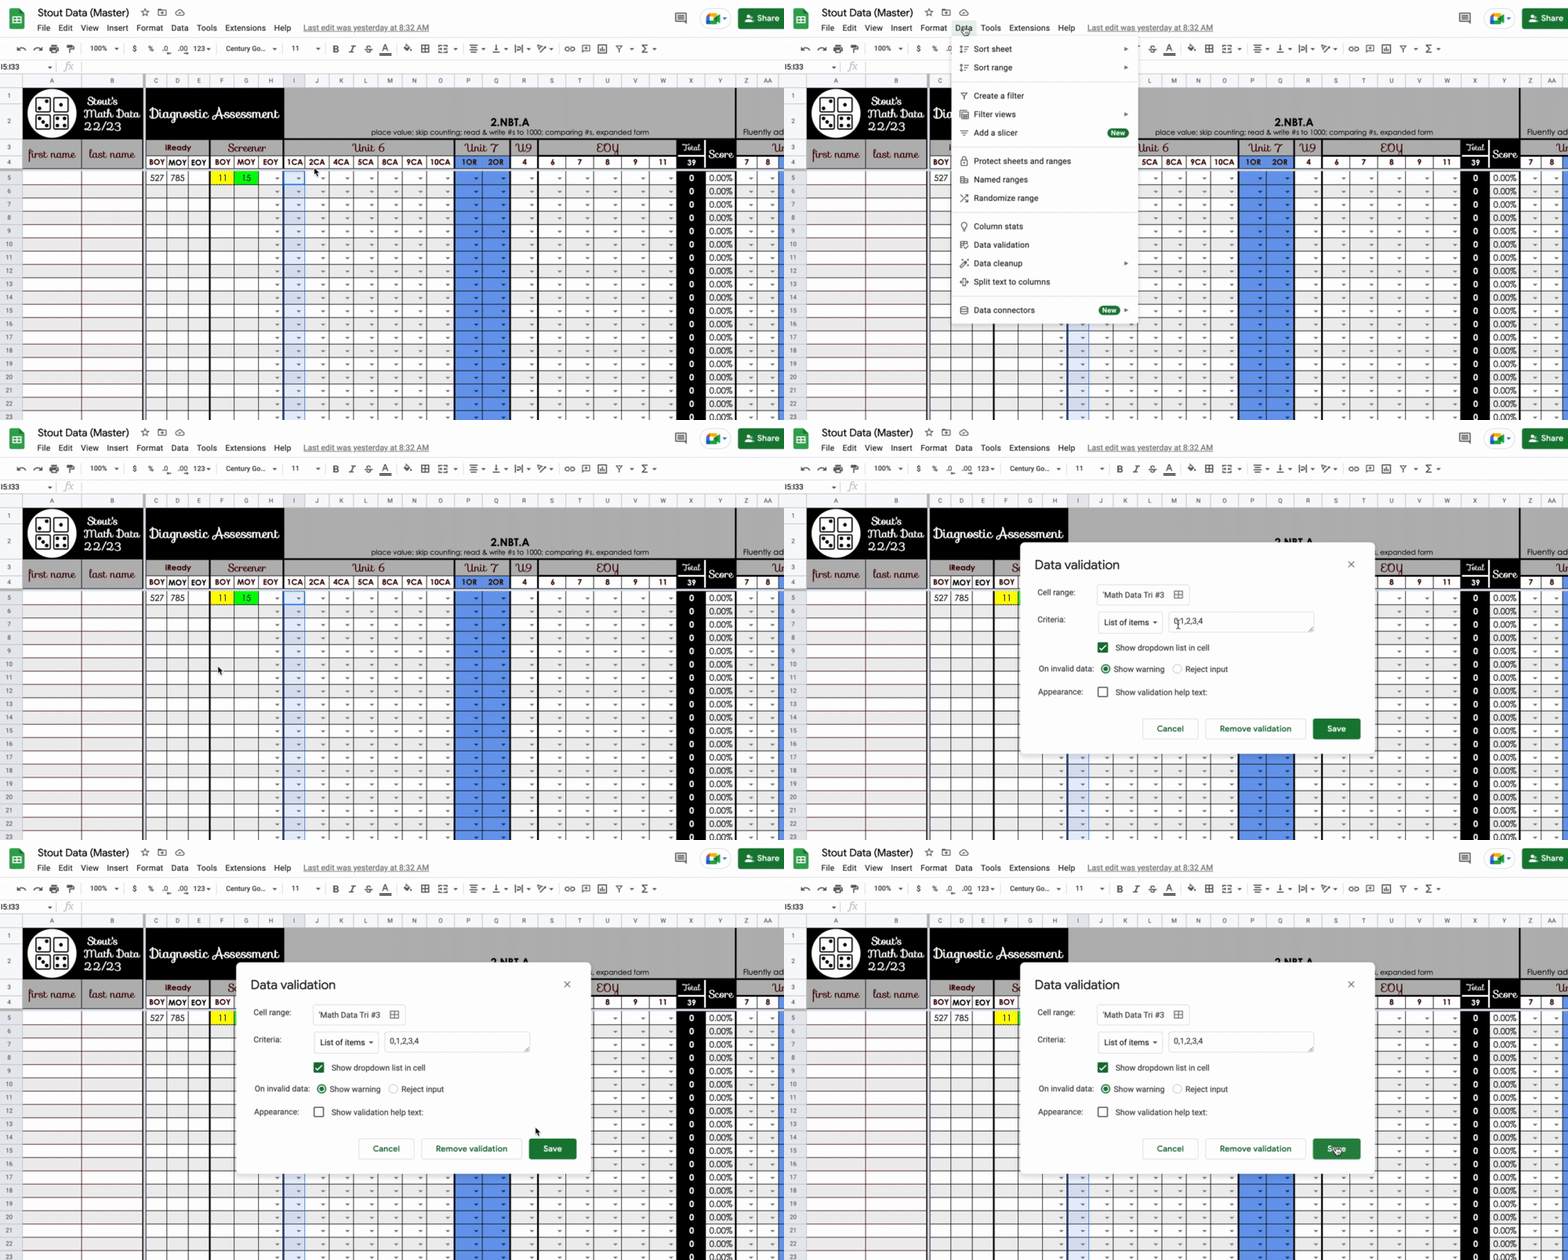
Image from Gyazo

This shortcut became a time saver for me because I am assigning a different value or weight to different test questions within a single test. The math program we use at my school tests a bunch of different standards on one test––not just one strand at a time. I have to figure out which standard correlates to each individual problem on the test and record them under a separate standard in my grade book (rather than one score for the whole test). So problem #1 which tests standard 2.NBT.1, for example, might have 3 parts (a, b, c), so I want it to be worth 3 points. But problem #2, which tests 2.OA.2, might only be worth 1 point. Using a drop down menu helps me remember how heavily I weighted each test question when I'm recording the grade so I stay consistent. To make a drop down menu, highlight the whole column, and go to Data––data validation––list of items. I always use 'list of items' and then list the numbers possible separating them with a comma like this: 1, 2, 3. I like it because it puts the number choices in the drop down menu for you to choose. Then click on the arrow to choose one of those numbers.


3. Color Code the Data
Format––conditional formatting–format rules–"is equal to"–change the default color with the paint bucket
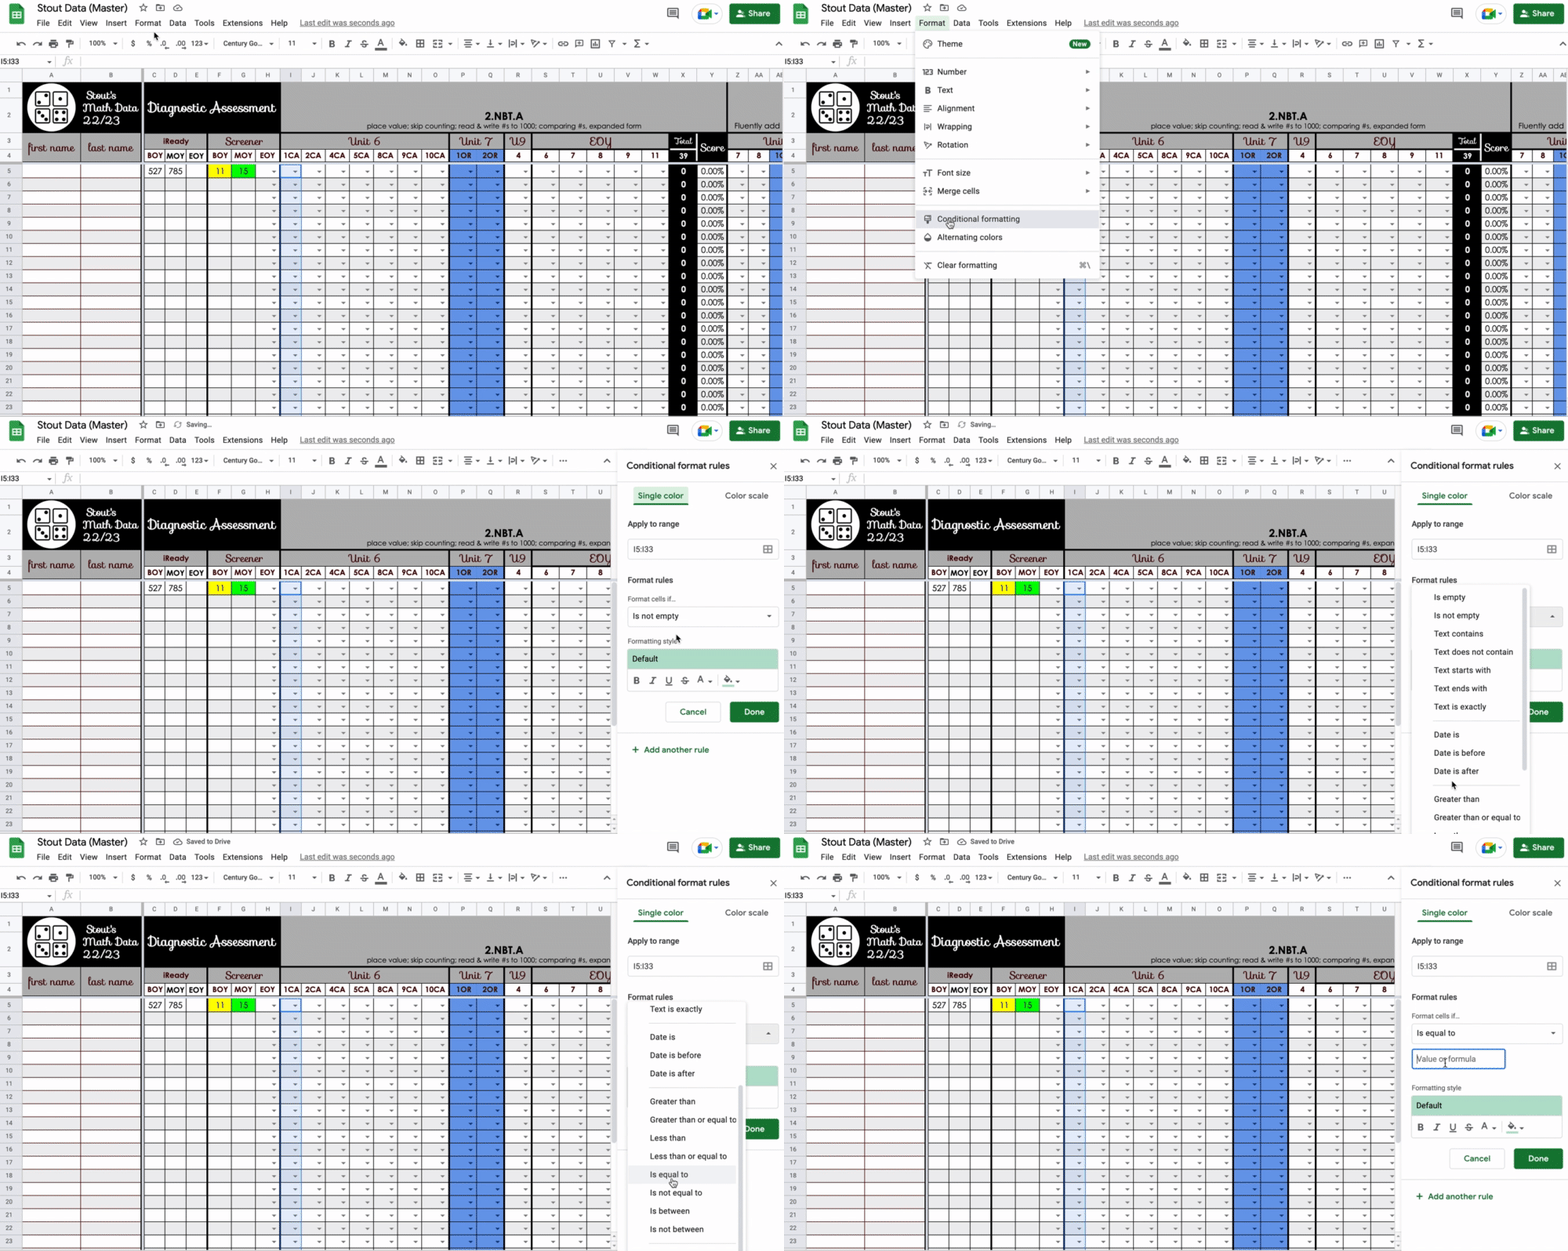
Image from Gyazo 

This shortcut has made the biggest difference for me! I like to see a data page color coded so I can get a sense of whether a student (or my whole class) is passing a standard at a glance. For example, if I have a problem worth 3 points, I can make 1 out of 3 points unsatisfactory and color code it red; 2 out of 3 points would be partially proficient and I would color it yellow; and 3 out of 3 points would be proficient and I would color it green. Then at a glance I can see if a lot of kids missed a certain question by the colors I see going down that column. I was color coding my data before, but I would highlight and change the color in each individual box. Conditional formatting has revolutionized my data analysis! I can set a whole column at one time to change the color of the box when I put the score in. Just highlight the column or row that you want to color code using the same data parameters. Go to Format––conditional formatting–format rules–"is equal to"–change the default color with the paint bucket. Now when you type in a number or choose a number from the drop down menu, it will automatically change the color based on the rules you set. 


4. Average the Score:

=(click in the box of the student total)/(click in box of the total possible) 

Going back to my math test example, I have random test questions across several units that fall under one standard. We use standards-based grading, so I average all of those individual test questions over several different units to determine how the student is doing on that one standard. To do this, first I have a total column at the end of each standard, and I have the spreadsheet automatically add up the total number of points the student earned for that standard (see the blog post Create Your Own Auto-Filling Data Spreadsheet With These 4 Tips for directions on automatically adding totals). For example, if unit 6 had five test questions for standard 2.NBT.B, and unit 7 had four test questions for 2.NBT.B, I have a box at the top of the spreadsheet with the total number of points possible––in this example 24––and then the spreadsheet calculates the total number that student earned. In the "Score" column, I have the spreadsheet average the score and turn it into a percent. To do this, click in the "Score" box for the first student and type =. Then click on that student's "total" box and it will add it to the formula. Next hit the / (which means divided by) and click on the box that has the total number of points possible. My formula for this example looks like this: =X5/X4
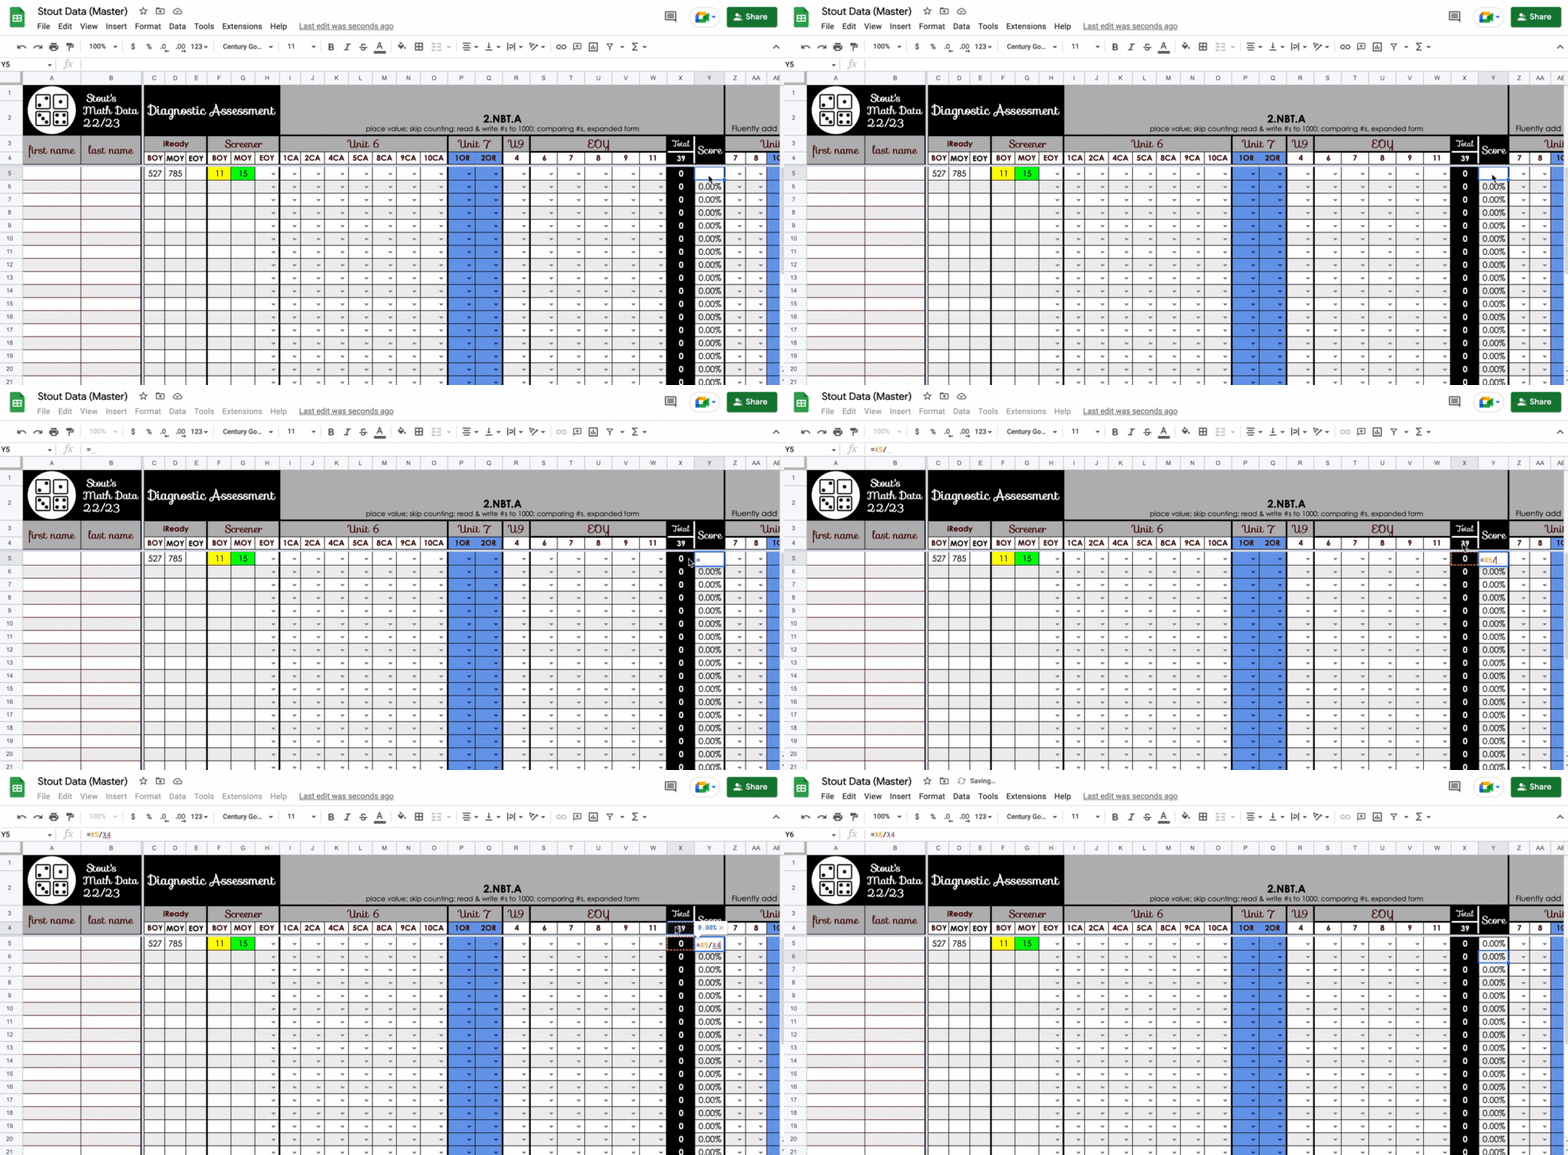

Image from Gyazo

To make sure the score is shown as a percentage, highlight the whole score column and click on the picture of the % on the toolbar across the top. Now at a glance you can see which students are passing the standard over time.

I also have a blog post that I published a few years ago called Create Your Own Auto-Filling Data Spreadsheet With These 4 Tips. It shows you how to freeze rows and columns, automatically add totals, automatically populate data on a shared page, and create pivot tables to analyze data. You should check it out for ways to make your data tracker even more legit.

I hope you find these tips helpful in saving you time during your data collecting! 


0

Teacher Stuff for You Newsletter #2: Bitmoji Mania


The 2nd edition of the Teacher Stuff for You Newsletter is ready! The theme of this newsletter is Bitmoji Mania. Click the picture to visit the live links. Use the arrow in the slide show to see the previous Newsletter. Enjoy!
1

Teacher Stuff for you Newsletter #1: Use for Remote & In-Person Learning


Thanks to the virtual class I took at #twtcon2020 from tech integration & innovation specialist Traci Piltz, I have decided to try making my own visual newsletter! You should definitely check hers out - it's amazing! I'm switching districts this coming year, and this is a way that we can stay connected! I will be creating themed newsletters. The first theme is: Use for remote or in-person learning. Click on the picture to access the links. I'll let you know when the next one is ready! As suggested by Traci, these newsletters will be on a continuous google slide. I will continue adding to the same google slideshow so you can always go back to find past tips and tricks. I hope you find this helpful!
0

Get Organized for #DistanceLearning: Sub Plans in Google Drive


No one knows exactly what school will look like in August yet, but there are a few things that we can do to get organized in the meantime. This series of blog posts called, "Getting Organized for #DistanceLearning" is full of tips that will be useful whether you're teaching online or face to face. So be sure to check back for all the tips in this series! 

Tip #1 was Password Saver
Here is your last tip in this series, tip #4 . . . 

Plan Ahead for a Sub

So this is one of the aspects about next year that feels the most unknown to me. What if we do get sick? Whether we are sick with the common cold or COVID-19, this is going to have a huge impact next year. There will be no more, "I'm not THAT sick, so I'll just work through it." We've all done that –worked even when we didn't feel great because it's easier sometimes than making sub plans. I'm guessing those days are over. I'm trying not to worry about the fact that I don't have 14 days of sick leave (I'm starting in a new district this coming year), so if I were to get sick, how would I stay home for 14 days AFTER my symptoms were gone?

So without worrying about how the details will play out yet, we obviously need a plan. I'm not talking about full blown lesson plans for the day. I've seen people do that and it seems to be successful, but I'm not a huge fan of writing the actual plans now. I'd rather have students work on what we're actually doing in class if I'm gone rather than something totally different. Although in an emergency, I can see the need for that. Today, I'm talking about organizing a template in google drive.

Sub Plans in Google Drive


If you don't write your lesson plans in google drive already, now is the time. Ditch the Word document or paper. It is inefficient. You need a template that you can easily fill out with boxes that remind you of what you need when you're not thinking clearly. Most importantly, you need to be able to share your plans easily with your sub, your team, and the office. You will probably not be allowed back inside the building if you are sick, so in google drive you just hit share. Forgot to add something to your lesson plans? No problem! You can change or add something, and they see your changes immediately. You can even link websites and videos inside your plans. So here are the things you can set up right now:


  1. Master class list: Create a table, type in your students first and last names, and leave notes that will be important for the sub to know. Who is in special ed? Who is a second language learner? Who has allergies? You can print this list for the sub, but it's easy to make changes to your master list if you get a new student or one moves away. 
  2. Attendance page: Copy and paste those first and last names into an attendance sheet that can be printed and sent to the office. I take attendance on the computer, but the sub doesn't have the ability to do that. Sometimes they're stuck sending a scrap of paper to the office, and that is not efficient for anyone. If you have a list made with your class name and grade, a place for the date, and the student names already typed in, your sub only needs to put a check mark next to any students that are absent. 


 3. Daily Schedule: Believe it or not, this is the number one thing I hear subs say they do not receive–the daily schedule! This is pretty important. Have a separate page that outlines your typical day. In a pinch your team can throw together some plans for you, but you will need to have your daily schedule ready to share.
    4. Helpful Info: When subs travel from one building to the next, they may not know your room number, your extension, or even the name of your principal. Having this info ready for your sub can really help out. If a student pukes in class, the sub will need to know how to reach the janitor and your room number. If your sub has a question, it would be really nice to have the name and extensions of your teammates and the office manager. This is one of those pages you only have to fill out once for the year, but it can come in really handy for your sub. 
    5. Classroom Procedures: This is another page that only needs to be filled out and printed once, but it's really important for the sub to have. Each teacher does things just a little bit differently in his/her own classroom, so share your procedure for the bathroom, snack time, and classroom rewards. 


    6. Sub Plans: I recommend having a template for this. A box for each section of the day with a header for the time and subject, and a checklist at the end for materials the sub will need for that subject. This will help your sub, but it will make it SO much easier for you too. When you're putting things together for your sub, you can check the list of materials at the end to make sure you have gathered what you need. I have a plastic envelope for each subject that I put materials into. It makes things more organized for the sub, but it also helps me when I need to put things away once I get back.
    7. Feedback: We always want to know how things went, so have a feedback form available for the sub. Nothing fancy, just make sure you leave room for what you need to know.

Taking the time to get organized for a sub will be worth it. I did this last year, and I got SO much positive feedback from the subs in my classroom. They were all happy to come back and sub for me, and that makes a big difference. We have had a sub shortage in my district for a few years, and there have been many times that we had to split our classes or pull an intervention teacher to cover the class. Next year it is going to be imperative to have good subs available, so we need to take care of them. 

If you don't want to make your own template, I do have all the pages you see in this post available in my TpT store as an editable google doc. You can find it here.

I hope these tips help you get started organizing for #DistanceLearning. Don't forget to check out all the tips in this series. It's a good place to start:

There are a lot of unknowns, which can cause some anxiety, but it's going to be okay. We'll figure it out! Take some time to just relax this summer, and good luck this coming school year!


0

10 ideas for Zoom Classroom Meetings #RemoteLearning


I think we can all agree–remote learning is hard! But one of my favorite things during remote learning is meeting with my students during zoom calls. I miss them, and I love seeing their sweet little faces! But as much as I love meeting with them everyday, we need some novelty in our meetings.

In our district, we do not teach live during zoom calls. Not all kids can attend at the same time (especially if there are multiple kids in the house and not enough devices for everyone), so we record our lessons and our zoom calls are reserved for community meetings. That's why it needs to be fun, engaging, and build classroom community while we're apart.

Here are 10 ideas to keep things engaging and novel. The first 5 are easy, no-prep ideas. The next 5 include game boards you can download from me for free.


  1. Show and Tell: If your class is anything like mine, this happens whether you like it or not! You are essentially in their home, and they love showing you around and showing you their favorite toys. Go with it!
  2. Scavenger Hunt: I've seen this one all over the internet! It's very popular and fun for the kids. Ask them to go and find something in their house that is red, something that is small, something that is soft, something that they sleep with, something that they love, etc. I give them a time limit of 30 seconds or 1 minute, otherwise we end up sitting awkwardly waiting for everyone to come back! Just be cognizant to ask neutral questions that are culturally responsive. Not everyone has the same things in their house, so keep it open-ended.
  3. Joke Day: Ask students to tell a joke. This one is really fun! Try telling them ahead of time so they can find a good joke. I assigned them joke books to read on Epic and MyOn, and most kids came prepared with a joke!
  4. I Spy: This is a fun and easy way to choose who gets to speak next. I keep the clues about the students–I spy a girl; I spy someone who is wearing pink; I spy someone with brown hair, etc. The student who has been "spied" gets to give clues about the next person. When it is their turn, they get to share something. 
  5. Read Aloud: I did a read aloud with my students everyday when our learning was in-person, so why not virtually? I choose a chapter book with short chapters and read them a chapter each day. I like to combine this with one of the other games as well.                                                                                       
  6. Pictionary: This is a lot of fun! First, share the word with the student who will be drawing by sending a private chat message. Then have that student share his/her screen and choose "whiteboard." I choose 1 - 3 other students to unmute and guess the picture so it is easier to hear and everyone gets a turn. I set a timer on my phone for 45 seconds. If they do not guess the picture in 45 seconds, I let other students guess too. I came up with words and categories that were related to the standards and easy to draw. You can get my list of words here with more detailed directions. I played this with my students on zoom. I'm not sure if it will work on all virtual meeting platforms.                                                                                                                                                   
  7. Sweet Sight Word Shoppe: This game is played like hangman if you remember that old classic! There is a hidden sight word on each slide, and each letter in the word is covered with a box. If students guess the wrong letter, they must ‘eat’ a sweet treat (the teacher deletes a treat across the top). To win, students must guess all the letters in the word correctly before they run out of treats and get a stomachache! This is a great way to practice sight words, and you can sneak in a teaching point about syllables and that there is at least one vowel in each syllable. It helps them with strategy in the game, and it's a first grade standard! Use knowledge that every syllable must have a vowel sound to determine the number of syllables in a printed word. (CCSS: RF.1.3d) Know and apply grade-level phonics and word analysis skills in decoding words. (CCSS: RF.1.3)                                                                                                             
  8. 4 Strikes and You're Out: This is another game that is played like hangman, but with math! There is a hidden number sentence on each slide, and each digit is covered with a box. If students guess the wrong digit, they get a strike. To win the game, students must guess all the digits correctly before they get 4 strikes and they’re out. This game builds number sense and computational fluency, including missing addends. More specific directions can be found in the download.  Understand that the two digits of a two-digit number represent amounts of tens and ones. (CCSS: 1.NBT.B.2) Add and subtract within 20, demonstrating fluency for addition and subtraction within 10. (CCSS: 1.OA.C.6)                                                                                      
  9. Math Bingo: This is another classic game that is fun to play on zoom!  Students find the sum of the math facts and cross out those numbers on their game board. The one who gets 3 in a row first wins! You could also play blackout and keep going until all the numbers on the board are full.  I have students draw a game board on a piece of paper at home and randomly fill in numbers that are between 1 and 20. This was definitely harder for my first graders than I thought, so we needed a lot of time just to set up our game boards! Once their game boards are made, draw a math fact and solve it together as a class. If that number is on their game board, they cross it out. This game gets easier the more you play it, but I recommend having an extra adult or 2 on hand when playing this game with young kids!    Add and subtract within 20, demonstrating fluency for addition and subtraction within 10. (CCSS: 1.OA.C.6)                                                  
  10. Memory: This game is just what it sounds like--memory. Match the Memory is a free website that lets you create memory games with words, pictures, or both. I created a sight word game (which you can find here) that has a sight word on each card that students have to match to the same word. Reading the same word over and over is great practice! I also created a math memory game (which you can find here) that has numbers up to 120 that students have to identify and match.  I also created a Math 2D Shape Memory Game with pictures (which you can find here). These memory games are easy to create and play, so you can try making one with your own content too. During a zoom meeting, I share my screen and click on the waffle with 9 squares in the right hand corner. This labels the cards with a number for the column and a letter for the row allowing students to tell you which 2 cards to flip over. Unfortunately, when you share your screen on a zoom call, you are the only one that can touch your screen, so students can guess, but they can't actually flip the cards over. But it's still a fun game to do as a class! Read grade-appropriate irregularly spelled words. (adapted from CCSS: RF.1.3g),* Count to 120, starting at any number less than 120. In this range, read and write numerals and represent a number of objects with a written numeral. (CCSS: 1.NBT.A.1), Distinguish between defining attributes (e.g., triangles are closed and three-sided) versus non-defining attributes (e.g., color, orientation, overall size); build and draw shapes to possess defining attributes. (CCSS: 1.G.A.1)


What do you do during your classroom zoom meetings? Whatever you choose to do, enjoy that time with your students!

0

Kid-Friendly Zoom Backgrounds #RemoteLearning

Image from Gyazo

If your students have figured out how to add a virtual background during zoom meetings, they are probably having a great time changing it up! Although it may be a little distracting at first, it's nice to keep things novel and fun. Here are 5 different kid-friendly virtual background collections that are safe to use (without breaking copyright). They are easy for kids to download, so feel free to share them with your students. Your students will love seeing you use them too! I included video directions that I made for my students on how to use these backgrounds, so feel free to share that as well. Have fun!


1. Zoo animalshttps://kidszoo.org/programs/zoom-backgrounds/


Finding Nemo video background

2. Disney Pixarhttps://news.disney.com/pixar-video-backgrounds-available

Make Your Next Call Magical With a Virtual Background From Walt Disney Animation Studios!

More Disneyhttps://news.disney.com/walt-disney-animation-studios-video-backgrounds


3. DC Comicshttps://www.dccomics.com/blog/2020/04/01/dial-in-from-the-dc-universe-with-these-virtual-backgrounds

avengers

4. Marvel Comicshttps://www.marvel.com/articles/culture-lifestyle/video-call-backgrounds

Star Wars virtual background: lightspeed

5. Star Warshttps://www.starwars.com/news/star-wars-backgrounds


0

The #classroombookaday Challenge: How to Share Your Class's Reading Progress


I'm so excited to join the #classroombookaday challenge! It is so important to read thought-provoking, engaging literature to our students everyday, especially for our students who may not get that opportunity at home.

I attended an IRLA (Independent Reading Level Assessment) training recently, and they talked about the importance of reading engagement. The first stage in their book leveling system is called 'Read to Me (RTM).' It states, "The RTM level represents the 2,000 hours of reading experiences (being read to, interactions with books) that is typical of the successful readiness reader to build the vocabulary, background knowledge, language experience, reading identity, attention span, genre exposure, and phonemic awareness to be ready to use the print on the page to read (iv)."

If students need 2,000 hours of experience with books to develop the readiness skills they need to understand how books work and begin to form their reading identity, then we need to be intentional  about making time for that in our classrooms. If students miss that foundational step, and instead we jump right into teaching students HOW to read the print on the page, we may end up teaching kids to hate reading because they have not yet had enough life experience to understand the purpose or enjoyment of reading.

The #classroombookaday challenge is a perfect opportunity to intentionally build that foundation, no matter what grade level you teach. "#classroombookaday was started by Jillian Heise (@heisereads) during the 2014-2015 school year, inspired by Donalyn Miller's (@donalynbooks) #bookaday challenge. With a goal to read aloud a picture book every day of the school year for a #bookaday with her 7th & 8th grade students, 180 complete texts were shared that grew classroom community and reading engagement." Click here for even more information about the #classroombookaday challenge.

I've already started collecting books for the challenge, and I'm compiling a list of book recommendations using wakelet (check it out on the bottom of this post). I'll continue adding to it, so feel free to follow me on wakelet @estout and Instagram @teacherstuff4U if you want to see my collection of recommendations.

I've seen teachers post different variations of huge wall displays in which they make copies of the book covers they read and hang them on the wall to share what they are reading for the #classroombookaday challenge. While it looks really cute, that seems like A LOT of work for the teacher! I'd like to make it easier to share and give the students more buy-in by having them do more of the work. 😉

First, my plan is to have the student with the classroom job "photographer" take a picture of the book we read each day and post it on SeeSaw. I have enabled the SeeSaw classroom blog so we can collaborate with other students and talk about books. Please comment below if you are a SeeSaw user and you'd like to connect with my class through the SeeSaw blog this year and talk about books! Here are some quick resources on how to use the SeeSaw blog:


I'm sure some people are still thinking: But what about the students and adults walking by my classroom? I want them to see what we are reading too. I have a plan for that! I attended a training about innovation with guest speakers John Spencer, author of LAUNCH, and Dr. Robert Dillon, author of The Space: A Guide For Educators. Dr. Dillon talked about the power of the whole learning process, not just the products created by students. Gone are the days of showing off "perfect" products as proof of student learning. The real learning happens when students are problem solving, thinking critically, and iterating. He encouraged us to add pictures of those steps on bulletin boards so we are valuing the learning that happened through the work being done. That gave me the idea to use a digital picture frame!

I got a skylight digital picture frame for Christmas, and I'm going to hang it in the hallway this year to share the awesome work students are doing AND to share the books we are reading for our challenge! The skylight frame seemed like the perfect tool for the job because it is so easy to add new pictures. With this frame, you set up an email account through skylight and just email the pictures or videos that you want added to the digital picture frame. It's as easy as that! No uploading with thumb drives or cords. In fact, I shouldn't have to touch the picture frame at all to add new photos. I can't wait to give it a try!

So I'm ready to start our #classroombookaday challenge on the first day of school AND share our progress! I can't wait to see who else is going to take on this challenge this school year! 
0