No one knows exactly what school will look like in August yet, but there are a few things that we can do to get organized in the meantime. This series of blog posts called, "Getting Organized for #DistanceLearning" is full of tips that will be useful whether you're teaching online or face to face. So be sure to check back for all the tips in this series!
Tip #1 was Password Saver
Tip #2 was Lesson Plan Templates and Hyperlinks
Here is tip #3 . . .
Organize Your Google Drive
Google drive is our 21st century filing cabinet, so there is no need to have 2 or 3 filing cabinets in your classroom anymore–save your master copies virtually. This will allow you to access everything you have from home and assign it virtually if necessary. It is SO much easier to keep track of what you have in your filing cabinet when it's a digital copy. And you will want an organized google drive next year–trust me! We'll all be using more digital resources (like it or not). I am a google certified educator level 1 and 2, and I have a few tips to make organizing your google drive so much easier!
Folders in Google Drive
 |
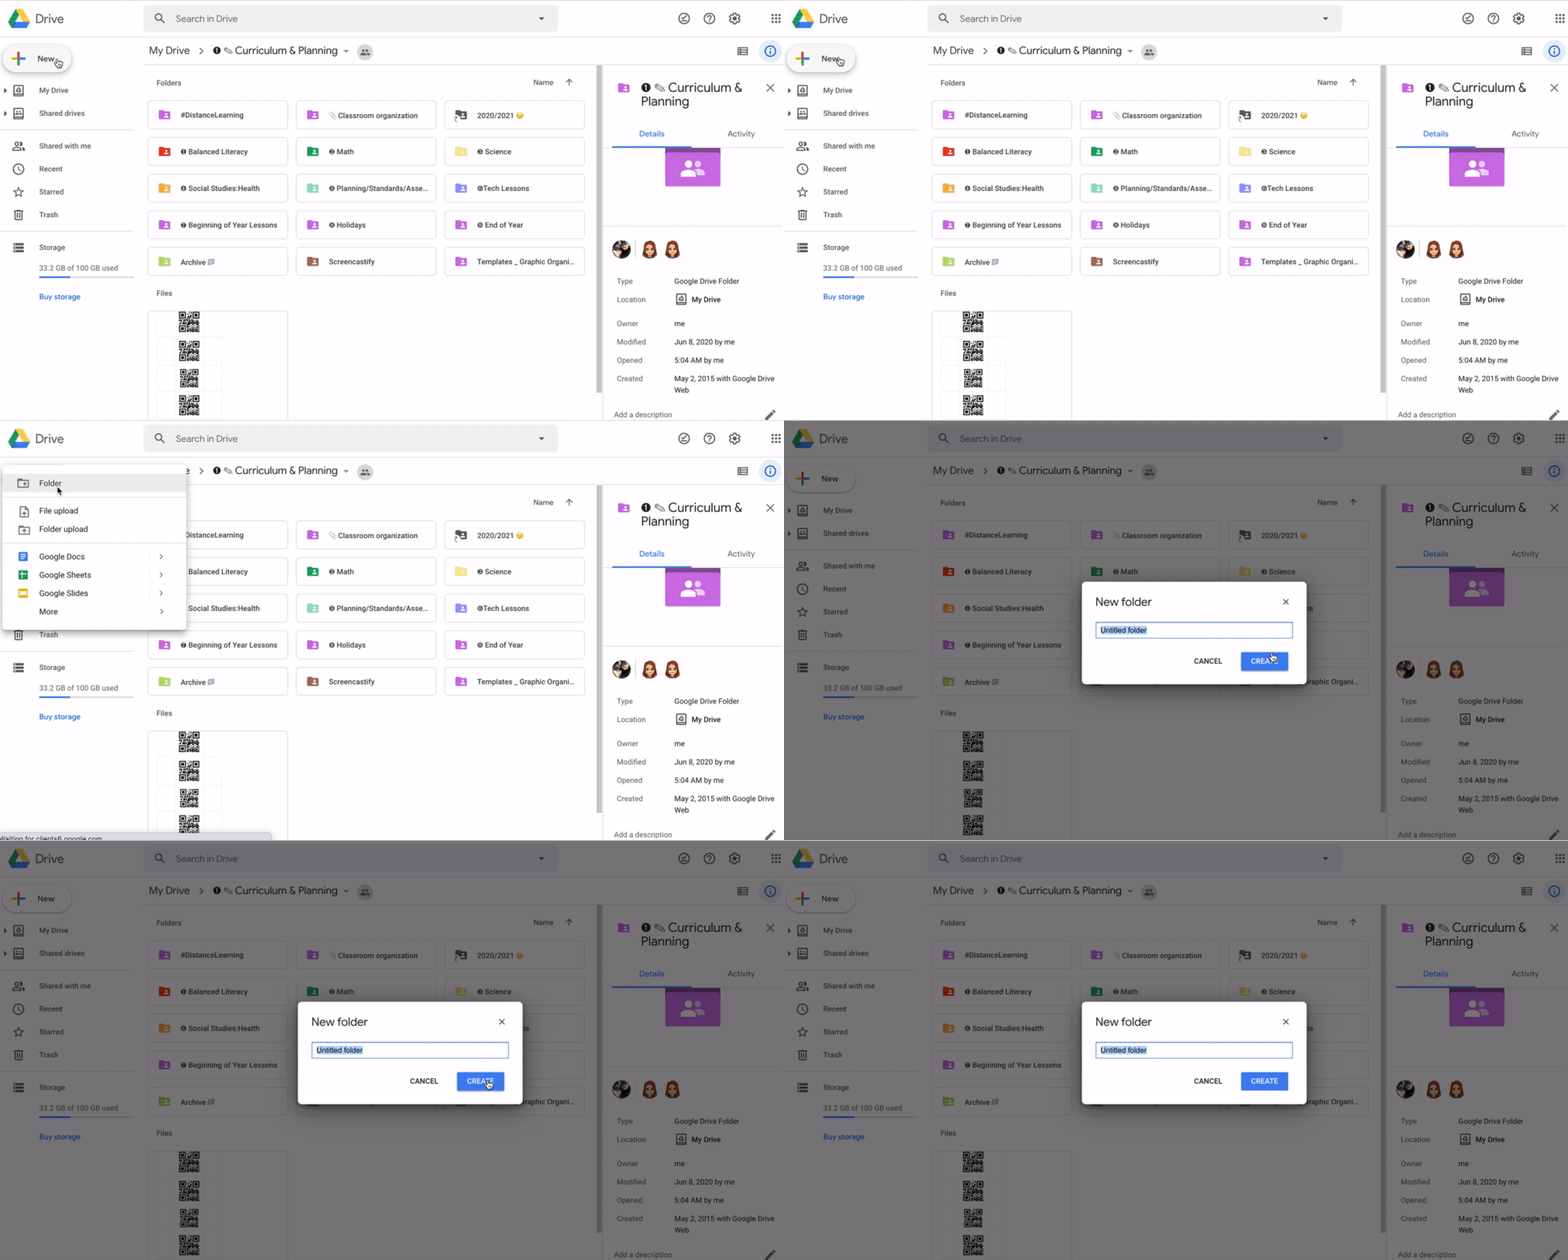
| How to create a new folder in Google Drive: new–folder |
First, if you haven't created folders in your google drive, that is the place to start. Click: new–folder. Just like you would in a metal filing cabinet, you can organize your files by subject. Then you can create folders inside folders to continue to organize your files. For example, I have a Balanced Literacy folder. Inside that folder, I have a folder for Comprehension, Read Aloud, Word Study, Conferring/Guided Reading, Shared Reading, and Writing. In my math folder, I have folders for each standard: Number and Quantity, Algebra and Functions, Data, Statistics & Probability, and Geometry. If I use a specific curriculum for any subject, I also create a folder it, i.e. Lucy Calkins Units of Study, or Bridges Math.
Once you have your files organized into folders, they will show up in alphabetical order. You can number your folders to reorder them in the order you want. Years ago, I learned this cool tip from Ladybug's Teacher Files. You can use https://www.copypastecharacter.com/numerals to give your numbered folders a sleeker look by copying and pasting their numbers in the name of your folders. You can use emojis and pictures too. Check out her original post from 2016 here: Color Code and Organize your google Drive.
 |
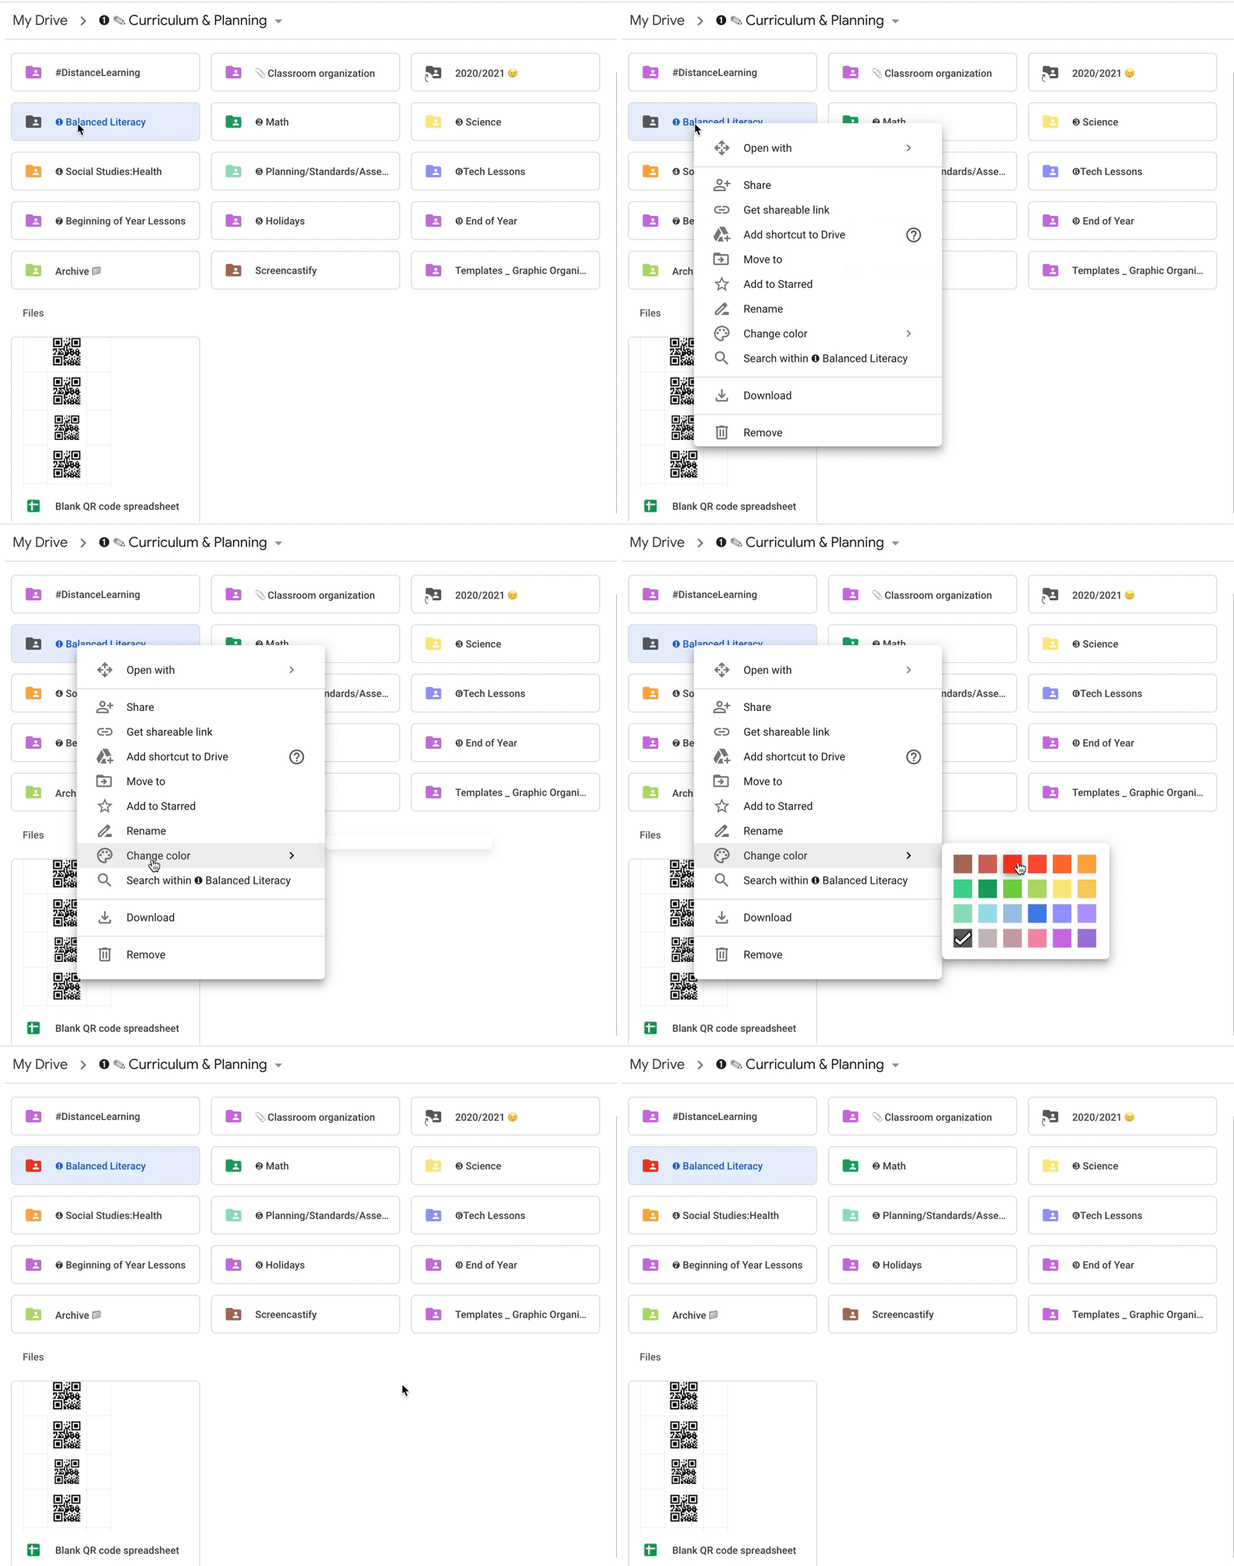
| How to change the color of your google drive folders: Right click on the folder–go down to 'change color' |
Next, I color-coded my folders in google drive to match the same colors I use in the classroom: red = literacy, blue = writing, green = math, yellow = science, orange = social studies. This helps me visually organize subjects. Just right click on the folder and go down to 'change color.'
#Hashtags and Shortcuts
 |
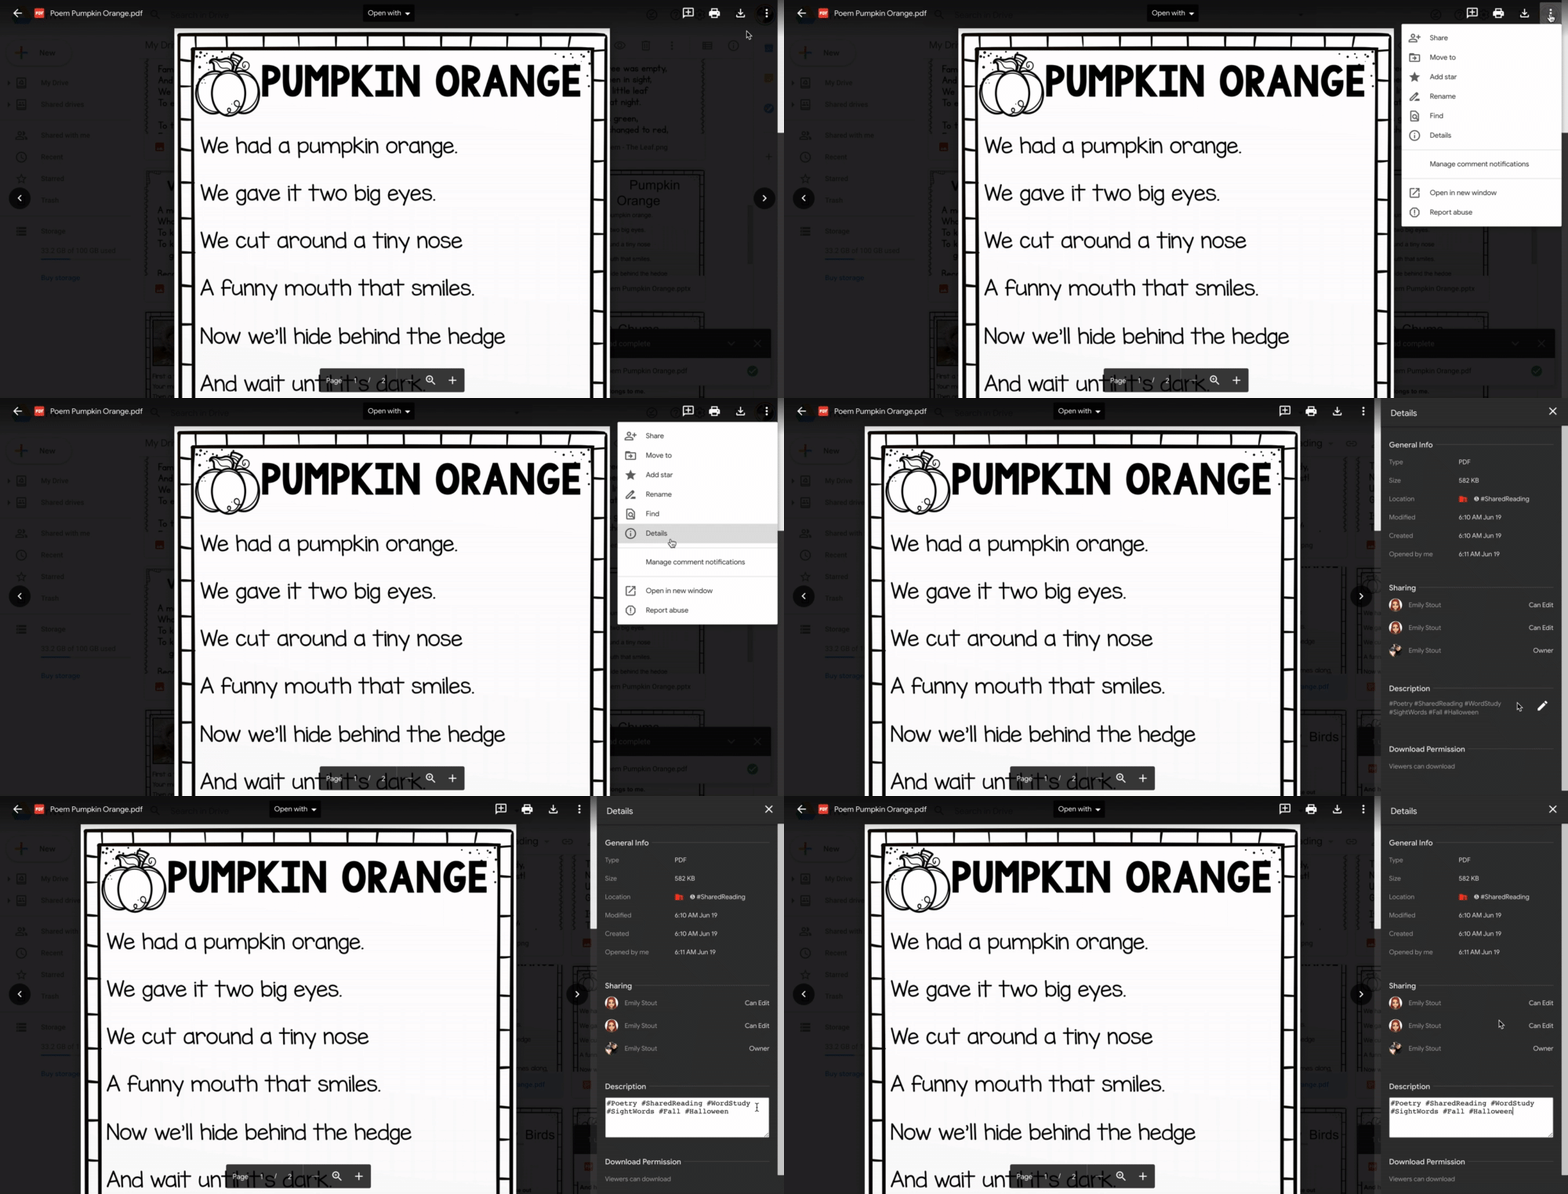
| Add hashtags to the file description when the file fits in more than one category: click on the file–3 dots in the corner–details–pencil under description |
Are you ready to take your google drive organization up a notch? Try #hashtags! I got this idea from Shake Up Learning. She has 13 Tips to Organize Your Google Drive that you can check out. The one that was new for me was adding descriptions to my folders in google drive using hashtags. This is really helpful when I have a file that I could put in more than one place. For example, I use a lot of poems during shared reading. This poem fits in the categories #Poetry #SharedReading #WordStudy #SightWords #Fall #Halloween. If I click on my poem and click on the 3 dots, click details, and click on the pencil under description, I can use all those hashtag labels to describe this file. Then, when I am planning for fall activities, I can type in #Fall in the Google Drive search bar. Anything I labeled with #Fall will pull up in the search no matter which folder I stored it in. Super helpful and easy!
 |
| How to add a file shortcut to another folder: right click on file–add shortcut to drive–choose folder in google drive to add it to |
In March 2020, google came out with a new update, 'add shortcut to google drive', that has been especially handy if you create and share teacher resources on a platform like Teachers Pay Teachers or Teacher Sherpa. I keep the teacher resources that I create in a separate folder instead of mixing them into my Google Drive teacher files. However, with the 'add shortcut to google drive' option, now I can add it to my personal files! For example, I created this 1G Power Words Sticker Book. I keep it in my folder of resources that I sell. But now I right click on that resource, click on 'add shortcut to drive', click on the folder in my google drive where I would use that resource, and now it lives in 2 places. Then I can see it in my teacher files when I'm planning, and I don't have to try to remember what I have.
I'm switching school districts this coming school year, and my big project this summer is organizing my google drive. You may already know that if you have a google account through a school district, anything owned by that account in google drive will disappear when they delete your account. Unfortunately, you cannot change ownership to your personal google drive because it will not allow ownership change outside of your organization. So now what? Apparently I have not paid attention to whether I created things with my personal google drive or my school google drive, so I have stuff all over the place! Here is a blog post that shares how to save everything in your school google drive account so you can transfer it to a new account: http://techtips-ccsd.blogspot.com/2015/05/tuesday-tech-tip-taking-it-with-you.html
These are the tips I'm using to organize my google drive this summer, and I hope you find them helpful too! Don't forget to check back next week for more tips. If you haven't seen the other tips in this blog series yet, make sure to go back and check out tip #1: Password Saver and tip #2: Lesson Plan Templates and Hyperlinks.


No comments