Teacher Stuff: back to school

Showing posts with label back to school. Show all posts

It's a Back to School Sale!  Everything in my store is 20% for 2 days! Teacher Stuff store

Download for Instagram - 1080 × 1080
0

3 Back To School Books With Creative Gifts & Activities For The Beginning of The Year


This post contains affiliate links for your convenience. That means I get a small commission if you use my links to buy something, but at no cost to you.

Are you looking for a back to school gift to start the year off "write"? Try tying tags onto a pen or pencil that say, "You are just 'write' for our class!" I give these to my students before school starts. We have students come in to do assessments before the first day of school. They come in small groups, and they are usually pretty nervous. I start by reading the book A Teacher's Top Secret. I found this book last year, and it is awesome! It tells the students a big teacher secret––that we pick them to be in our class because of all the special gifts they have to offer our classroom family. It talks about how sometimes it gets pretty heated and teachers throw down over the students to make sure they get them in their class! It's really cute. After we read the book, it's time for them to start their beginning of year assessments. I give them their pen and tell them it is a special pen that will help them do their best! 

You can download the tag for free here in my TpT store. I print the tag on different colored AstroBright card stock and use a 3 inch circle punch to cut them out quickly (Note: You have to cut off some of the extra paper to get the hole punch close enough to cut out the circle perfectly). These tags are made for the 3 inch punch. Then I use a regular hole punch in the top and curling ribbon to tie it onto the pen. These are some of my favorite pens to give the students. They love them! 


This year, I'm adding this little fairy or elf door to my classroom. I'm going to let the kids know that we have some magical friends that live in our classroom who left the pens for them to use during their assessment days, and I will show them the little door. I will let them speculate on who or what could be living there! Once school starts, one of our first units is fairytales and folktales.  After I read The Elves and the Shoemaker by Jacob Grimm and Jim LaMarche, it will lead us to the discovery that we have magical elves that live in our classroom. Our elves will leave little notes, drawings, and words of encouragement sporadically throughout the year. I think we'll also have some visits from their cousins from the North Pole around Christmas time and their friends the leprechauns will visit around St. Patrick's Day and play tricks on us!


2. Lubna and Pebble by Wendy Meddour:
Make a Bed For Pebble


Lubna and Pebble is a beautiful book that I love to use to start off the year. It is about a little girl who is a refugee (it doesn't specify from where) who comes to a new country, and she feels lonely and scared. Her best friend is a pebble that she holds when she is scared, and she talks to it when she is lonely. When they make camp and pebble is cold, dad helps Lubna make a cozy bed for pebble. When a new boy joins the camp, Lubna becomes his friend because he is lonely and scared too. When it's time for Lubna to leave the camp, the boy doesn't want her to go. She leaves her best friend pebble with him so he has someone to hold onto when he is scared and talk to when he is lonely. It is a very touching story of friendship that is beautifully written and beautifully illustrated. 

After reading this story, we talk about who feels a little scared and lonely in a new classroom. Then I pass out a pebble friend to them to hold onto when they feel that way. This is a gift that is super special to kids EVERY time. We bust out the STEM supplies next, such as cardboard tubes, egg cartons, small boxes, etc. and I let the kids build a bed for their pebble. When they're done, we all go around and introduce ourselves and share our bed creations, then I let kids go back and make adjustments if they got new ideas from other classmates. I encourage them to collaborate with each other on their modifications as we also build classroom community. This is always an amazing first day activity that leaves kids feeling excited about coming back to school.


3. Scribble Stones by Diane Alber:
Scribble Stones


Scribble Stones is a great follow up to Lubna and Pebble (I typically do it several days later or the following week). Scribble Stones is a book about this stone that has waited his whole life to be chosen for a special job only to become someone's paper weight. It's disappointing until one day these scribbles use all the paper in the office. The stone has a great idea, and the scribbles use him to create their art! In the back of the book, the scribble stone project is explained: You find a stone, add some art, and then pass it on to someone else to spread kindness in the world. They add more art to the stone and pass it on too. It's a great way to start a chain of kindness. At the beginning of the year when we go over classroom rules or the school PBiS letters, kindness is always incorporated.

I usually get 3 - 4 inch stones for every student in my classroom from a local landscaping company since they are so heavy, but I put a link to some stones here that should work too. I have the kids use colored sharpie markers to decorate their stones. I used paint one year, and it was pretty messy and didn't stay on the stones, so sharpies work better for me! After the kids finish decorating their stones, we decide who to give them to in order to spread kindness. This can be tricky because beginning of the year 2nd graders are really still first graders, and they want to keep their stone. We really have to emphasize kindness and decide as a class how to pass them on. It helps that they got their own stone to keep with the Lubna and Pebble activity, but this is a big and cool stone! Two years ago we decided to share our stones with parents by putting them out by the front door of the school. Parents could not enter the building due to COVID, so we thought they would appreciate our beautiful stones in front of the school when they picked up their kids. Last year we decided to give our stones to kindergartners. My class thought they were probably afraid to start school for the first time and having a scribble stone would make them feel good about school. I can't wait to see who my students decide to share them with this year!


I have done these beginning of the year activities with my students for a few years, and they are always a huge hit! They are great ways to build classroom community and start off with some fun! 
0

Teacher Stuff Newsletter #3 - Back to School


The 3rd edition of the Teacher Stuff Newsletter is available, and the theme is 'Back to School.' Check out this collection of free resources to help you get ready for the new school year. Just click on the picture to go to the google slide that has live links to the resources. You can also see previous newsletters by clicking the arrows on the slide show. Happy New (School) Year!

0

Teacher Stuff for You Newsletter #2: Bitmoji Mania


The 2nd edition of the Teacher Stuff for You Newsletter is ready! The theme of this newsletter is Bitmoji Mania. Click the picture to visit the live links. Use the arrow in the slide show to see the previous Newsletter. Enjoy!
1

Teacher Stuff for you Newsletter #1: Use for Remote & In-Person Learning


Thanks to the virtual class I took at #twtcon2020 from tech integration & innovation specialist Traci Piltz, I have decided to try making my own visual newsletter! You should definitely check hers out - it's amazing! I'm switching districts this coming year, and this is a way that we can stay connected! I will be creating themed newsletters. The first theme is: Use for remote or in-person learning. Click on the picture to access the links. I'll let you know when the next one is ready! As suggested by Traci, these newsletters will be on a continuous google slide. I will continue adding to the same google slideshow so you can always go back to find past tips and tricks. I hope you find this helpful!
0

Get Organized for #DistanceLearning: Sub Plans in Google Drive


No one knows exactly what school will look like in August yet, but there are a few things that we can do to get organized in the meantime. This series of blog posts called, "Getting Organized for #DistanceLearning" is full of tips that will be useful whether you're teaching online or face to face. So be sure to check back for all the tips in this series! 

Tip #1 was Password Saver
Here is your last tip in this series, tip #4 . . . 

Plan Ahead for a Sub

So this is one of the aspects about next year that feels the most unknown to me. What if we do get sick? Whether we are sick with the common cold or COVID-19, this is going to have a huge impact next year. There will be no more, "I'm not THAT sick, so I'll just work through it." We've all done that –worked even when we didn't feel great because it's easier sometimes than making sub plans. I'm guessing those days are over. I'm trying not to worry about the fact that I don't have 14 days of sick leave (I'm starting in a new district this coming year), so if I were to get sick, how would I stay home for 14 days AFTER my symptoms were gone?

So without worrying about how the details will play out yet, we obviously need a plan. I'm not talking about full blown lesson plans for the day. I've seen people do that and it seems to be successful, but I'm not a huge fan of writing the actual plans now. I'd rather have students work on what we're actually doing in class if I'm gone rather than something totally different. Although in an emergency, I can see the need for that. Today, I'm talking about organizing a template in google drive.

Sub Plans in Google Drive


If you don't write your lesson plans in google drive already, now is the time. Ditch the Word document or paper. It is inefficient. You need a template that you can easily fill out with boxes that remind you of what you need when you're not thinking clearly. Most importantly, you need to be able to share your plans easily with your sub, your team, and the office. You will probably not be allowed back inside the building if you are sick, so in google drive you just hit share. Forgot to add something to your lesson plans? No problem! You can change or add something, and they see your changes immediately. You can even link websites and videos inside your plans. So here are the things you can set up right now:


  1. Master class list: Create a table, type in your students first and last names, and leave notes that will be important for the sub to know. Who is in special ed? Who is a second language learner? Who has allergies? You can print this list for the sub, but it's easy to make changes to your master list if you get a new student or one moves away. 
  2. Attendance page: Copy and paste those first and last names into an attendance sheet that can be printed and sent to the office. I take attendance on the computer, but the sub doesn't have the ability to do that. Sometimes they're stuck sending a scrap of paper to the office, and that is not efficient for anyone. If you have a list made with your class name and grade, a place for the date, and the student names already typed in, your sub only needs to put a check mark next to any students that are absent. 


 3. Daily Schedule: Believe it or not, this is the number one thing I hear subs say they do not receive–the daily schedule! This is pretty important. Have a separate page that outlines your typical day. In a pinch your team can throw together some plans for you, but you will need to have your daily schedule ready to share.
    4. Helpful Info: When subs travel from one building to the next, they may not know your room number, your extension, or even the name of your principal. Having this info ready for your sub can really help out. If a student pukes in class, the sub will need to know how to reach the janitor and your room number. If your sub has a question, it would be really nice to have the name and extensions of your teammates and the office manager. This is one of those pages you only have to fill out once for the year, but it can come in really handy for your sub. 
    5. Classroom Procedures: This is another page that only needs to be filled out and printed once, but it's really important for the sub to have. Each teacher does things just a little bit differently in his/her own classroom, so share your procedure for the bathroom, snack time, and classroom rewards. 


    6. Sub Plans: I recommend having a template for this. A box for each section of the day with a header for the time and subject, and a checklist at the end for materials the sub will need for that subject. This will help your sub, but it will make it SO much easier for you too. When you're putting things together for your sub, you can check the list of materials at the end to make sure you have gathered what you need. I have a plastic envelope for each subject that I put materials into. It makes things more organized for the sub, but it also helps me when I need to put things away once I get back.
    7. Feedback: We always want to know how things went, so have a feedback form available for the sub. Nothing fancy, just make sure you leave room for what you need to know.

Taking the time to get organized for a sub will be worth it. I did this last year, and I got SO much positive feedback from the subs in my classroom. They were all happy to come back and sub for me, and that makes a big difference. We have had a sub shortage in my district for a few years, and there have been many times that we had to split our classes or pull an intervention teacher to cover the class. Next year it is going to be imperative to have good subs available, so we need to take care of them. 

If you don't want to make your own template, I do have all the pages you see in this post available in my TpT store as an editable google doc. You can find it here.

I hope these tips help you get started organizing for #DistanceLearning. Don't forget to check out all the tips in this series. It's a good place to start:

There are a lot of unknowns, which can cause some anxiety, but it's going to be okay. We'll figure it out! Take some time to just relax this summer, and good luck this coming school year!


0

Getting Organized for #DistanceLearning: Lesson Plan Templates and Hyperlinks


No one knows exactly what school will look like in August yet, but there are a few things that we can do to get organized in the meantime. This series of blog posts called, "Getting Organized for #DistanceLearning" is full of tips that will be useful whether you're teaching online or face to face. So be sure to check back for all the tips in this series! 
Tip #1 was Password Saver
Here is tip #2 . . .

Lesson Plan Templates and Hyperlinks


Image from Gyazo
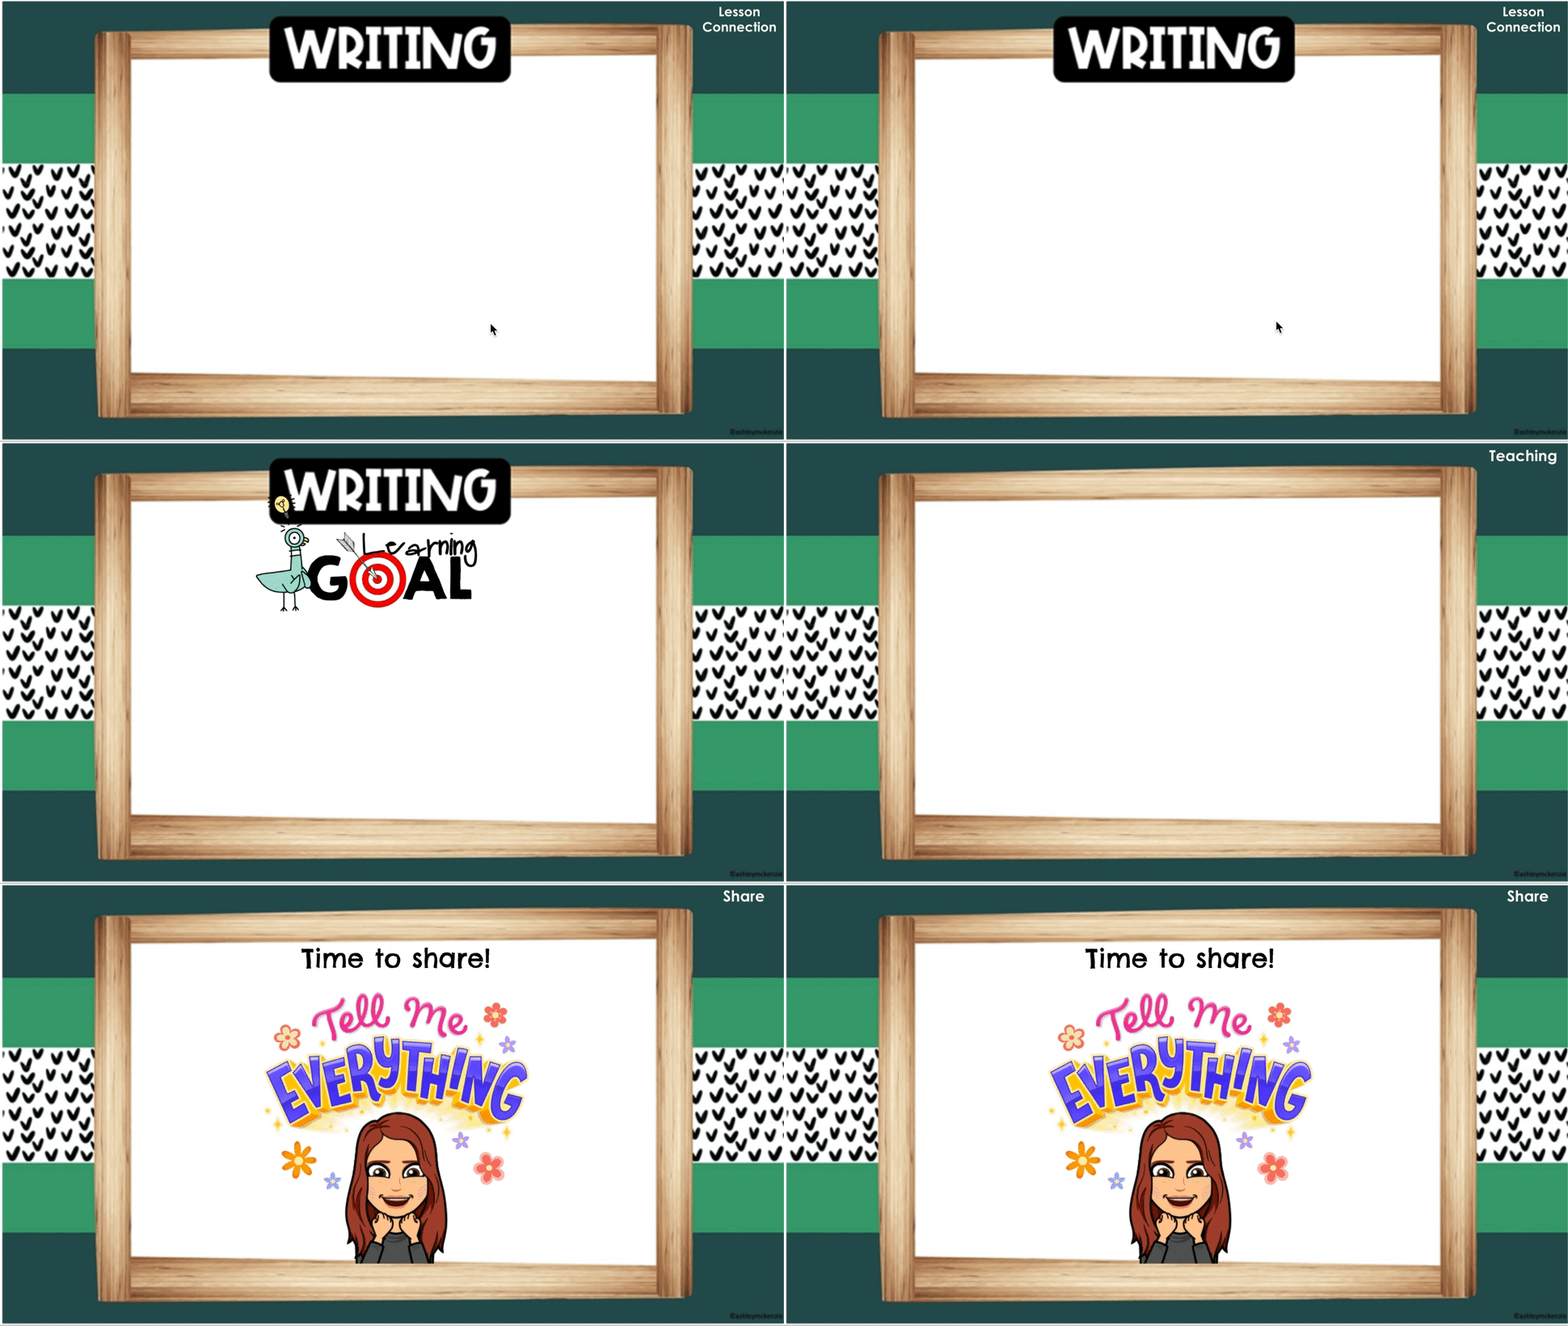
Blank lesson plan template for writing

Templates

I'm really excited to share with you this efficient way to organize and access lesson plans! Whether we are teaching face to face, online, or a combination of both, creating a lesson plan template for each subject is going to save you time and create a learning routine that is more predictable for kids. Every lesson usually has a similar format – a connection or hook,  a teaching point, some modeling, guided practice, independent practice, and sharing. First, start by creating a blank template in google slides for each subject with at least one slide for each part of the lesson. You can see my blank template for writing above. This will make your lesson planning much quicker. Having a slide that names the teaching point in the same way each time (mine says "Learning Goal" and has the picture of the Pigeon) will help students tune into the teaching point when they know where to look for it. If you use Lucy Calkins Units of Study in any subject, your teaching point is the sticky note! You can see mine on the writing slide. Because the language she uses for her teaching point is usually so wordy, you can see I typed it into the notes section of the slide. That way I can still share her teaching point with fidelity, but I don't have to read it out of the book or have kids worry about a bunch of text on the slide. The sticky note focuses them on the teaching point while I still share the exact language. You can even get started on your lesson planning for the year this summer. If you have a curriculum you follow, you can make a slideshow for each lesson and plug in the teaching point or learning goal right now like in the examples above. Leave the rest blank for now so you can plan it as you go. You can even use the same slides each year and just make adjustments as needed. The big idea will already be there!  I'm using the templates created by Ashley McKenzie called Scandi Mountains. She has a lot of cute designs! If you're looking for some free templates, there are a lot out there. Some of my favorite free templates are from Slides Carnival

Hyperdocs

Google doc hyperlink page
Image from Gyazo
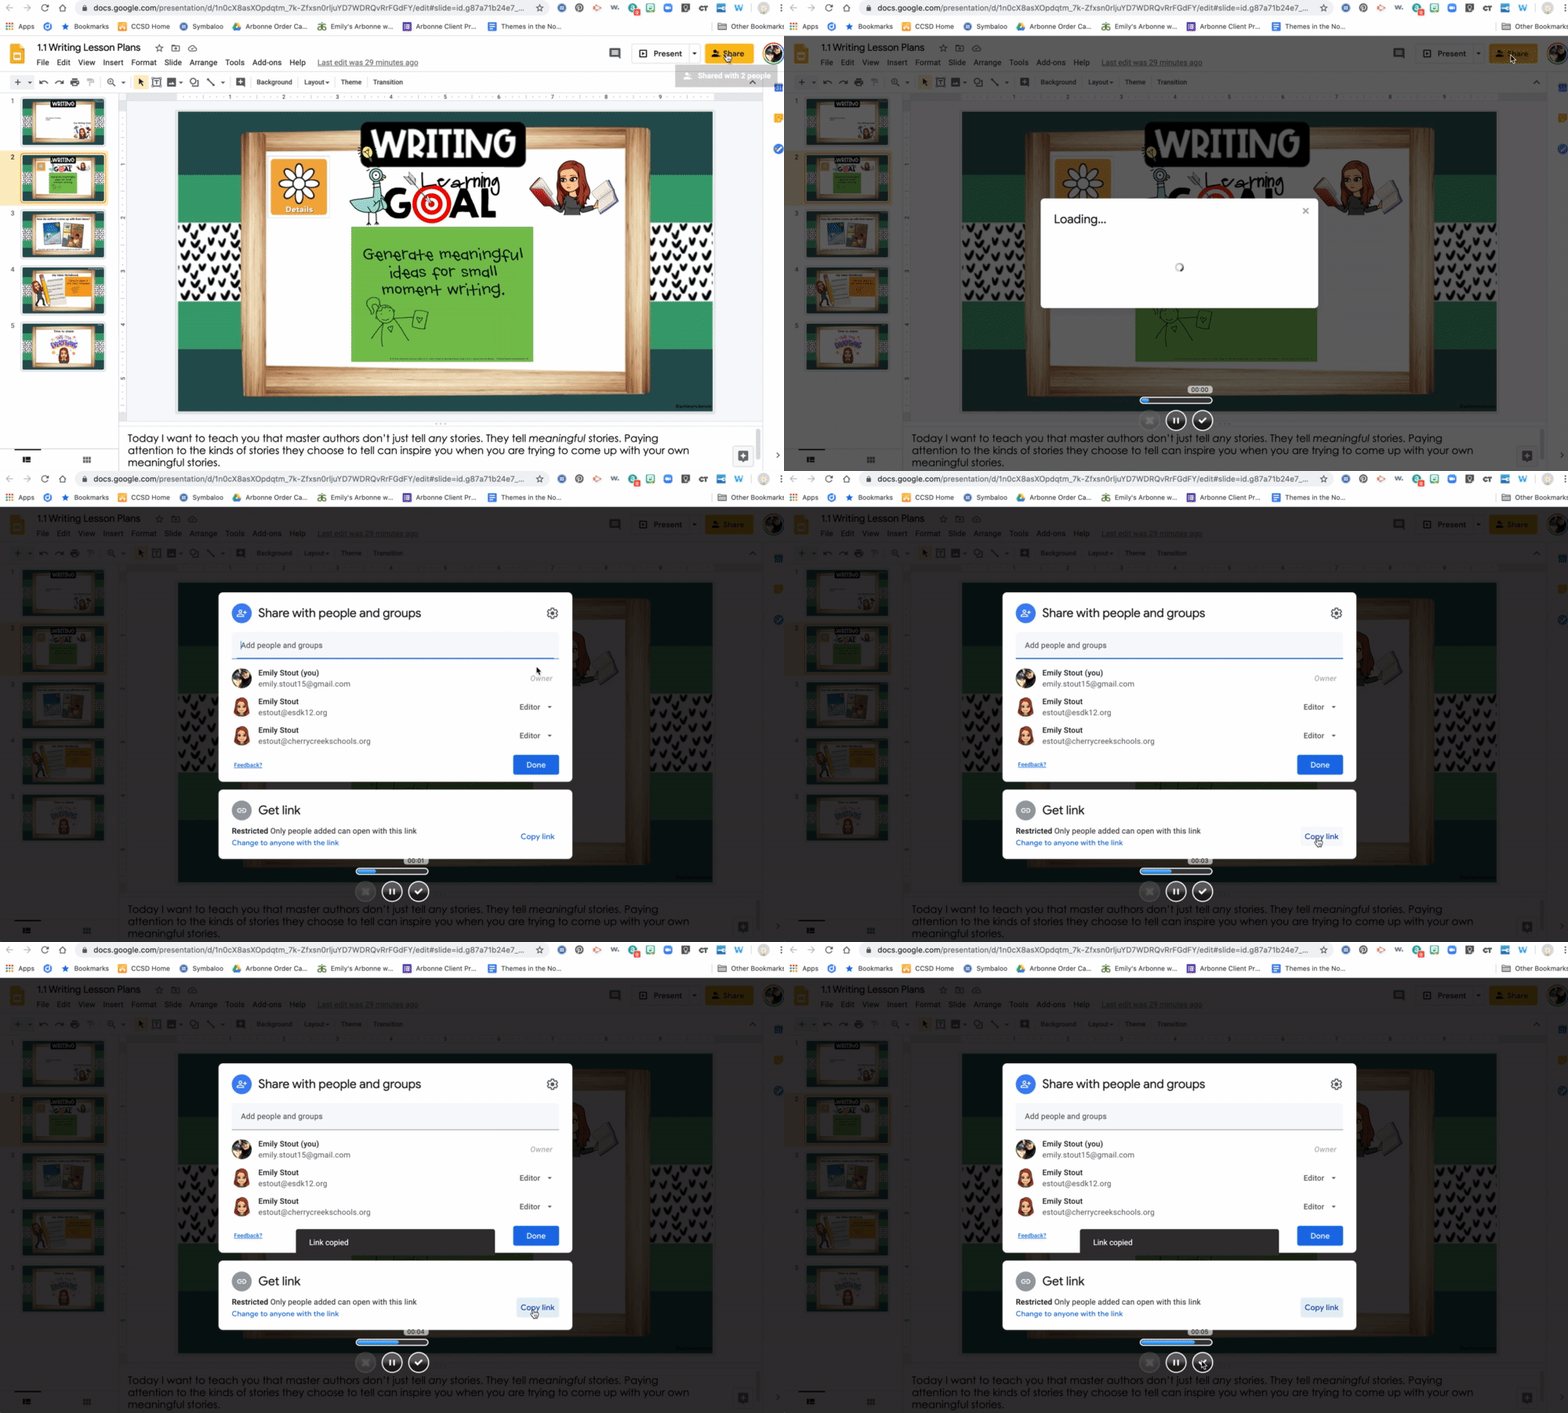
How to copy the link from your google slide lesson plan:
share–copy link

Image from Gyazo
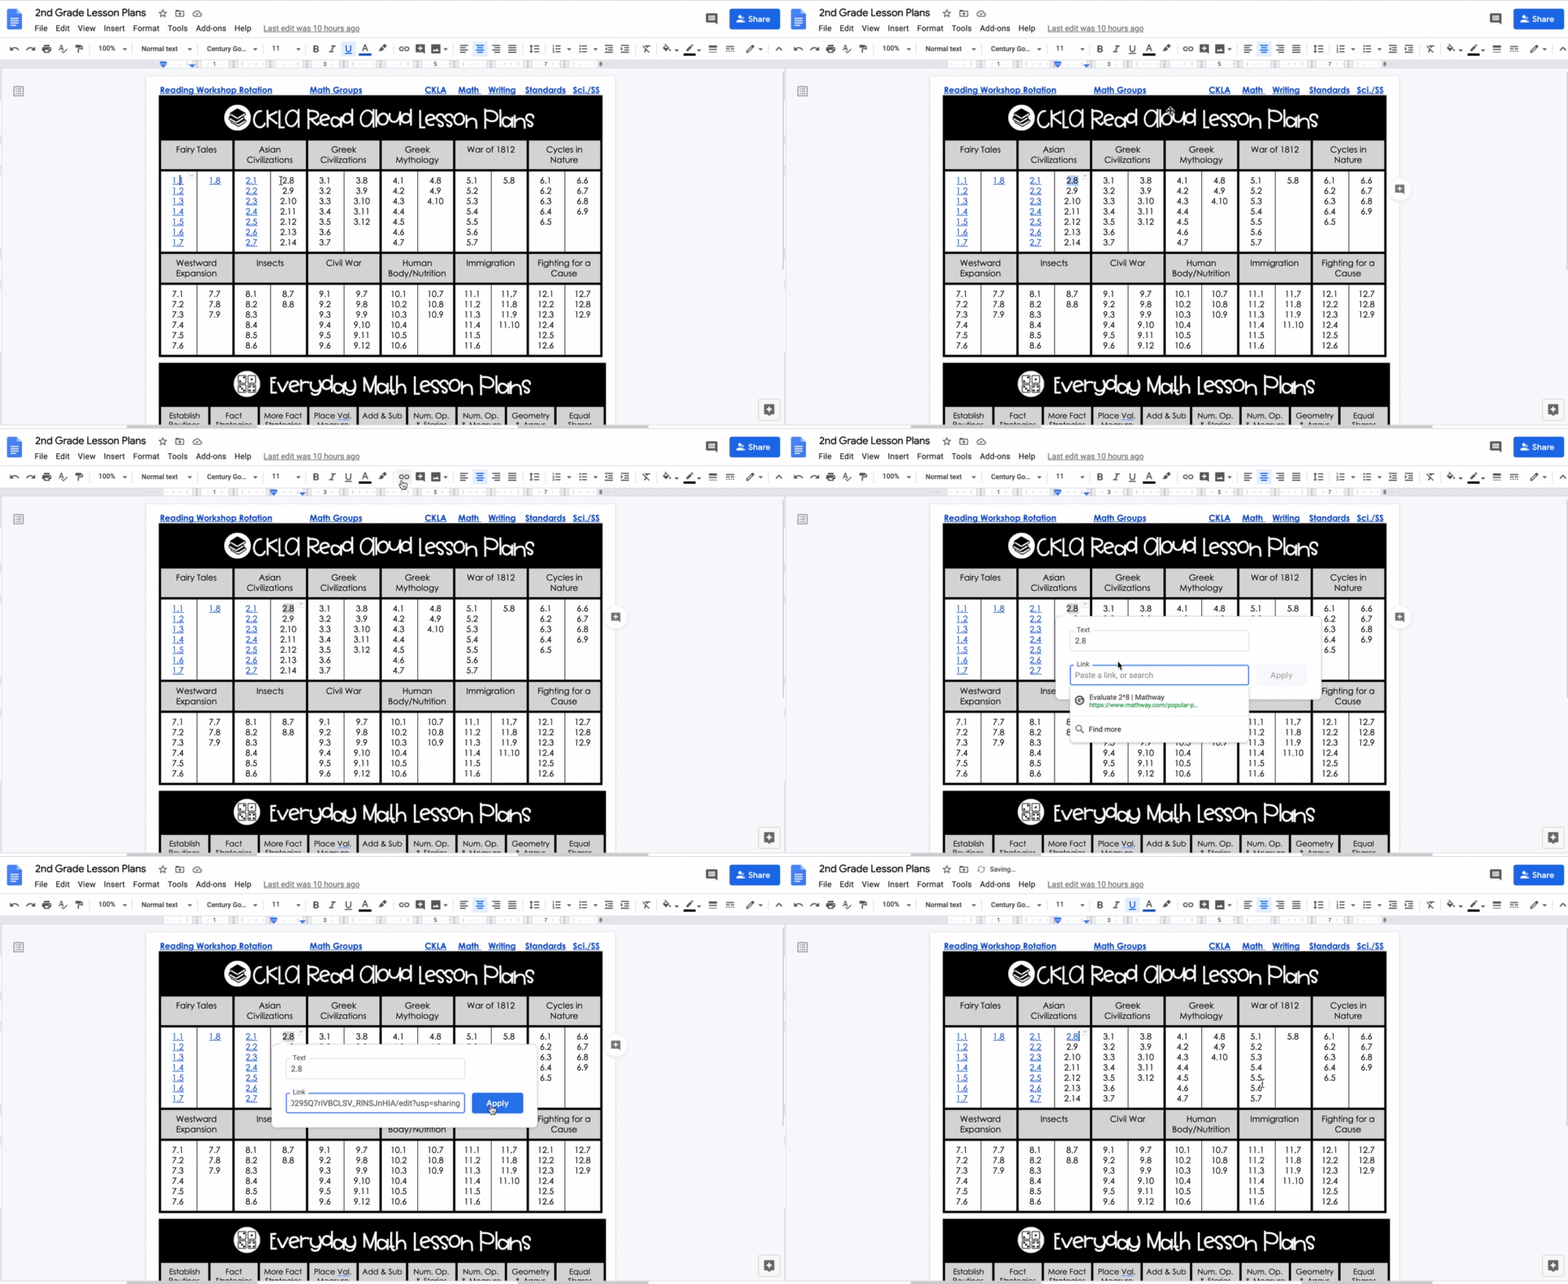
How to add the link from your lesson plan to your google doc hyperlink:
highlight the lesson plan number–click on the picture of the link–paste the link–apply


Once you have a bunch of google slides lessons created, you need to be able to get to them quickly and efficiently. That's where hyperdocs come in! A hyperdoc is basically a google doc that holds a bunch of links that are part of a common theme. My school (which will be new for me next year) has a curriculum for reading, writing, and math. I created a google doc with each of those subjects (above), and I added the lesson number in each table. For example, 1.1 is unit 1, lesson 1. When I have a google slide lesson plan created, I link it to the correct lesson number. First click "share" on your google slide lesson plan and copy the link (see example above). Then highlight the lesson plan number on the google doc, click on the picture of the link, and paste the link you copied from the lesson (see the example above). That's it! Your lesson plans are now all in one place.
Image from Gyazo
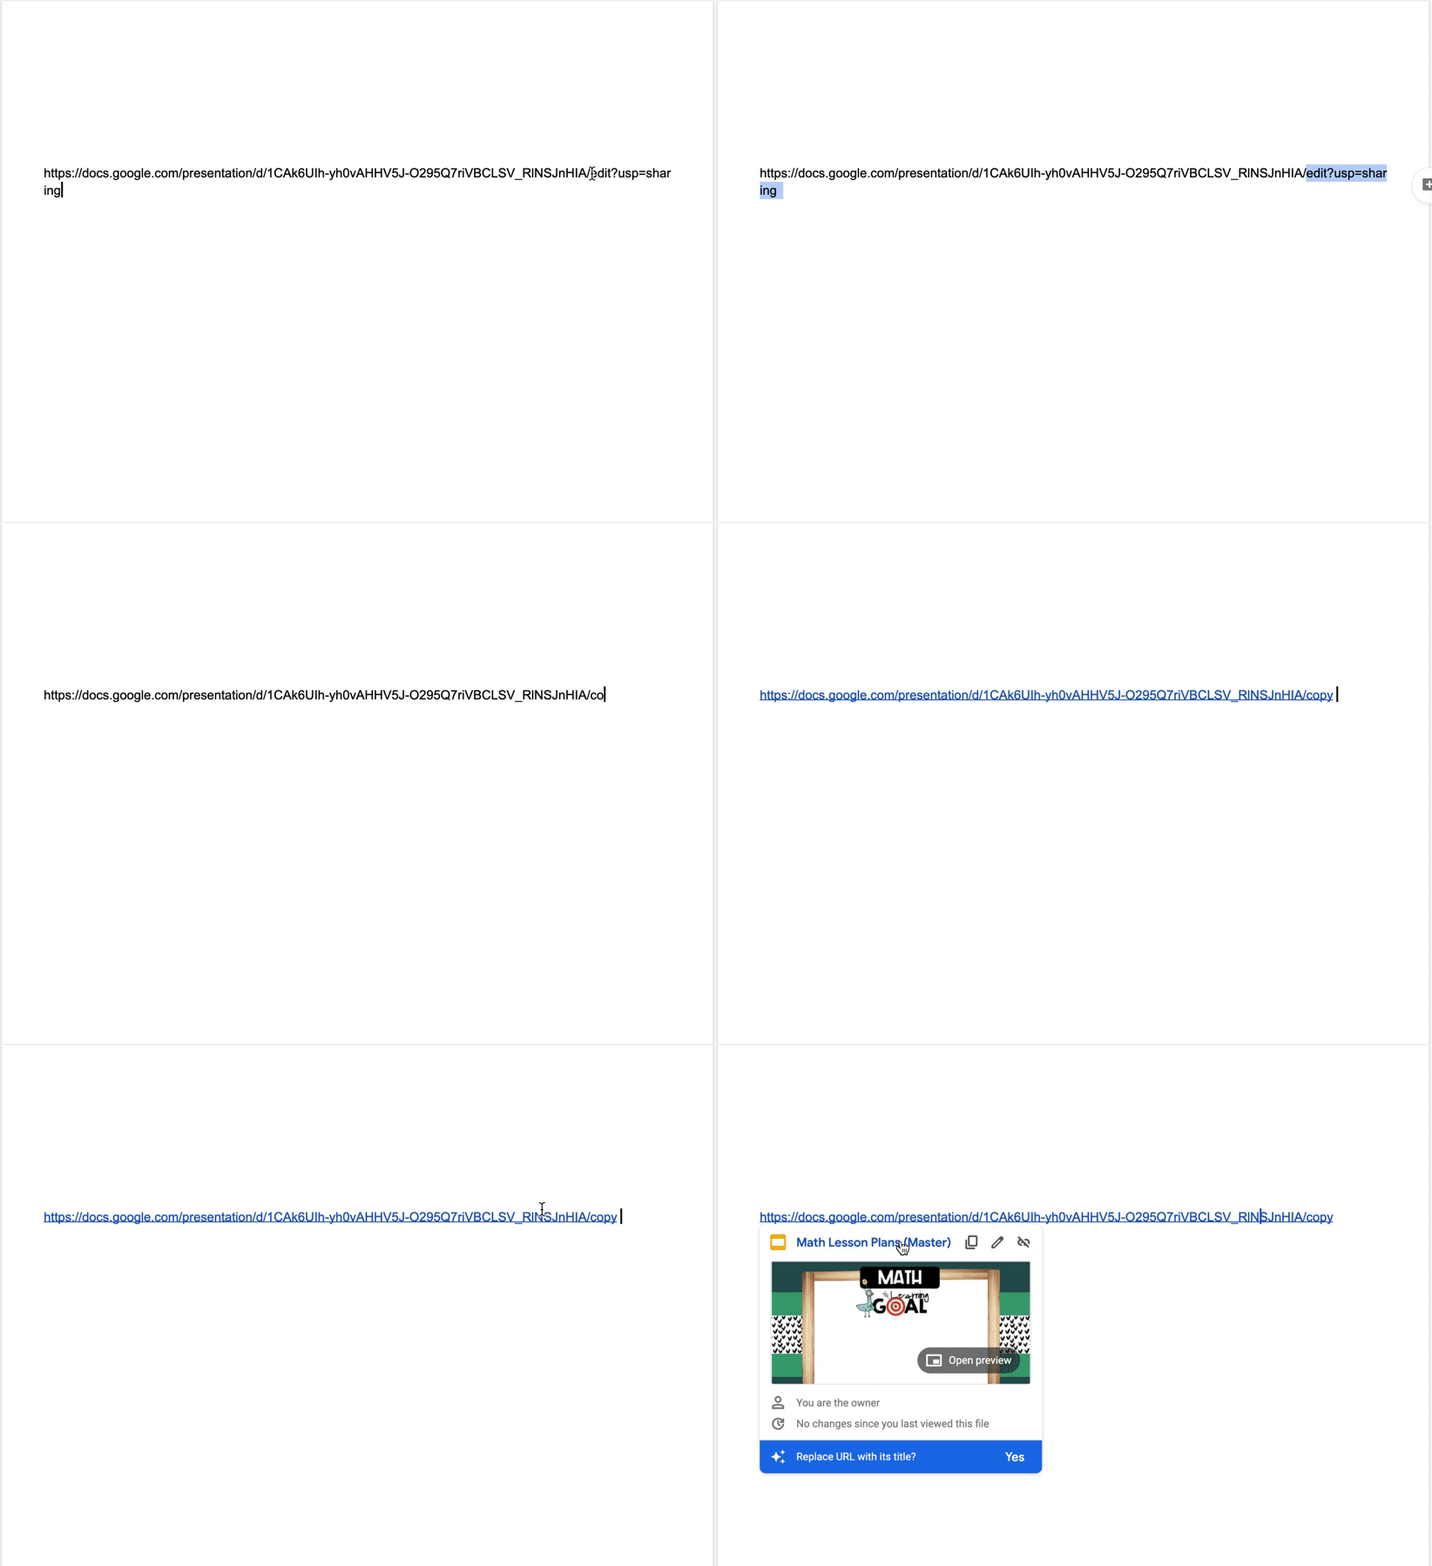
How to change a link so it automatically make a copy when you click on it:
in the link, delete "edit" (and anything that comes after it)–type in "copy"


I also linked the blank lesson plan template for each subject at the top of my google doc hyperlink page. This saves me time when I am ready to create a new lesson plan. I created the link to automatically make a copy of the blank lesson plan template when I click on it. To do this, just copy the link of the google slide template (see the hyperlinks example again) and change the last part of the url that begins with /edit to the word copy (see the example above), and paste the new link to your google doc hyperlink page. Then when you click on it, it will automatically make a copy of your blank lesson plan template so you can start working on your next lesson plan. Nice and efficient!


I also have my reader's workshop rotation and math groups on google slides, which I linked to my google doc hyperlink page too. I just project the groups and rotations during workshop time, and it's easy to change as needed when it's a google slide. I also linked the standards to my google doc hyperlink page because I often need to refer to them when I am planning. That makes everything I need for my lesson plan in one spot. Perfect!

Bookmarks

Symbaloo bookmark page

Now that everything digital you need to teach your lessons all year is linked on one page, I still have one more shortcut that will make your life easier. Have you ever used Symbaloo? It is a free bookmark tool that is saved in the cloud, so you can access your bookmarks on any device. I have my computer set up so that when I log onto the internet, my symbaloo page (above) automatically pops up and all my bookmarks are automatically at my fingertips. You can choose the color and picture for each bookmark you save. One of the really convenient things about symbaloo is that you can also bookmark a google doc, a google slide, etc. That means I can copy the link to my google doc hyperlink page and create a bookmark that will open that doc for me. (tip: when creating that bookmark, save it as a website instead of embedding it in symbaloo, and it will open the whole doc.) The picture of the target on the picture above is my google doc hyperlink page. That means whether we're teaching face to face or remotely next year, with one click, I'm ready! 

I hope you found this tip for Getting Organized for #DistanceLearning helpful! Check back next week for tips on organizing your google drive. If you haven't seen the other tips in this blog series yet, make sure to go back and check out tip #1: Password Saver

0

Getting Organized for #DistanceLearning: Password Saver


No one knows exactly what school will look like in August yet, but there are a few things we can do to get organized in the meantime. This upcoming series of blog posts called, "Getting Organized for #DistanceLearning" is full of tips that will be useful whether we're teaching online or face to face. So be sure to check back for all the tips in this series! Here is tip #1 . . .

Password Saver

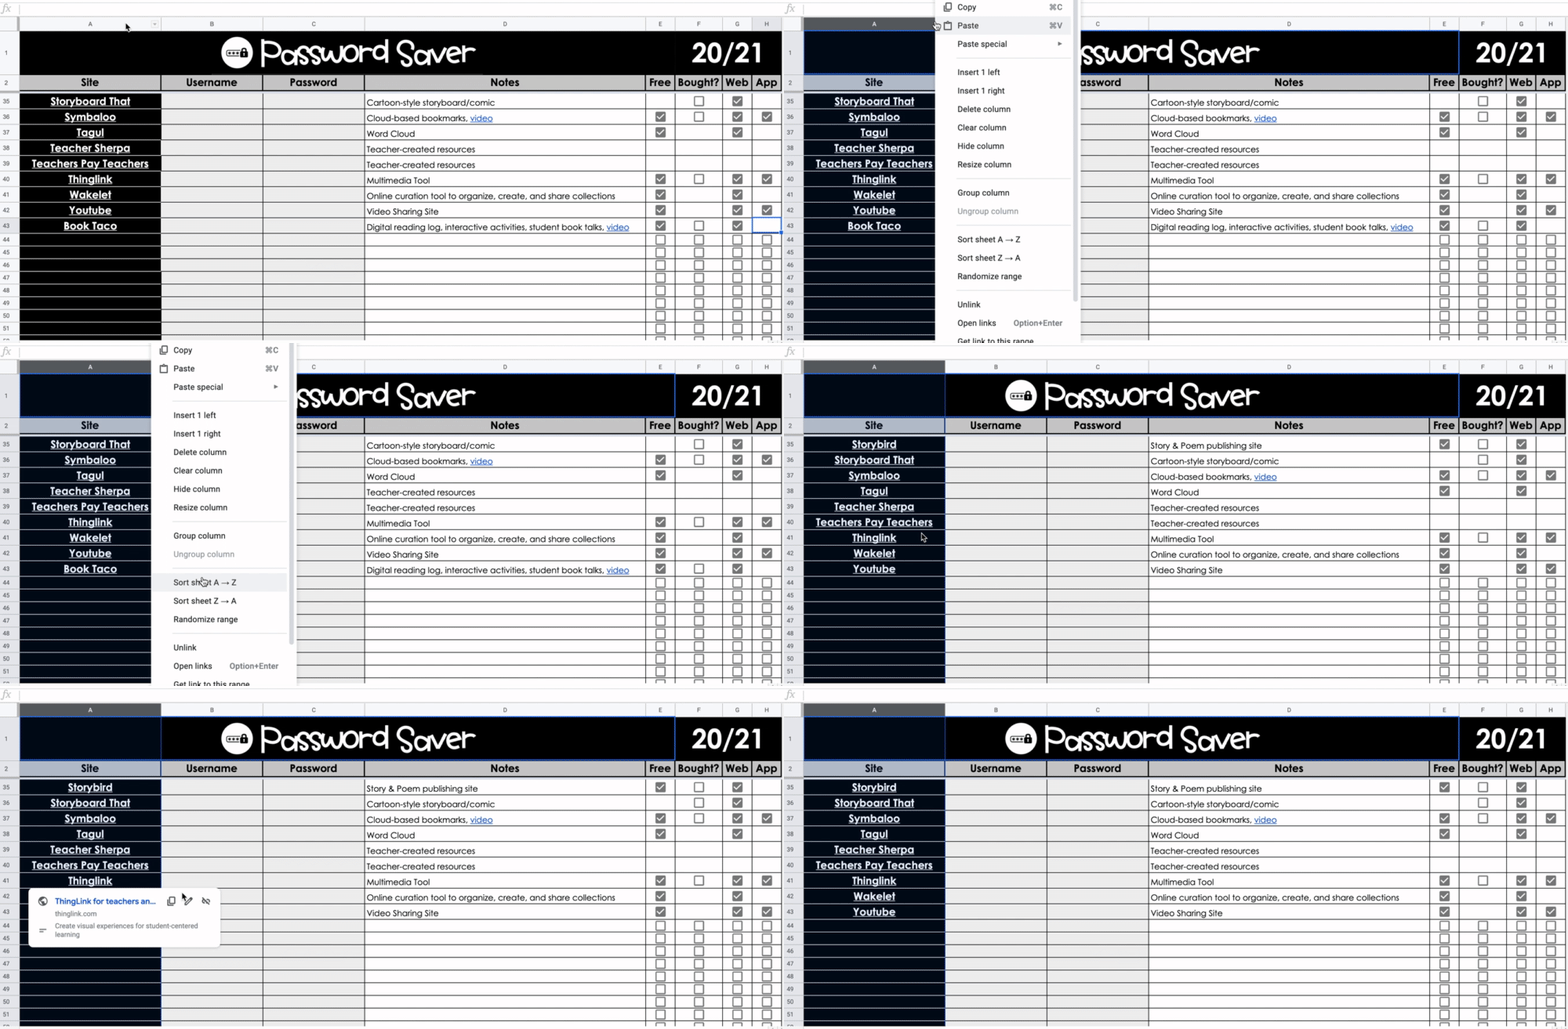
As teachers, we have a lot of websites and programs that we use, and each one usually requires an account. Keeping track of them all, plus usernames and passwords for each is tough. Remembering them after taking a break over the summer is next to impossible! This password saver keeps everything you need to remember in one place. I've shared password savers before, but this is an updated version for the 20/21 school year. This is a google sheet or excel spreadsheet that has a link to each of the sites or programs listed, and it includes a short definition for each. There are also boxes with checkmarks that let you know whether it is available for free, and if it is web-based and/or an app. There is also a check box that you can use to keep track of which programs have been purchased by you or your school/district. Google forms have gone through an update, so now you can include more than one link in a box. I included some helpful videos in the notes that give you an overview of some of the sites or a tutorial for using it. There is also a page for you to keep track of your students' usernames and passwords all in one place. 

Image from Gyazo

Personally, I prefer to use a google sheet for my password saver for a few reasons. 
1. If you add more sites to the list throughout the year, you can easily resort it in alphabetical order. Just click on the arrow in the column that lists the names of the sites and click "sort sheet A-Z" (see gif above). It will automatically sort them into alphabetical order.
2. I like a google sheet because it automatically saves in my google drive so that I always have the most current version on any device I use. I don't have to upload it again when I make changes, and it's not stuck on just one computer. 
3.  I like using a google sheet as a password saver because I can add hyperlinks to each site, videos, or anything else that will help keep me organized. 

Please NoteIt is never a good idea to save passwords on a google sheet that contains your social security number, any bank information, or any sites in which you have your credit card information saved. It is not secure enough to trust that hackers could not gain access. However, saving my username and password for teaching sites in which I view or assign work seems reasonably secure to save on a document like this. Just be thoughtful about your private information!

You can download a free copy of the Password Saver 20/21 for yourself here

This will be handy whether we are teaching online next year, in person, or a combination of both by helping you keep track of all the sites and programs you use. Check back next week for another tip on Getting Organized for #DistanceLearning. It will focus on organizing your lessons!
0

Turning Worksheets Digital #distancelearning


As we say goodbye to our students virtually, the possibility of beginning next year the same way is a real one. As districts contemplate solutions to the social distancing issue in schools, we are looking at the possibility of half the students in-person and half the students online switching throughout the week, or continuing remote learning only. Whatever the outcome (and the problems that will come along with it), the one thing we know for sure is that schools will not look the same in August. So it's time to start planning ahead. The good news is, we don't have to start from scratch. Many of the things we were already using in our classrooms can make the switch to a virtual setting pretty easily. 
Right now, I'm focusing on worksheets that I used for students' independent practice. If we have a hybrid of in-person and remote learning time next year, I want to have a bank of independent activities for the students to do virtually. Then in-class time can be spent on formative assessments, reteaching, and small group or one on one conferencing. I already have worksheets that I used for independent practice to reinforce skills I taught in the classroom. Those are still great resources, and you don't need to ask parents to print them out at home. All you need to do is turn that worksheet into a picture, and then you can assign it through online platforms like Seesaw or Google Classroom. Are your worksheets all pdfs? Don't worry–just take a screen shot to turn it into a picture. (How to take a screen shot on a mac. How to take a screen shot on a PC. Just make sure you bought the product before snapping screen shots of copyrighted material!) Students can write on top of it, record their voice (in Seesaw) and turn it in to you. You can give them feedback virtually, and if they have any problems with the assignment, you can address it when you see them in person. During distance learning, I created multimedia video instructions on Seesaw so the students could see how to do it, then use the template provided to work on the assignment themselves. So this summer, I'm going to work on turning those worksheets into pictures that I can assign! Here are some of my favorite worksheets for independent practice online:
  • Read and Find Blends & Digraphs from Mrs. Thompson's Treasures - she has several of these that are fun for the kids to do online. Like 'I Spy' books, students read the targeted word and then find and color the picture of that word. 
  • 120 Chart Mystery Pictures from Mrs. Thompson's Treasures - she also has several versions of these – even superheroes! Students color numbers on the 120 chart that make fun pictures. Great practice for identifying numbers up to 120.
  • Color by Number Worksheets - Addition to 12 by Shanon Juneau - she has several versions of these as well. Students have to find the answer to each math problem and color the sum of the math facts a certain color to reveal the picture. 
  • Color by Code from Creating 4 the Classroom - You can also create your own color by code with these blank pictures divided into sections. You can make them math facts, sight words, etc. There are a lot of options! 
  • Differentiated Number Mazes for Each Decade (from 20 - 120) by Maria Gavin – these are fun for the kids and easy to do online. It is kind of like a cross between a maze and connect the dots. Students have to follow the numbers in order to the target number.
  • I Spy Word Search by Teacher Stuff - I have several of these as well. It is a word search modified for early emergent readers. They have to find and circle the same word 6 times on the word search game board to practice a specific sight word. There are also I spy options for a little bit more advanced readers with 6 words they must find on one game board. I found that traditional word searches were too overwhelming for my first graders, especially at the beginning of the year or if they were struggling readers. However, the practice of reading their sight words and attending to each letter was good practice, so I made the game board smaller and was very strategic in choosing sight words they needed to practice. 
  • Cooking in the Classroom by Teacher Stuff - these recipes are easy for kids to make and require no actual cooking on the stove or in the oven. While they can be done in the classroom, I have a feeling this will be a fun at-home assignment next year. Students get experience with measuring, language, and creating a hands-on healthy-ish snack, but the main learning objective is for students to write how-to directions for something that they made. There are several recipes with a how-to writing template. 
None of these resources were created for distance learning, but these are a few of my favorites that are easy to convert into digital assignments. I know there are many more that would easily convert to distance learning independent practice, so please share them in the comments! Let's work smarter, not harder, and we can use what we already have to make this work!


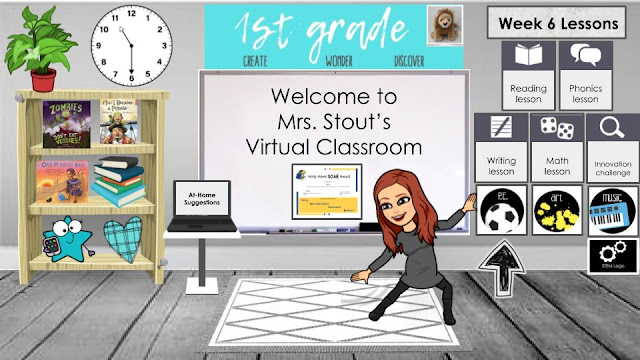
Now we have to organize all these assignments. I'm loving all the virtual bitmoji classrooms out there, so I had to try my own! It really is fun to make, and it's easy to link assignments, lessons, and resources. The visual platform for students to navigate assignments is going to be a game changer, especially for our little learners. They will learn quickly how to access everything they need with a well laid-out virtual classroom. One thing that became abundantly clear as a parent and a teacher during remote learning – we need kids to do their online learning with some level of independence.  Parents cannot walk them through every lesson all day, so if we have huge amounts of text for our kinder, first, and even second graders to navigate, it's not going to be independent. A virtual classroom is what I'm going to use to organize the assignments and lessons I give to students online. Even our non-readers can have some independence this way once they know the routine. The pictures will allow them to navigate the assignments and directions if we record the lesson. 

In my virtual classroom above, a video lesson for each subject is linked to each "poster" on the wall. The morning announcements are linked on the board; each book on the bookshelf is a book that supports a lesson. The star on the bookshelf is a website for independent practice created by our interventionists; the heart on the bookshelf is a social-emotional lesson created by our school mental health team; and the computer on the little table is a pdf with links to websites for independent practice, directions, and passwords. Even the clock shows the time for our daily zoom meetings, and it is a link to our zoom meeting. If you click on my bitmoji, it is a video that shows you how to navigate the virtual classroom. These cool virtual classrooms are a great way to organize assignments on any platform you are using. Here are some great tutorials on how to set up your own virtual classroom: Interactive Bitmoji tutorial | Google Classroom and Seesaw, Bitmoji Classroom Scenes & Virtual Classroom Backgrounds

These are only a few small pieces that go into distance learning, but it's a good place to start planning this summer! How are you preparing for what may come next year? 


1

Classroom Reveal!


This is a bit late, (we started school in the middle of Aug., so this is a room that has been used for a month and a half) but better late than never! I have gone back into the classroom after being a tech coach for the last 6 or 7 years. This year I am teaching first grade, and I am really excited to incorporate flexible seating and a maker culture in my classroom.  Last year, I got to hear keynote speaker Dr. Robert Dillon, author of The Space A Guide for Educators. He talks about the brain research behind designing a classroom with purpose and using the space intentionally. In his article 7 Tips for Moving From Decorating to Designing Classrooms, he says, "Ideally, schools would be taking time to study and design with intention spaces that support excellent learning." Going back into the classroom with a plan for how I wanted students to use the space in their learning gave me a chance to design my new classroom with some key principles in mind. Here is my classroom . . .


I used an intentional color palette instead of a theme–I was going for a cozy farmhouse feel where the students and I will enjoy spending time. Dr. Dillon says, "Research continues to emerge that an intentional color palette enhances learning. Too many spaces look like a bag of skittles exploded with every color of the rainbow represented in the rugs, furniture, and items on the wall. Designers are looking for a base color with a couple of accent colors. Classroom decorators, though, are adding flare and pop, and this rarely helps with the focus or calm of a space." This brain research has actually been around for awhile. In 2005, Eric Jensen published Teaching With the Brain in Mind. His research stated that warmer colors such as red and yellow stimulate students, and cooler colors such as light blue have a calming effect. 

I did a makeover in 2011 after taking a class about how to use brain research to create an inviting classroom. I wrote this advice on my blog which I learned from my class at that time, and it still rings true: "Decorate your classroom the way you would decorate your house. Would you splash bright blue, yellow, red, and green on your walls at home? Then you shouldn’t do it in your classroom either. Pick 1-2 main colors and an accent color. Make it something that makes you feel comfortable because you do spend 7 hours (ha! Usually more) a day there. Use color to draw attention to what you want your students to focus on. When that learning focus is over, take it down and highlight something new. The novelty of changing what you hang on the wall keeps things interesting and it keeps students attention. I wasn’t sure about this at first. I’ve heard it all before, but I was sure my students liked all the bright colors and stuff on the walls, and they probably did. But if my purpose is to emphasize a particular skill or concept, having lots of “stuff” everywhere wasn’t helping me accomplish that. Too much visual clutter can be distracting and then students don’t use it as a teaching tool. Effective teachers focus on one concept or theme to make a students’ understanding deep, not a little bit everything all at once." You can see my first makeover and advice here on my old blog

This time around, I had already gotten rid of a lot of my "stuff" from being in the classroom before, and I am determined to keep things decluttered so the space feels big, open, and inviting. I kept the blue accent color I had in 2011 for a calming effect, but I updated the look of my classroom with a softer gray and white shiplap. The gray rug is from Amazon, and it ties the room together nicely! 


Our school got new cloud tables this year, which I LOVE! They seat 6 students per table. I have 2 tables that are chair height and 2 tables that students sit on the floor to use. They are free to move to whatever space best meets their need depending on what they are working on, as long as they are making good choices. I also have spaces around the perimeter that are less collaborative work spaces that seat one or two students because they need the option for time to work by themselves as well. Dr. Dillon writes, "It is essential that students can choose the seating that meets their learning task and their learning style, but adding neat items to the classroom for novelty will get the undesired effect of students focused on furniture instead of their future."

Empowering them with the choice of where they work is going really well! Of course there have been times that I have needed to choose for some students who weren't making good choices, but honestly, I think my students are more productive when they get to decide what best meets their needs. It's less of a power struggle, and it helps students become more aware and self regulate what they need to do their best learning.

I found the supplies caddies on clearance at Walmart at the end of the summer for $5. Score! They were picnic caddies that were supposed to hold ketchup, forks, etc., but they also work great for our pencils, dry erase markers, glue, and sticky notes!


This is the front of the room. On the left is a chalkboard schedule for my students. My husband made the chalkboard, and I put up words, pictures, and clocks so the students can keep track of when things happen throughout the day. I didn't want a million questions about when recess begins, so they are responsible for looking at the hands on the clock to figure it out. Even if they don't know how to tell time, they can look at the hands on the clock to see where we are in our day and what is coming next. So far, it's working!


This is the front of the room where we gather. I found the chair and the little shelf under the board at Good Will. They just needed a little cleaning and some paint! The pillow that says "gather" and the crate next to the chair with our read aloud books are from Hobby Lobby. The clock is to help students manage their time. I can color in how many minutes they have to complete a task using a dry erase marker so they can see the time elapse. This is a tip I learned from a class I took this summer about helping students self-regulate and organize. It's really helpful!


On top of the little shelf are 3 plastic jars that say "Save, Spend, Give," which is part of our Social Studies standards. We have SOAR bucks as part of our PBiS program, and when students earn one, we put it in our "Save" jar. As a class, we vote on how we want to spend our money using the option board above. 


This tall table is off to the side of the board where I keep my computer and a tall stool. My computer can connect to the projector wirelessly with a screen beam, so I use it as my doc camera too without all the wires and mess! I can just pick up the tablet part of my computer and walk around the room while writing on it, and it projects on the board. It's awesome!


This is part of my classroom library. The shelf in the middle was made by my husband years ago when I was a classroom teacher before. The shelf on the right is from Ikea, I just turned it on its side so I could display books. I got plate or frame displays from the dollar store to display the books. The shelf on the left hand side is also from Ikea. I use it to hold specific authors we like to read. The wall behind the shelves is an ugly collapsable wall, so my husband and I covered it with shiplap paper I got from Lakeshore (yep–I'm a big Fixer Upper fan!). This fadeless paper is thicker than normal paper, and you can even write on it with a dry erase marker. I use the big sticky note chart paper for our anchor charts from the Units of Study Reading, Writing and Phonics lessons. It can come on and off that shiplap paper easily, so I can move the anchor chart around. I love the sticky notes from these programs because I can put them up when they are our teaching point, and when we move on to new teaching points, I put the sticky notes in a folder full of blank paper so we can reference it if necessary, but we don't have to have it taking up space and distracting us from our main learning target.


On top of my bookshelf is a framed print illustrated by Peter Reynolds. It says, "I Love My Library." I was so excited when I found these from thedotcentral.com. You can order them, and even have them autographed! 


My library continues around the corner with a comfy leather chair I got for free on Facebook Market Place, and a pillow from Hobby Lobby that says, "Let's Get Cozy." 


This is my son who couldn't resist reading a book in this space. There is a basket full of stuffed animals next to the chair that make great reading buddies!

There are 2 shelves from Ikea laid down end to end to form a bench with pillows on top that the students sit on, especially during independent and buddy reading time. Under the bench are more books separated by genre and author. Above that is the word wall. On top you can see the 3 verbs I chose to describe the kind of learning that I want to happen my classroom. Dr. Robert Dillon inspired me during his talk when he shared his idea about choosing 3 verbs: "Design requires a human-centered lens that allows you to understand the true purpose of a space. When teachers and leaders know the verbs of their space, they have a deeper level of intentionality. Is your space designed to explore, investigate, and discover? Is your space designed to create, make, and tinker? This clarity makes decoration seem like frosting instead of missional." He also talked about how much of the space in your room is really for the students to use, and how much is unintentionally off limits because it's full of your "stuff." I'm determined to have less "stuff" so I can give more space to the students. I'm keeping my "stuff" digital as much as possible so it doesn't become clutter!


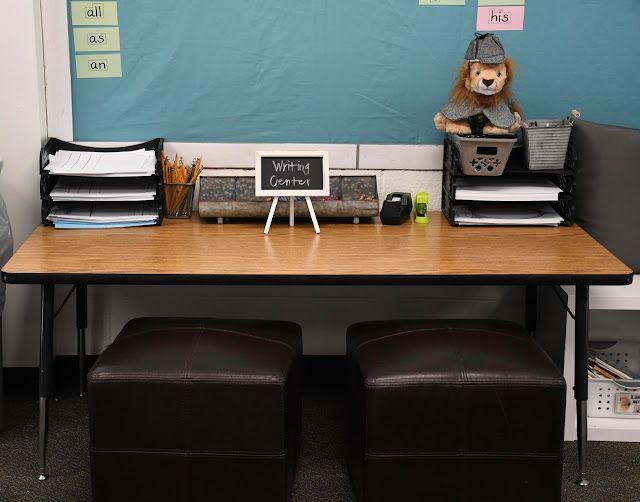
The writing center is also under the word wall, and it has writing tools that the students use everyday. There are blank books with different kinds of paper that the students write their stories in, pencils, crayons, tape, a stapler, and of course Rasheed, our class mascot (from the Lucy Caulkins Phonics program). We are currently word detectives, so he is dressed like a detective!


I got these cute little chalkboard displays on clearance at Michaels this summer, and I used a chalk marker to write on them. 


This super cute crayon caddy is from Hobby Lobby. I got the idea for a crayon caddy from my teammate, Kelsey at Teaching Tiny Techies. If a student loses a crayon, they just get another one. If we find some on the floor, we just put it back in our crayon caddy. It's just not worth the time to figure out whose missing crayon is on the floor!


On the other side of the room are my STEAM bins. These little white baskets (from the Dollar Tree) hold STEAM activities I found from Sarah Cooley on TpT. We have a soft start, which means that students can come into the classroom anytime between 7:40 - 8:00 before the bell rings. They can grab these activities and work on them until the bell rings. We also make time on Friday for students to do these STEAM activities if they have done their homework. They absolutely LOVE them! It's incredible! Create is one of my classroom words, and incorporating STEAM is important to me because I think it is so valuable as a learning opportunity for kids. Dr. Dillon says, "If we keep designing makerspaces, isolated from classroom learning, with no plan to close them in lieu of a maker culture, we are building this decade’s computer lab. We need to instead think about creating a culture of making in every classroom. This doesn’t mean that we are putting 3D printers in every classroom, but maybe we are adding cardboard and low-tech creation items in all spaces. Allow students to showcase their learning in a variety of ways. Don’t limit making to space or specific time of the day." One of the STEAM bins is just an open explore bin that has cardboard, bubble wrap, paper towel tubes, etc. Whenever a we empty a Kleenex box or a box that held snacks, it goes into that bin. They. Love. It! I had no idea just how important is to them to have open-ended opportunities to create, but I won't forget. They have created fidget tools that go into our calming corner, settings for stories that we have read, and more. 


I got another print from Peter Reynolds that is hanging in the STEAM area. It autographed to my class!


This is my technology center.  This is a sitting table with cushions my mom made (thanks mom!). The headphone/iPad stands are from Ikea. We use it for uploading our learning to Seesaw, reading or listening to reading with Epic! and eventually Overdrive, and I also have 2 Osmos that the students have used for math, sight word practice, and coding. They are amazing learning tools! I also have 5 chromebooks that we sometimes use for websites connected to our math unit.


SOAR is our PBiS word which stands for Safe, Open-hearted, Achieve, and Resilience. I used the clock as the "O" in SOAR. The kids made a name banner that is hanging across the top of the board, and there are more flexible seating options you can see next to the technology center. The students love to sit on the floor using the lap desks!


This is my calming corner, which I call Australia from the book Alexander and the Terrible, Horrible, No Good, Very Bad Day. If the students are having a bad day like Alexander, they can visit Australia to self-regulate. There are fidget tools, a folder with self-regulation strategies when students are in different zones that make it difficult for them to stay focused (check out this resource from Kelsey at Teaching Tiny Techies for Self-Regulation Strategies), and this beautiful poem I found on Amy Ludwig VanDerwater's blog The Poem Farm called It's ok. If you haven't ever checked out her blog, it's amazing! She is a published poet that is the co-author of the poetry chapter in the Units of Study in Writing with Lucy Caulkins. She writes original poetry on her blog with students as her audience, and she records herself reading each one. She often has a follow up teaching point for students too. With this beautiful poem, It's ok, I have students draw something that they may not be feeling great about that is ok. Sometimes I decide students need to visit Australia too when they are having trouble self-regulating. 

This is a standing table that also has tall stools. The kids love to work here, not just as a place for self regulation, but to work too. I love that it doesn't have a negative connotation, and it can be used as a flexible space in our classroom!


Next to Australia is the math area. This shelf (and the matching shelf on the other side holding the STEAM bins) was made by my awesome husband. They hold our math tools and bins of Legos that we use for various maker projects. You can also see the little trash cans from the dollar store that we use when cutting or doing something messy to contain the trash!


With our flexible seating options, the students have a drawer in the back of the room to store their supplies. I tried a cheaper option for them to store their supplies, and it did NOT work. I suggest investing in these Trofast drawers from Ikea. I was not crazy about the yellow drawers (they had no more white drawers when I needed them), but the color is not too bad. They have other color options as well, they just didn't match my room! 😉


This is my small group area.


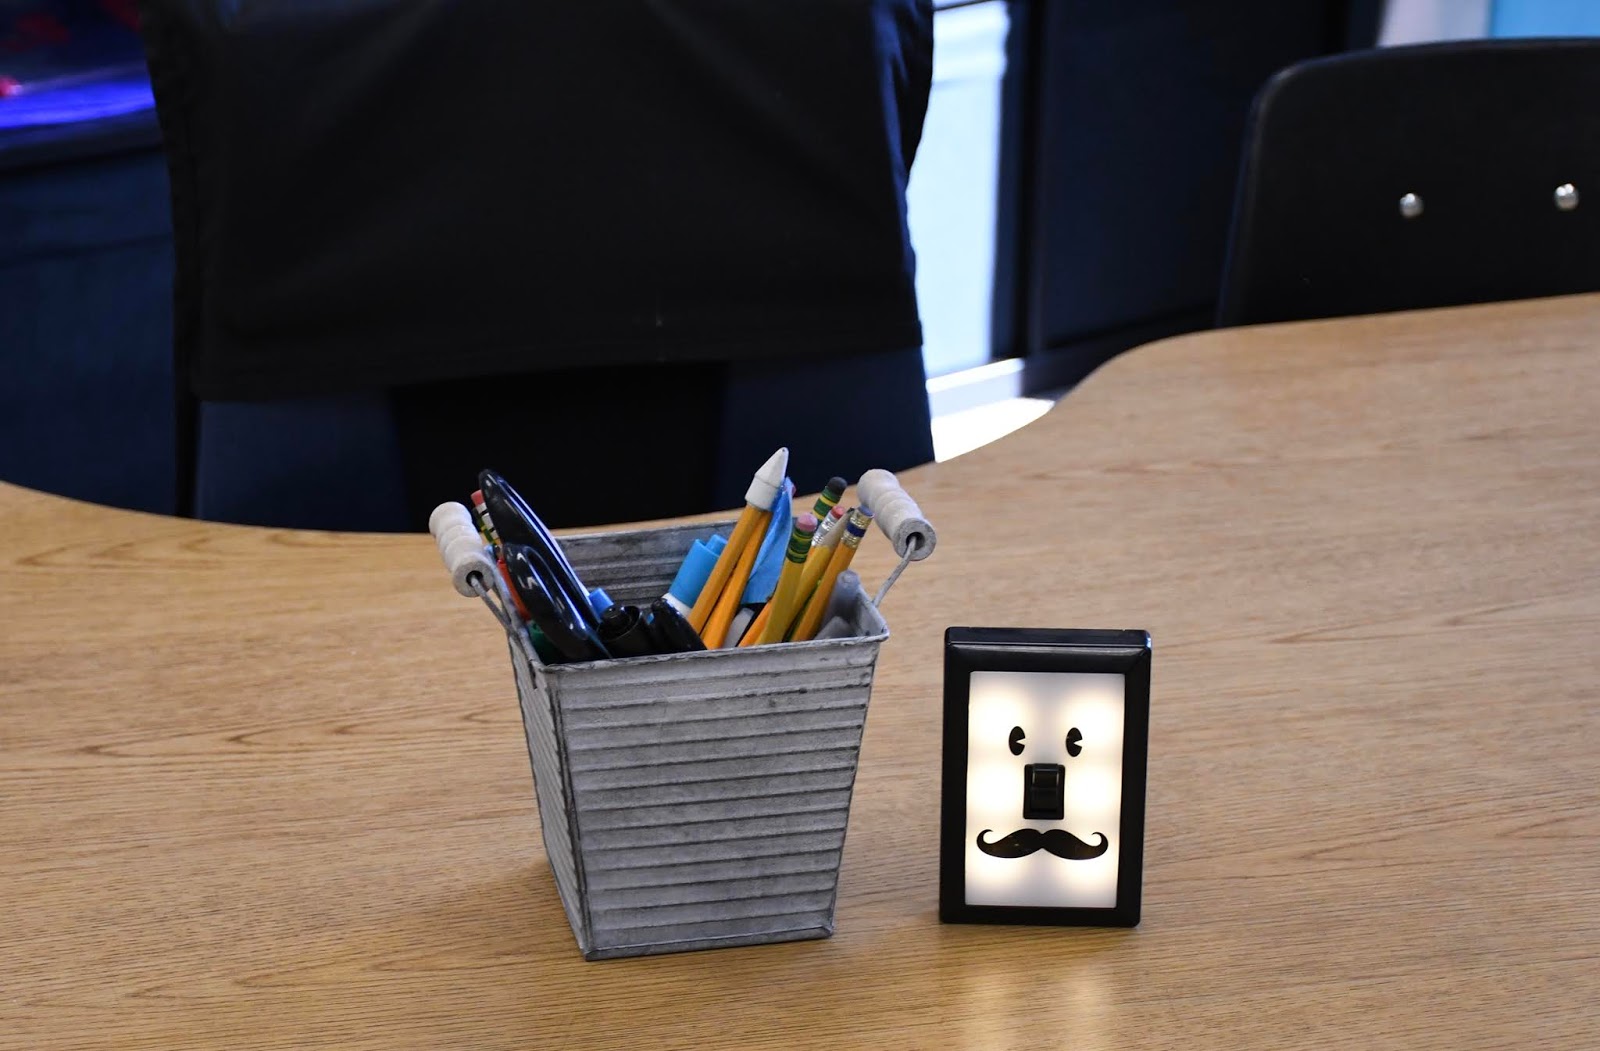
I got this super cute little light guy from Amazon. When the light is on, the students cannot interrupt. They love it! So far, they've been great about not interrupting!


Behind my small group table is where I keep my teacher stuff. I don't have a desk exactly, but I am not organized enough not to have a place where I put my stuff. There are 2 cube shelves put together from Ikea, and years ago my husband made the shelf that sits on top with basket drawers and little cubbies for each subject across the top. I also have cube drawers on the bottom, and I'm doing my best to stay organized with this great set up! 


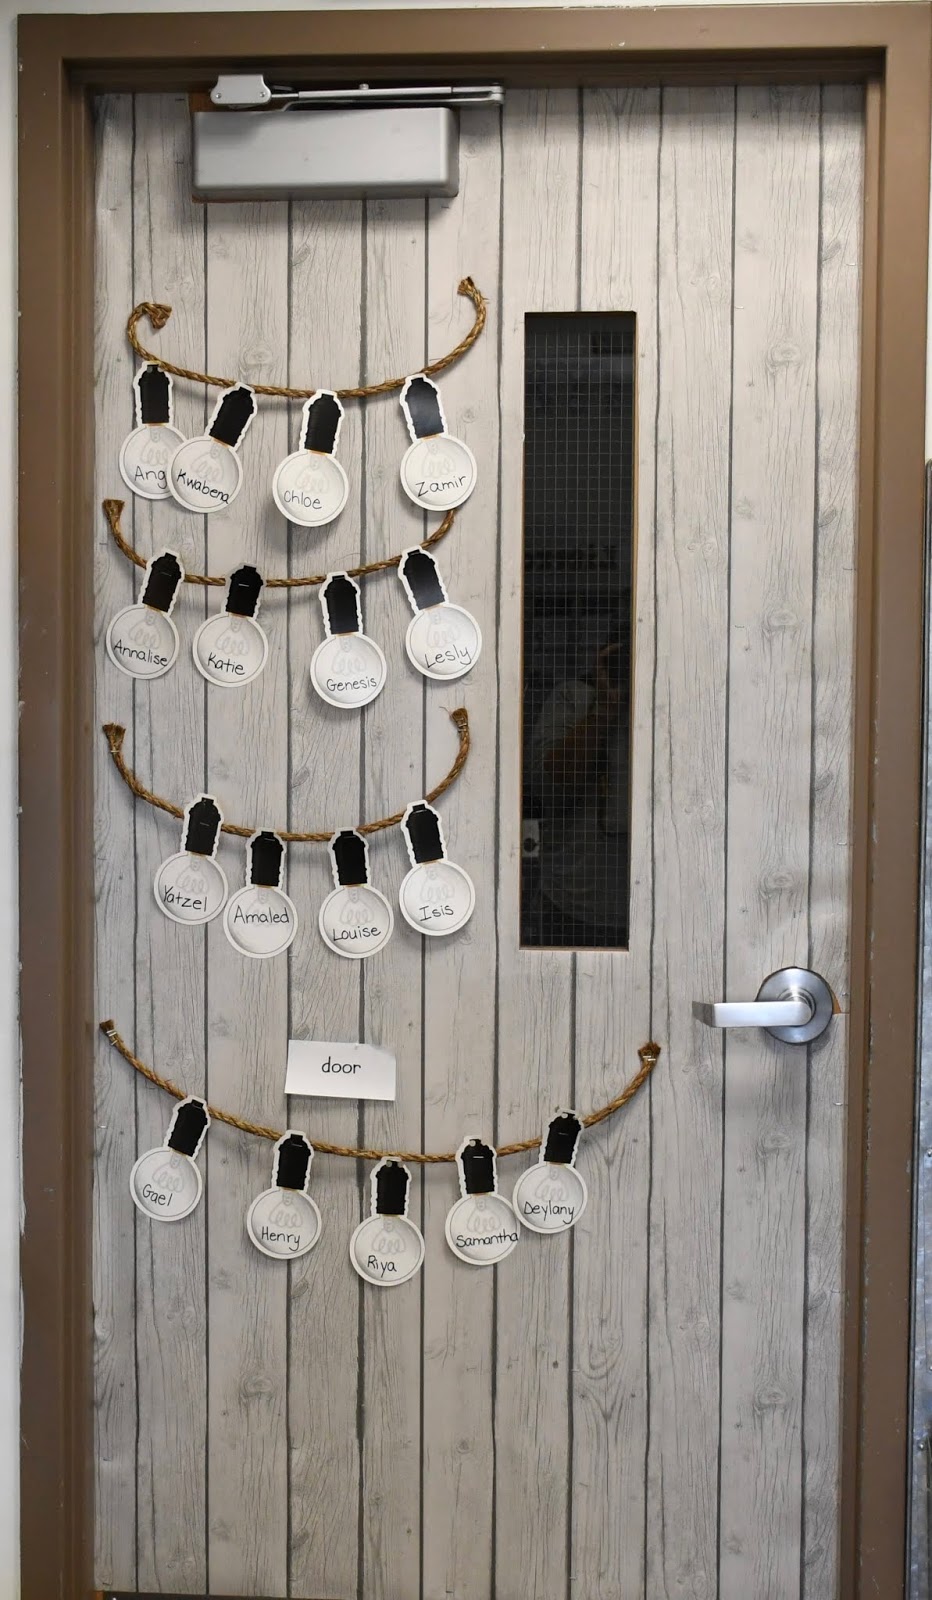
And this is my door with student names on the light bulbs (minus a few that fell off). I am loving my classroom, and so are my students! Although it gets a little messy at times, we have done a pretty good job of keeping it clean and cozy. It's going to be a great year!


0