Teacher Stuff: STEAM

Showing posts with label STEAM. Show all posts

3 Back To School Books With Creative Gifts & Activities For The Beginning of The Year


This post contains affiliate links for your convenience. That means I get a small commission if you use my links to buy something, but at no cost to you.

Are you looking for a back to school gift to start the year off "write"? Try tying tags onto a pen or pencil that say, "You are just 'write' for our class!" I give these to my students before school starts. We have students come in to do assessments before the first day of school. They come in small groups, and they are usually pretty nervous. I start by reading the book A Teacher's Top Secret. I found this book last year, and it is awesome! It tells the students a big teacher secret––that we pick them to be in our class because of all the special gifts they have to offer our classroom family. It talks about how sometimes it gets pretty heated and teachers throw down over the students to make sure they get them in their class! It's really cute. After we read the book, it's time for them to start their beginning of year assessments. I give them their pen and tell them it is a special pen that will help them do their best! 

You can download the tag for free here in my TpT store. I print the tag on different colored AstroBright card stock and use a 3 inch circle punch to cut them out quickly (Note: You have to cut off some of the extra paper to get the hole punch close enough to cut out the circle perfectly). These tags are made for the 3 inch punch. Then I use a regular hole punch in the top and curling ribbon to tie it onto the pen. These are some of my favorite pens to give the students. They love them! 


This year, I'm adding this little fairy or elf door to my classroom. I'm going to let the kids know that we have some magical friends that live in our classroom who left the pens for them to use during their assessment days, and I will show them the little door. I will let them speculate on who or what could be living there! Once school starts, one of our first units is fairytales and folktales.  After I read The Elves and the Shoemaker by Jacob Grimm and Jim LaMarche, it will lead us to the discovery that we have magical elves that live in our classroom. Our elves will leave little notes, drawings, and words of encouragement sporadically throughout the year. I think we'll also have some visits from their cousins from the North Pole around Christmas time and their friends the leprechauns will visit around St. Patrick's Day and play tricks on us!


2. Lubna and Pebble by Wendy Meddour:
Make a Bed For Pebble


Lubna and Pebble is a beautiful book that I love to use to start off the year. It is about a little girl who is a refugee (it doesn't specify from where) who comes to a new country, and she feels lonely and scared. Her best friend is a pebble that she holds when she is scared, and she talks to it when she is lonely. When they make camp and pebble is cold, dad helps Lubna make a cozy bed for pebble. When a new boy joins the camp, Lubna becomes his friend because he is lonely and scared too. When it's time for Lubna to leave the camp, the boy doesn't want her to go. She leaves her best friend pebble with him so he has someone to hold onto when he is scared and talk to when he is lonely. It is a very touching story of friendship that is beautifully written and beautifully illustrated. 

After reading this story, we talk about who feels a little scared and lonely in a new classroom. Then I pass out a pebble friend to them to hold onto when they feel that way. This is a gift that is super special to kids EVERY time. We bust out the STEM supplies next, such as cardboard tubes, egg cartons, small boxes, etc. and I let the kids build a bed for their pebble. When they're done, we all go around and introduce ourselves and share our bed creations, then I let kids go back and make adjustments if they got new ideas from other classmates. I encourage them to collaborate with each other on their modifications as we also build classroom community. This is always an amazing first day activity that leaves kids feeling excited about coming back to school.


3. Scribble Stones by Diane Alber:
Scribble Stones


Scribble Stones is a great follow up to Lubna and Pebble (I typically do it several days later or the following week). Scribble Stones is a book about this stone that has waited his whole life to be chosen for a special job only to become someone's paper weight. It's disappointing until one day these scribbles use all the paper in the office. The stone has a great idea, and the scribbles use him to create their art! In the back of the book, the scribble stone project is explained: You find a stone, add some art, and then pass it on to someone else to spread kindness in the world. They add more art to the stone and pass it on too. It's a great way to start a chain of kindness. At the beginning of the year when we go over classroom rules or the school PBiS letters, kindness is always incorporated.

I usually get 3 - 4 inch stones for every student in my classroom from a local landscaping company since they are so heavy, but I put a link to some stones here that should work too. I have the kids use colored sharpie markers to decorate their stones. I used paint one year, and it was pretty messy and didn't stay on the stones, so sharpies work better for me! After the kids finish decorating their stones, we decide who to give them to in order to spread kindness. This can be tricky because beginning of the year 2nd graders are really still first graders, and they want to keep their stone. We really have to emphasize kindness and decide as a class how to pass them on. It helps that they got their own stone to keep with the Lubna and Pebble activity, but this is a big and cool stone! Two years ago we decided to share our stones with parents by putting them out by the front door of the school. Parents could not enter the building due to COVID, so we thought they would appreciate our beautiful stones in front of the school when they picked up their kids. Last year we decided to give our stones to kindergartners. My class thought they were probably afraid to start school for the first time and having a scribble stone would make them feel good about school. I can't wait to see who my students decide to share them with this year!


I have done these beginning of the year activities with my students for a few years, and they are always a huge hit! They are great ways to build classroom community and start off with some fun! 
0

The Top 5 Things I Can't Wait to Try In My Classroom (ISTE)

This week I got to attend #ISTELive, which is the biggest educational technology conference in the country. This coming year I'm transitioning out of the classroom (again), and I will be a technology teacher and librarian and incorporate a maker space in the library. That's what I had in mind while attending this conference, and I am so FULL of ideas because it's always very inspiring (and overwhelming) at a conference like this! Here are the top 5 things I can't wait to try in my new classroom after attending this conference! 

This post contains some affiliate links, which means that if you purchase something using my link, I get a small stipend, but at no cost to you. It's an easy way to show your support if you like my blog!

5. Digital Citizenship: Cyber Sleuths Book Series 

I had a chance to see some early chapter books in the new Cyber Sleuths book series by Thomas Kingsley Troupe. Two books in the series, The Sasquatch Suspect and The Sham City of Atlantis, will be available to buy in August, but I got to buy and read The Sasquatch Suspect this weekend. I am already loving this series! Although it says it's for grades 4 - 6, I would say it's more like a 2nd - 3rd grade reading level. 


In The Sasquatch Suspect, Cliff is on a summer weekend getaway with his parents and his little brother at a Lake in Washington. On the drive to the lake, they see a billboard that says, 'Coming Soon? Sasquatch Shack.' The Malarks are people who claim to have taken the best picture of Bigfoot to date in those woods in Washington, which apparently is the heart of Bigfoot land. They want to build a Sasquatch shack for people to visit and try to get a glimpse of Bigfoot. They later release a sound clip of Bigfoot, then a video too. They have a FastFund Page (like GoFundMe), and they are trying to get 2 million dollars to build their Sasquatch Shack. Cliff's 9 year old brother is scared of the idea that Sasquatch is living in the woods where they are staying, but Cliff isn't sure he believes it. As part of a world-wide group of kids who call themselves the Cyber Sleuths, Cliff does some online investigating to see if the evidence is real. In this story, Cliff gets help from Galina who lives in Ukraine, and Ola from Nigeria (I believe you meet other members of the cyber sleuths in other books). Together they analyze the evidence to see if it is trustworthy. I love how the investigation is done in the book. They are respectful of people's ideas and beliefs, so they don't dismiss the idea of Bigfoot, but they do dig into the evidence to see if it is reliable. That is just what we want students to learn to do with information they find on the internet! In the back of the book, it says how being a cyber sleuth connects to the ISTE standards. I love how it uses modern day problems and technology to thoughtfully investigate the validity of a problem. I think it will be very appealing to 2nd-3rd graders, and I plan on reading it aloud during library, then connecting it to digital citizenship lessons in technology. It lists resources in the back of the book including Be Internet Awesome, which is a free resource from google that was a new resource to me. It has digital citizenship lessons and games that I'm looking forward to trying. This is also a great tie-in to depth and complexity. I always use Bigfoot to introduce the idea of unanswered questions. This definitely raises an ethical question as well when people try to use digital tools to trick other people.


4.  STEM Materials: MakeDo Cardboard Kit and Strawbees

MakeDo may not be new to you because I think they've been around for a little while, but it was new to me. I could not believe how easy it was to cut and screw together cardboard with the MakeDo tools! We use cardboard to create things in my room all the time, and this was so easy and safe. It has no sharp edges to cut kids, but it works like a dream on cardboard. Anyone who has ever tried to cut cardboard with student scissors knows how valuable this is! Since we are creating a maker space in the library, it's going to be a must-have for me. You can get the MakeDo cardboard classroom kit on Amazon, and it has 14 safe-saws, 7 scru-drivers, 7 fold rollers, 240 scrus, 80 scru+, and 12 mini tools to punch holes. You can get smaller kits too, but this is perfect for table groups.

Strawbees were another cool new tool to me! They are straws that have connectors that allow you to build a lot of different things. They can even be moveable which is pretty amazing! There is a free teacher resource called Classroom Strawbees which has lesson plans, webinars and courses for teachers. They are very detailed lesson plans, such as the Boreal Forest Biome lesson written by the Strawbees team. From the lesson plan: The Boreal forest biome, also known as Taiga, is an expansive-forested region situated in the Northern Hemisphere. Distinguished by its coniferous pine and spruce trees, the Boreal forest experiences a prolonged period of cold temperatures lasting for several months. This forest provides habitat for various wildlife species such as bears, moose, moss, and reindeer. The objectives are:

  • Imagine – Discover the characteristics of a boreal forest biome by trees and cold temperatures providing habitat for various wildlife species.
  • Build – Make a moose wandering through the vast boreal forest biome.
It includes vocabulary words to focus on, information, pictures, and a quiz, as well as build instructions with a lot of pictures. It's well put together! There are also some awesome physical science lessons for simple machines, and so much more! Now the STEAM School Kit comes with over 4,000 pieces, but it's pricey. However, the free detailed lesson plan resource makes it worth it in my opinion, and I am going to suggest my school invest in it. 

Another super cool thing about both MakeDo and Strawbees is that you can combine them with things like micro:bit or a Bird Brain Hummingbird Classroom Kit and turn your cardboard and straw creations into animated robots! With the Bird Brain Hummingbird kit, students can use a variety of programming languages to program it too. While some of this can get a little pricey, it's a great way to have a variety of building tools that can be used all the way across grade levels, and it can be used with other materials for endless options!


3. Quizizz: Not just quizzes anymore!

I have been a fan of quizizz for awhile, but their new updates blew me away! If you haven't used quizizz before, it is a game-based quiz, similar to Kahoot. Now, however, they have upped their game! They have interactive lessons (not just quizzes), and there are multiple options for students to answer. There are questions such as drag and drop, open text, reorder, hot spot (i.e. click on the spots on the shape that show a right angle), and so much more! Also, you can use a video you made or a youtube video, a pdf worksheet, or google slides and drop it into your lesson or quiz. Then there is a button where AI will help you generate questions based on the video, worksheet, or presentation you added saving you a ton of time! It's amazing! Better yet, you can make accommodations for students. It can read the questions to students who need it,  it can give extra time, or even assign fewer choices when picking an answer (2 choices instead of 4). No other students know about the accommodations, and all students can participate and be successful on the same quiz or lesson in a way that maybe they couldn't before. I got game changer certified so I could see what all the options were in Quizizz. It's free and it only takes about a half an hour. It takes you through their lessons/quiz to learn what it has to offer. You get to experience it like a student, and I LOVE that if you don't know an answer that there are multiple formats to use that will teach the answer. You can even make it adaptive! I suggest getting game changer certified too. I can't wait to try these with students!


2. Digital Breakout Rooms With Genially + ChatGTP

I had not tried genially before, but basically it's a  much cooler presentation format that includes animation, music, and you can even make digital breakout rooms with their premade templates. Breakout rooms, like Breakout EDU, are game-based adventures where students have to solve puzzles in order to break out of a room or into a lockbox. It's a fun way for them to review and apply skills they've learned. For example, they may have to solve multiple math problems, and the answers to the math problems are the code to open the locks. I've had fun making breakouts with students, but especially when using the physical locks, it can be a lot to undertake. With genially, they have premade templates that are already engaging–just add your content. They solve different puzzles to be able to move on to the next clue, but it doesn't involve any physical locks. The part that really blew my mind was using ChatGTP, a free AI tool, to help me create it! Now if you're new to the AI (artificial intelligence) world like me, I had heard the hype, but I didn't really know what to do with it. The key is being very specific. Since I am teaching library next year, I thought it would be fun to do a breakout in the  library. 

Here is what I typed into chatGTP: Expert Role: You are an instructional strategy and curriculum expert in CO, as well as an experienced K-8 teacher. You are also proficient in designing engaging and educational digital escape rooms using Genially. Task: Create a student-centered digital escape room for second grade library. The escape room should include various interactive challenges that align with the learning objectives and keep students engaged. Each interactive challenge should be laid out explicitly to be created within Genially. Constraints: This digital escape room should take approximately 20 minutes for students to complete. Level: This should be an INTRODUCTION activity. Include: [Student-friendly learning goals: Clearly state what students should achieve by completing the escape room. Student-friendly directions: Provide clear instructions on how to navigate and complete the escape room.

Here is what I got back: 

Title: "Library Adventure: The Quest for Knowledge!"

Student-friendly Learning Goals:

  1. Learn how to navigate the library.
  2. Understand the different sections of the library and what they offer.
  3. Practice using library resources, such as the catalog and book sections.
  4. Develop teamwork and problem-solving skills.

Student-friendly Directions: Welcome to the Library Adventure! In this digital escape room, you will help guide our friend, Lucy the Librarian, through the library. She needs to find special items and solve puzzles to unlock the secret door. Work with your classmates, follow the clues, and use your library skills to complete each challenge. Good luck!

Structure of the Digital Escape Room:

  1. Introduction Scene:

    • Description: A welcoming screen with an image of Lucy the Librarian at the entrance of the library.
    • Interactive Elements: A start button that transitions to the first challenge.
    • Instructions: Click the start button to begin your adventure with Lucy!
  2. Challenge 1: Library Map Puzzle

    • Description: Lucy needs to find the reading area. Students are presented with a jumbled library map.
    • Interactive Elements: Drag-and-drop pieces to complete the map.
    • Learning Objective: Understand the layout of the library.
    • Instructions: Drag the pieces to complete the library map. When you're done, click the check button to see if you're correct.
  3. Challenge 2: Dewey Decimal System Match

    • Description: Lucy needs to find a book on animals. Students must match book topics with their Dewey Decimal numbers.
    • Interactive Elements: Matching pairs game.
    • Learning Objective: Familiarize with the Dewey Decimal System.
    • Instructions: Match the book topic with the correct Dewey Decimal number. Click on the cards to flip them over and find the pairs.
  4. Challenge 3: Catalog Search

    • Description: Lucy is looking for a specific book. Students are shown a catalog search bar and must find the book by title or author.
    • Interactive Elements: Simulated catalog search with dropdown options.
    • Learning Objective: Learn how to use the library catalog.
    • Instructions: Use the catalog to find the book Lucy is looking for. Type the title or author and click search. Choose the correct book from the results.
  5. Challenge 4: Book Sections Sorting

    • Description: Lucy needs to organize books into their correct sections: Fiction, Non-fiction, Biography, and Reference.
    • Interactive Elements: Drag-and-drop books into their corresponding shelves.
    • Learning Objective: Understand different sections of the library.
    • Instructions: Drag each book to the correct section of the library. When all books are sorted, click the done button.
  6. Challenge 5: Secret Code

    • Description: Lucy finds a locked box that requires a secret code. The code is hidden in a riddle.
    • Interactive Elements: Riddle-solving with text input for the code.
    • Learning Objective: Develop critical thinking and problem-solving skills.
    • Instructions: Read the riddle and find the secret code. Type the code into the box and click unlock.
  7. Conclusion Scene:

    • Description: Lucy has unlocked the secret door and found a treasure of knowledge!
    • Interactive Elements: A congratulatory message with a button to finish the escape room.
    • Instructions: Click the finish button to complete the adventure and see your certificate.

Additional Notes for Implementation in Genially:

  • Use engaging visuals and sounds to enhance the experience.
  • Include hints for each challenge to support students who might need extra help.
  • Ensure all interactive elements are easy to use and accessible for second graders.
  • Provide a printable certificate of completion at the end of the escape room.

This digital escape room is designed to be interactive, educational, and fun, keeping second graders engaged while they learn important library skills.


Wow! Now I still have to build the genially escape room, but it saved me a lot of time coming up with the ideas of what to put in my escape room. Feel free to copy and paste my instructions to chatGTP and change the parts that need to fit your lesson. 


1. AI: Padlet, Adobe Express, Adobe Firefly

You can probably guess that AI (artificial intelligence) was a big theme at the technology conference this year. AI is definitely dominating a lot of conversations, not just in education, but world-wide. Before this conference, I knew that I was worried about the ethical implications of AI, even if I didn't know exactly what they were (I've seen iRobot). But truthfully, I didn't know enough about AI or how to use it to really articulate my thoughts about it. Now that I've had a chance to try it and understand what I can do with it, it's pretty awesome! First of all, one important thing to emphasize is that the AI available to us right now, at least what I played with, is not the evil take-over-the-world kind of technology. ChatGTP, Adobe Firefly, Adobe Express, Padlet cannot teach students in my place. It just can't. This type of AI HAS to be driven and implemented by a person. It's a tool, like a toaster. A toaster cannot toast bread unless someone puts the toast in and turns it on. It just can't make breakfast by itself while I'm asleep. This is the same. And like a toaster, microwave, dishwasher, etc., it can save us time! And it opens a whole new door to creativity too. Another concern is, can students use it to cheat? Yes. They could ask chatGTP to write them a paper that was written by a 5th grader about the Civil War (but let's not give them any ideas!). However, did students cheat before AI? Yep. Our tools may be more sophisticated, but the ethical issue is as old as education. Keeping them away from the technology won't teach kids not to cheat. Parents and educators still need to work as a team to teach children right from wrong. Because it doesn't matter if we like it or not, our children exist in a world with AI. We can teach them how to use it ethically and responsibly or they will figure it out on their own.  

  • Padlet: I've always been a fan of padlet! It is like a page of interactive sticky notes that can be shared among a class. You can add words, links, images, add videos, etc. Now you can also add things from your google drive, create a poll, or you can generate images using AI! Just click on the words "I can't draw" in your padlet and tell it what you want. The picture above is something I created in Padlet using AI to share a favorite story. I told AI that I wanted a cartoon elephant with a bird on its head.

  • Adobe Express: This is great for making posters, flyers, social media posts, or videos with still pictures. It has some fun new features, and students can have their own free, secure account. As a get-to-know you activity, try having students create a poster with their name and include things that describe themselves. I used AI to create my name with text effects. I chose a background with mountains because that is my favorite place to get away. I chose elements around the outside of my name that are important things to me, and I picked music with a strong drum sound because my son plays the drums. This can be fun practice using Adobe Express to have students share about themselves. Later in the year this can be an option to create a poster for a book report, a vocabulary word, or an advertisement for a national park (4th grade standard), or your state.


  • Adobe Firefly: This has been the one I've had the most fun playing with! Adobe Firefly is a generative AI program that is free for educators and students. It lets you type words that it will turn into an image, remove images in an existing picture (are there pillars in the way? Just remove them and AI will fill in the missing parts), and more! The power of this tool is that you can create unique images that could not be found anywhere else. Are you writing a story with students that involves a bee that plays the flute and wears little red boots? Just type it in. Does someone in your story fall through a magic portal and land in a purple forest with blue flowers? You can create it. Of course you can always have students draw their unique ideas too–this is just another option. And I learned the hard way that you only get so many credits a month for free, so if you keep tweaking your wording to try again, you'll eventually run out of credits for the month and have to wait for more! One of the ways I'm looking forward to using this is by creating characters and props that I will print and use in a retell center (for my younger students). I will have setting options that they can use like a kinetic sand tray, glass beads, rice, beans, etc. They can add rocks, wood, seashells, insects, etc. and use characters I generate to create scenes where they tell or retell a story. The pictures above can be for retelling a fantasy story, but there can be non-fiction stories as well. Students can share a report with facts they learned by creating a habitat and adding animals and plants that would be included in that biome. They could create stop motion videos or design a zoo. There are so many ways to get creative!
I hope you found some things that you want to play around with and give it a try too! 
0

Teacher Stuff Newsletter #5: The STREAM Edition


Here is the Teacher Stuff Newsletter #5: The STREAM Edition. You have probably heard of STEM, which stands for Science, Technology, Engineering, and Math. You may have heard that you can incorporate Art to get STEAM. Well, when you also incorporate Reading, you have STREAM! What better way to incorporate a STEAM lesson than to base it on a picture book? Here are some easy ideas to get you started. If you click on the books it will take you to an affiliate link. This means if you buy the book using my link, I earn a small commission, but at no cost to you. But you can always check these books out at the library too!

0

Classroom Reveal!


This is a bit late, (we started school in the middle of Aug., so this is a room that has been used for a month and a half) but better late than never! I have gone back into the classroom after being a tech coach for the last 6 or 7 years. This year I am teaching first grade, and I am really excited to incorporate flexible seating and a maker culture in my classroom.  Last year, I got to hear keynote speaker Dr. Robert Dillon, author of The Space A Guide for Educators. He talks about the brain research behind designing a classroom with purpose and using the space intentionally. In his article 7 Tips for Moving From Decorating to Designing Classrooms, he says, "Ideally, schools would be taking time to study and design with intention spaces that support excellent learning." Going back into the classroom with a plan for how I wanted students to use the space in their learning gave me a chance to design my new classroom with some key principles in mind. Here is my classroom . . .


I used an intentional color palette instead of a theme–I was going for a cozy farmhouse feel where the students and I will enjoy spending time. Dr. Dillon says, "Research continues to emerge that an intentional color palette enhances learning. Too many spaces look like a bag of skittles exploded with every color of the rainbow represented in the rugs, furniture, and items on the wall. Designers are looking for a base color with a couple of accent colors. Classroom decorators, though, are adding flare and pop, and this rarely helps with the focus or calm of a space." This brain research has actually been around for awhile. In 2005, Eric Jensen published Teaching With the Brain in Mind. His research stated that warmer colors such as red and yellow stimulate students, and cooler colors such as light blue have a calming effect. 

I did a makeover in 2011 after taking a class about how to use brain research to create an inviting classroom. I wrote this advice on my blog which I learned from my class at that time, and it still rings true: "Decorate your classroom the way you would decorate your house. Would you splash bright blue, yellow, red, and green on your walls at home? Then you shouldn’t do it in your classroom either. Pick 1-2 main colors and an accent color. Make it something that makes you feel comfortable because you do spend 7 hours (ha! Usually more) a day there. Use color to draw attention to what you want your students to focus on. When that learning focus is over, take it down and highlight something new. The novelty of changing what you hang on the wall keeps things interesting and it keeps students attention. I wasn’t sure about this at first. I’ve heard it all before, but I was sure my students liked all the bright colors and stuff on the walls, and they probably did. But if my purpose is to emphasize a particular skill or concept, having lots of “stuff” everywhere wasn’t helping me accomplish that. Too much visual clutter can be distracting and then students don’t use it as a teaching tool. Effective teachers focus on one concept or theme to make a students’ understanding deep, not a little bit everything all at once." You can see my first makeover and advice here on my old blog

This time around, I had already gotten rid of a lot of my "stuff" from being in the classroom before, and I am determined to keep things decluttered so the space feels big, open, and inviting. I kept the blue accent color I had in 2011 for a calming effect, but I updated the look of my classroom with a softer gray and white shiplap. The gray rug is from Amazon, and it ties the room together nicely! 


Our school got new cloud tables this year, which I LOVE! They seat 6 students per table. I have 2 tables that are chair height and 2 tables that students sit on the floor to use. They are free to move to whatever space best meets their need depending on what they are working on, as long as they are making good choices. I also have spaces around the perimeter that are less collaborative work spaces that seat one or two students because they need the option for time to work by themselves as well. Dr. Dillon writes, "It is essential that students can choose the seating that meets their learning task and their learning style, but adding neat items to the classroom for novelty will get the undesired effect of students focused on furniture instead of their future."

Empowering them with the choice of where they work is going really well! Of course there have been times that I have needed to choose for some students who weren't making good choices, but honestly, I think my students are more productive when they get to decide what best meets their needs. It's less of a power struggle, and it helps students become more aware and self regulate what they need to do their best learning.

I found the supplies caddies on clearance at Walmart at the end of the summer for $5. Score! They were picnic caddies that were supposed to hold ketchup, forks, etc., but they also work great for our pencils, dry erase markers, glue, and sticky notes!


This is the front of the room. On the left is a chalkboard schedule for my students. My husband made the chalkboard, and I put up words, pictures, and clocks so the students can keep track of when things happen throughout the day. I didn't want a million questions about when recess begins, so they are responsible for looking at the hands on the clock to figure it out. Even if they don't know how to tell time, they can look at the hands on the clock to see where we are in our day and what is coming next. So far, it's working!


This is the front of the room where we gather. I found the chair and the little shelf under the board at Good Will. They just needed a little cleaning and some paint! The pillow that says "gather" and the crate next to the chair with our read aloud books are from Hobby Lobby. The clock is to help students manage their time. I can color in how many minutes they have to complete a task using a dry erase marker so they can see the time elapse. This is a tip I learned from a class I took this summer about helping students self-regulate and organize. It's really helpful!


On top of the little shelf are 3 plastic jars that say "Save, Spend, Give," which is part of our Social Studies standards. We have SOAR bucks as part of our PBiS program, and when students earn one, we put it in our "Save" jar. As a class, we vote on how we want to spend our money using the option board above. 


This tall table is off to the side of the board where I keep my computer and a tall stool. My computer can connect to the projector wirelessly with a screen beam, so I use it as my doc camera too without all the wires and mess! I can just pick up the tablet part of my computer and walk around the room while writing on it, and it projects on the board. It's awesome!


This is part of my classroom library. The shelf in the middle was made by my husband years ago when I was a classroom teacher before. The shelf on the right is from Ikea, I just turned it on its side so I could display books. I got plate or frame displays from the dollar store to display the books. The shelf on the left hand side is also from Ikea. I use it to hold specific authors we like to read. The wall behind the shelves is an ugly collapsable wall, so my husband and I covered it with shiplap paper I got from Lakeshore (yep–I'm a big Fixer Upper fan!). This fadeless paper is thicker than normal paper, and you can even write on it with a dry erase marker. I use the big sticky note chart paper for our anchor charts from the Units of Study Reading, Writing and Phonics lessons. It can come on and off that shiplap paper easily, so I can move the anchor chart around. I love the sticky notes from these programs because I can put them up when they are our teaching point, and when we move on to new teaching points, I put the sticky notes in a folder full of blank paper so we can reference it if necessary, but we don't have to have it taking up space and distracting us from our main learning target.


On top of my bookshelf is a framed print illustrated by Peter Reynolds. It says, "I Love My Library." I was so excited when I found these from thedotcentral.com. You can order them, and even have them autographed! 


My library continues around the corner with a comfy leather chair I got for free on Facebook Market Place, and a pillow from Hobby Lobby that says, "Let's Get Cozy." 


This is my son who couldn't resist reading a book in this space. There is a basket full of stuffed animals next to the chair that make great reading buddies!


There are 2 shelves from Ikea laid down end to end to form a bench with pillows on top that the students sit on, especially during independent and buddy reading time. Under the bench are more books separated by genre and author. Above that is the word wall. On top you can see the 3 verbs I chose to describe the kind of learning that I want to happen my classroom. Dr. Robert Dillon inspired me during his talk when he shared his idea about choosing 3 verbs: "Design requires a human-centered lens that allows you to understand the true purpose of a space. When teachers and leaders know the verbs of their space, they have a deeper level of intentionality. Is your space designed to explore, investigate, and discover? Is your space designed to create, make, and tinker? This clarity makes decoration seem like frosting instead of missional." He also talked about how much of the space in your room is really for the students to use, and how much is unintentionally off limits because it's full of your "stuff." I'm determined to have less "stuff" so I can give more space to the students. I'm keeping my "stuff" digital as much as possible so it doesn't become clutter!


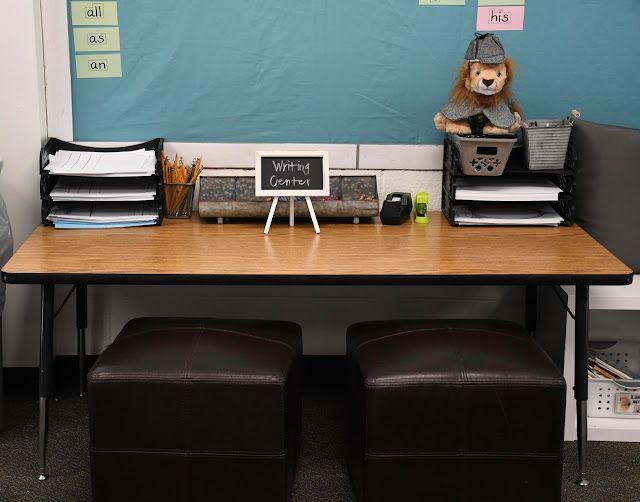
The writing center is also under the word wall, and it has writing tools that the students use everyday. There are blank books with different kinds of paper that the students write their stories in, pencils, crayons, tape, a stapler, and of course Rasheed, our class mascot (from the Lucy Caulkins Phonics program). We are currently word detectives, so he is dressed like a detective!


I got these cute little chalkboard displays on clearance at Michaels this summer, and I used a chalk marker to write on them. 


This super cute crayon caddy is from Hobby Lobby. I got the idea for a crayon caddy from my teammate, Kelsey at Teaching Tiny Techies. If a student loses a crayon, they just get another one. If we find some on the floor, we just put it back in our crayon caddy. It's just not worth the time to figure out whose missing crayon is on the floor!


On the other side of the room are my STEAM bins. These little white baskets (from the Dollar Tree) hold STEAM activities I found from Sarah Cooley on TpT. We have a soft start, which means that students can come into the classroom anytime between 7:40 - 8:00 before the bell rings. They can grab these activities and work on them until the bell rings. We also make time on Friday for students to do these STEAM activities if they have done their homework. They absolutely LOVE them! It's incredible! Create is one of my classroom words, and incorporating STEAM is important to me because I think it is so valuable as a learning opportunity for kids. Dr. Dillon says, "If we keep designing makerspaces, isolated from classroom learning, with no plan to close them in lieu of a maker culture, we are building this decade’s computer lab. We need to instead think about creating a culture of making in every classroom. This doesn’t mean that we are putting 3D printers in every classroom, but maybe we are adding cardboard and low-tech creation items in all spaces. Allow students to showcase their learning in a variety of ways. Don’t limit making to space or specific time of the day." One of the STEAM bins is just an open explore bin that has cardboard, bubble wrap, paper towel tubes, etc. Whenever a we empty a Kleenex box or a box that held snacks, it goes into that bin. They. Love. It! I had no idea just how important is to them to have open-ended opportunities to create, but I won't forget. They have created fidget tools that go into our calming corner, settings for stories that we have read, and more. 


I got another print from Peter Reynolds that is hanging in the STEAM area. It autographed to my class!


This is my technology center.  This is a sitting table with cushions my mom made (thanks mom!). The headphone/iPad stands are from Ikea. We use it for uploading our learning to Seesaw, reading or listening to reading with Epic! and eventually Overdrive, and I also have 2 Osmos that the students have used for math, sight word practice, and coding. They are amazing learning tools! I also have 5 chromebooks that we sometimes use for websites connected to our math unit.


SOAR is our PBiS word which stands for Safe, Open-hearted, Achieve, and Resilience. I used the clock as the "O" in SOAR. The kids made a name banner that is hanging across the top of the board, and there are more flexible seating options you can see next to the technology center. The students love to sit on the floor using the lap desks!


This is my calming corner, which I call Australia from the book Alexander and the Terrible, Horrible, No Good, Very Bad Day. If the students are having a bad day like Alexander, they can visit Australia to self-regulate. There are fidget tools, a folder with self-regulation strategies when students are in different zones that make it difficult for them to stay focused (check out this resource from Kelsey at Teaching Tiny Techies for Self-Regulation Strategies), and this beautiful poem I found on Amy Ludwig VanDerwater's blog The Poem Farm called It's ok. If you haven't ever checked out her blog, it's amazing! She is a published poet that is the co-author of the poetry chapter in the Units of Study in Writing with Lucy Caulkins. She writes original poetry on her blog with students as her audience, and she records herself reading each one. She often has a follow up teaching point for students too. With this beautiful poem, It's ok, I have students draw something that they may not be feeling great about that is ok. Sometimes I decide students need to visit Australia too when they are having trouble self-regulating. 

This is a standing table that also has tall stools. The kids love to work here, not just as a place for self regulation, but to work too. I love that it doesn't have a negative connotation, and it can be used as a flexible space in our classroom!


Next to Australia is the math area. This shelf (and the matching shelf on the other side holding the STEAM bins) was made by my awesome husband. They hold our math tools and bins of Legos that we use for various maker projects. You can also see the little trash cans from the dollar store that we use when cutting or doing something messy to contain the trash!


With our flexible seating options, the students have a drawer in the back of the room to store their supplies. I tried a cheaper option for them to store their supplies, and it did NOT work. I suggest investing in these Trofast drawers from Ikea. I was not crazy about the yellow drawers (they had no more white drawers when I needed them), but the color is not too bad. They have other color options as well, they just didn't match my room! 😉


This is my small group area.


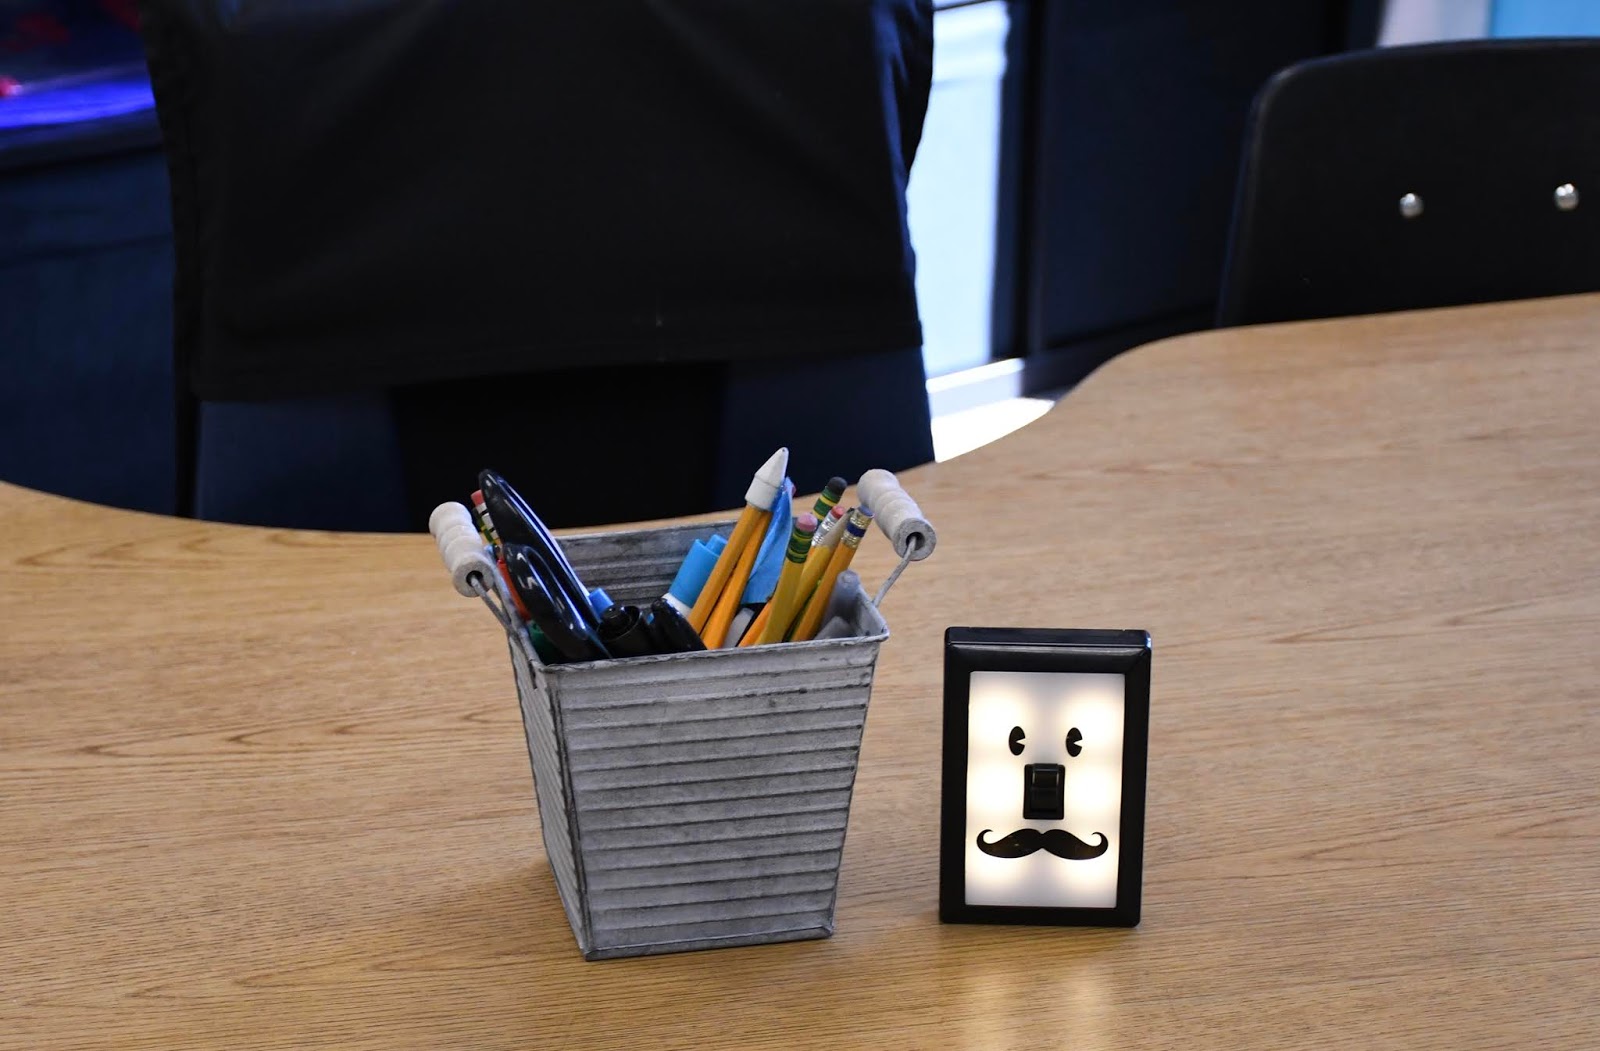
I got this super cute little light guy from Amazon. When the light is on, the students cannot interrupt. They love it! So far, they've been great about not interrupting!


Behind my small group table is where I keep my teacher stuff. I don't have a desk exactly, but I am not organized enough not to have a place where I put my stuff. There are 2 cube shelves put together from Ikea, and years ago my husband made the shelf that sits on top with basket drawers and little cubbies for each subject across the top. I also have cube drawers on the bottom, and I'm doing my best to stay organized with this great set up! 


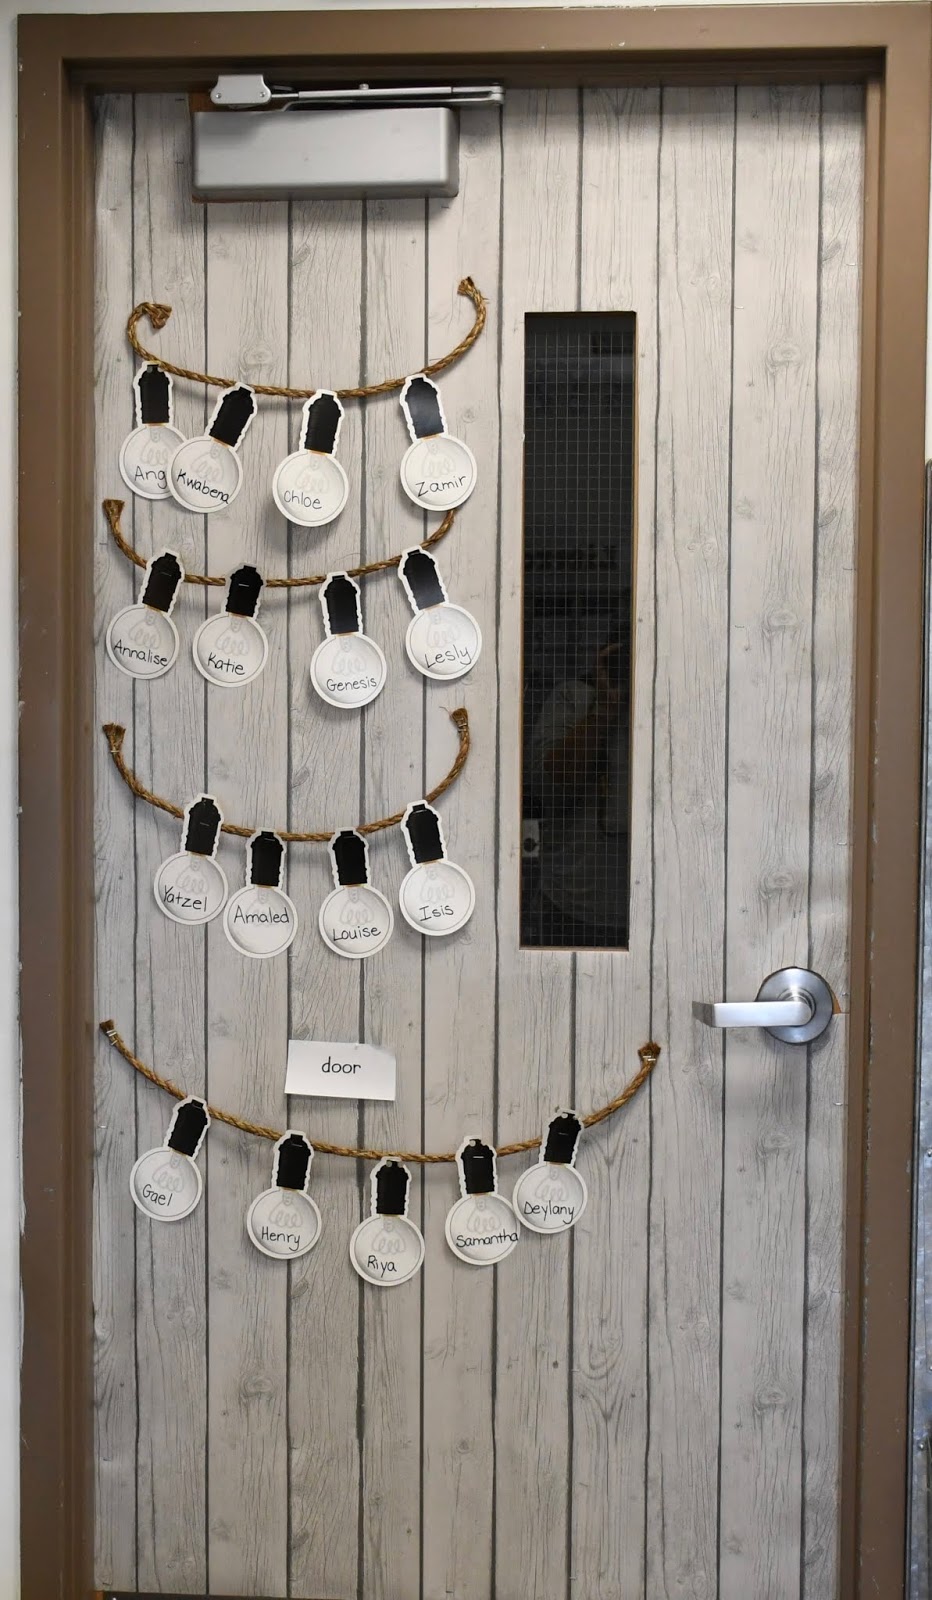
And this is my door with student names on the light bulbs (minus a few that fell off). I am loving my classroom, and so are my students! Although it gets a little messy at times, we have done a pretty good job of keeping it clean and cozy. It's going to be a great year!


0

Hands-On Learning With Green Screen


Kids today are expected to learn so much so fast and at a younger age than ever before, and both kids and teachers are exhausted! We have to cram so much learning in that there isn't enough time to let kids just play anymore.  But that is not healthy. The American Academy of Pediatrics published an article in September 2018 that stated, "Play is not frivolous: it enhances brain structure and function and promotes executive function (ie, the process of learning, rather than the content), which allow us to pursue goals and ignore distractions." 

So how do we stay focused on learning, but still incorporate the creative and innovative elements of open-ended play? I think hands-on opportunities for students to create along with STEAM elements that increase problem solving and innovation is a great place to start in the classroom! This summer I went to #geekcamp19 and I was inspired by a green screen class I took from The Marvelous Ms. M! A lot of the green screen videos we do in the classroom involve kids standing in front of the green screen themselves. That is a great way to incorporate green screen, but I hadn't really considered using things like legos or little toy figures to retell a story, so I am inspired to try a whole new type of green screen experience!

Image result for the reading strategies book and the writing strategies book

Two professional books on my reading list this summer are from Jennifer Serravallo: The Reading Strategies Book and The Writing Strategies Book. I am SO excited about these resources! They are like giant cookbooks for literacy goals. They outline strategies (many of which I already use) and include a common language for the strategy, prompts, and tips. I can't wait to use them this year! I decided to try integrating hands-on learning with the green screen to support some of the strategies in these books. Here are a few examples of how that could look:
This post contains affiliate links for your convenience, but at no cost to you. That means that if you use the link to purchase any items, I do receive a small stipend, but you pay the same price. Thank you for your support!


1. Reading Goal: Fluency - Make Your Voice Match the Feeling 

(from The Reading Strategy Book by Jennifer Serravallo)
    

Thanks to my mom and dad who donated the book Narwhal Unicorn of the Sea that came with adorable Narwhal and Jellyfish puppets, my son (who just finished 1st grade) and I read the first chapter of this book using the puppets and green screen! A collapsible green cube was our background, a green lego baseplate was the floor, and we each wore a green latex dishwashing glove to hold the puppets. (We have since learned that if the lighting is better, you do not see the gloves in the video.) I used this tip from goodwinnovate to add a pastel colored background using pic collage so it looks like the book. We had a lot of fun creating this video and really trying to match the feeling of the characters with our voice. Narwhal and Jellyfish are funny, animated characters that are a great fit for this reading strategy.

I also have the stuffed animal characters from Mo Willems' Pigeon, Piggy and Gerald (from the Kohls Cares program), as well as characters from the books of Oliver Jeffers, Pete the Cat, and Eric Carle's Brown Bear Brown Bear. These would all be really fun options for using the green screen with this  fluency goal!

2. Writing Goal: Generating and Collecting Ideas--Writing to Change the World!

(from The Writing Strategy Book by Jennifer Serravallo)

Reading Goal: Strategies for Thinking About Characters- Role Playing Characters to Understand Them Better

(from The Reading Strategy Book by Jennifer Serravallo)


My son wrote this story and drew the character puppets in it. I love that his story was about how to be happy! What a great platform to let students create videos about social emotional vocabulary or concepts that you're teaching. This would support the writing strategy: Writing to Change the World! After he drew and cut out the characters, we taped green straws onto them and used the same green cube, green lego base plate, and green gloves to tell the story in front of the mini green screen. Next he chose a background on google images as his background, but students could also draw their own background. Then after their green screen telling of the story, they could glue their puppet to the background they drew and add it to the words they wrote to keep as a paper copy of their story.

The same idea can be used in reading. Jennifer Serravallo writes, "Sometimes the best way to get to know our characters is to stand in their shoes--to do what they do, say what they say, and act how they act. With a partner choose a scene. Using puppets or props, act out the scene (p.172)."  This is a great opportunity to have students create their own characters using crayons, markers, paper and glue. You could also throw in wiggle eyes, jewels, and patterned paper if you want to let them get really creative! I have A LOT of scrapbook paper that I will never use, so I put it in the writing center and let the kids use it to create. You can also use other mediums to let them tell their story. If you look closely, you can see that we used clear light blue glass stones as a pond and little toy turtles as part of the setting. You can get a lot of inexpensive props like this at the dollar store so students can add details to their setting and then go back and add those details into their writing too. This technique would support the writing strategy from Serravallo called: Add More to Your Pictures (Then, Maybe More to Your Words!)


3. Reading Goal: Strategies for Understanding Plot and Setting --

Summarizing What's Most Essential

(from The Reading Strategy Book by Jennifer Serravallo)

On  Amazon Prime day, I got the boxed set You Are (Not) Small which includes 3 books by Ana Kang with stickers from each of the 3 stories. I put the stickers on green Astrobright paper and cut them out. Then I glued on a green popsicle stick so we could use the stickers to retell the story. We used the same green cube, lego base plate, and green gloves as the green screen backdrop. I also used the same tip from goodwinnovate to add a pastel colored floor and white background using pic collage so it looks like the book.


While I love the creativity of kids using crayons, markers, scissors, and glue to create the characters, sometimes, you just don't want to take the time for that. This is another fun, novel way to work on summarizing what's most essential. It also provides a scaffold for kids who are struggling with this strategy. If you give them pictures that support the most essential parts in the beginning, middle, and end of the story, it will help them focus on the important parts to retell. If you do not have stickers for a story, you can make copies of pictures in the book, or cut out the pictures from favorite stories that are falling apart. This summer, I weeded my book collection, and I had several favorites that had pages falling out. Instead of throwing them away, I decided to cut out the characters for students to use when retelling a story, or even create their own stories with these pictures by standing on the shoulders of those authors and using the same characters to write a new story. David Shannon books are going to be another favorite series that we retell in this way this coming year!


4. Stop Motion Commercials

Image result for Doink green screenImage result for stop motion app
Lego stop motion movies can also be used with green screen! Using the same mini green screen set up with the green cube as the backdrop and a green lego baseplate for the ground, I moved the lego people a little bit at a time snapping pictures inside the free app, Stop Motion. Once the movie was complete, I saved it and uploaded it into the Doink Green Screen app and added a background. You can now use iMovie to create the green screen effect too, however, I still prefer the Doink Green Screen app. In my opinion, it's easier to edit. 

This stop motion movie is an example of a procedure we teach at the beginning of the year--line basics. (But I learned from now on, always use an iPad stand when snapping pictures for stop motion!) Having students create little commercials for beginning of the year procedures and rules is an engaging way for them to internalize it and teach others. After students create these little commercials, we will add them to a class book using book creator to remind students of the rules and procedures in our classroom. We can revisit this class created book when we get new students, after a long break, or when students seem to need a reminder. I use a variety of apps to create these commercials in the classroom. Stop motion and green screen are two great choices, and I also like the apps Superhero Comic Book Maker, Draw & Tell, and Princess Fairytale Maker for students to create easy animated videos that teach rules and procedures. This is so much more interactive than a boring lecture on rules!

Image result for book creator app Image result for superhero comic book maker app 
Image result for Draw & tell app Image result for princess fairytale maker app

Another cool new innovative way to use green screen is with the worm hole effect. Have you heard of it? Using green Play-doh, you can reveal just part of an image creating a worm hole effect. The blog post, Space Saving Green Screen Ideas for the Classroom from Erintegration shows some really innovative examples of how people created this worm hole green-screen effect. Of course, we had to try it! 


We created a monster using green Play-doh and a wiggle eye. Using the Stop Motion app, we made our monster walk forward. When the video was done, we uploaded it into the green screen app and added a video of blue flames to make it look like the monster was on fire. This step was more work than I would probably do in the classroom, but I'm thinking of a lot of ways to use the general idea in the classroom. Another blog post with more ideas about how to use this in the classroom will be coming soon!

How will you use academics, innovation, and the elements of open-ended play in the classroom this year? 
0