Teacher Stuff: paperless classroom

Showing posts with label paperless classroom. Show all posts

Classroom Digital Data Tracker Shortcuts in Google Sheets


As a teacher, if I got to pick a super power, I'd have to go with freezing time. Remember those shows from the 80s where a witch could blink or put her two fingers together and freeze time? If I could do that, I'd have more time to grade papers, create lesson plans, workout, or sleep! While I don't yet know how to give myself super powers, I do know how to give you a little bit more time––every teacher's dream!


It's important to collect a lot of data about our students, but trying to sift through it all can be a lot. Here are some shortcuts I learned using google sheets as a digital data tracker to cut down on the time I spend sorting data so I can spend that time analyzing it instead. It makes report card time SO much easier too!  


1. Alternating Colors: 

Format––alternating colors
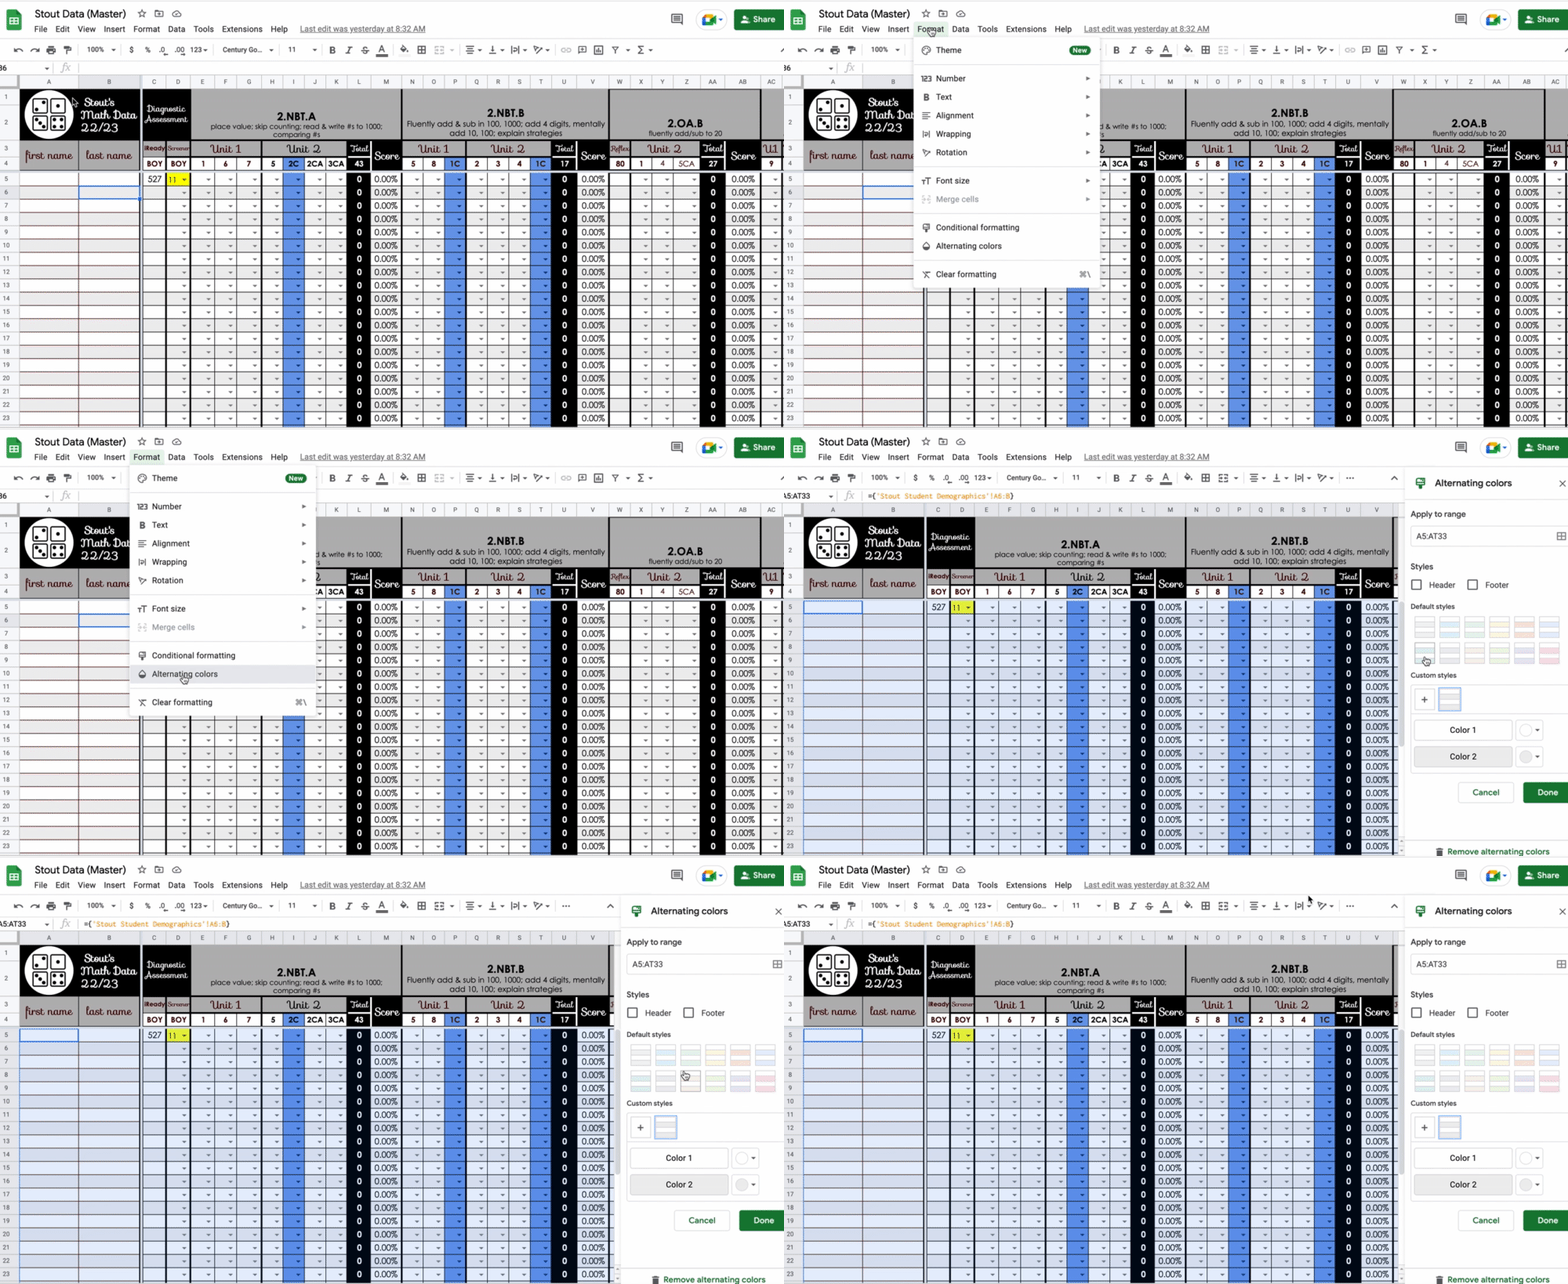
Image from Gyazo

Okay, this is a really simple no-brainer that has been done since the beginning of teaching time, but it really does help! Google Sheets will make every other row an alternating color so it's easier to follow one line across the row. Just go to Format ––alternating colors. You can even pick different color combinations or customize your own. Freezing rows that need to stay in the same place can help with following the line across the row or column too. Check out my post Create Your Own Auto-Filling Data Spreadsheet With These 4 Tips for directions on how to do this. 


2. Drop Down Menus: 

Data––data validation––list of items
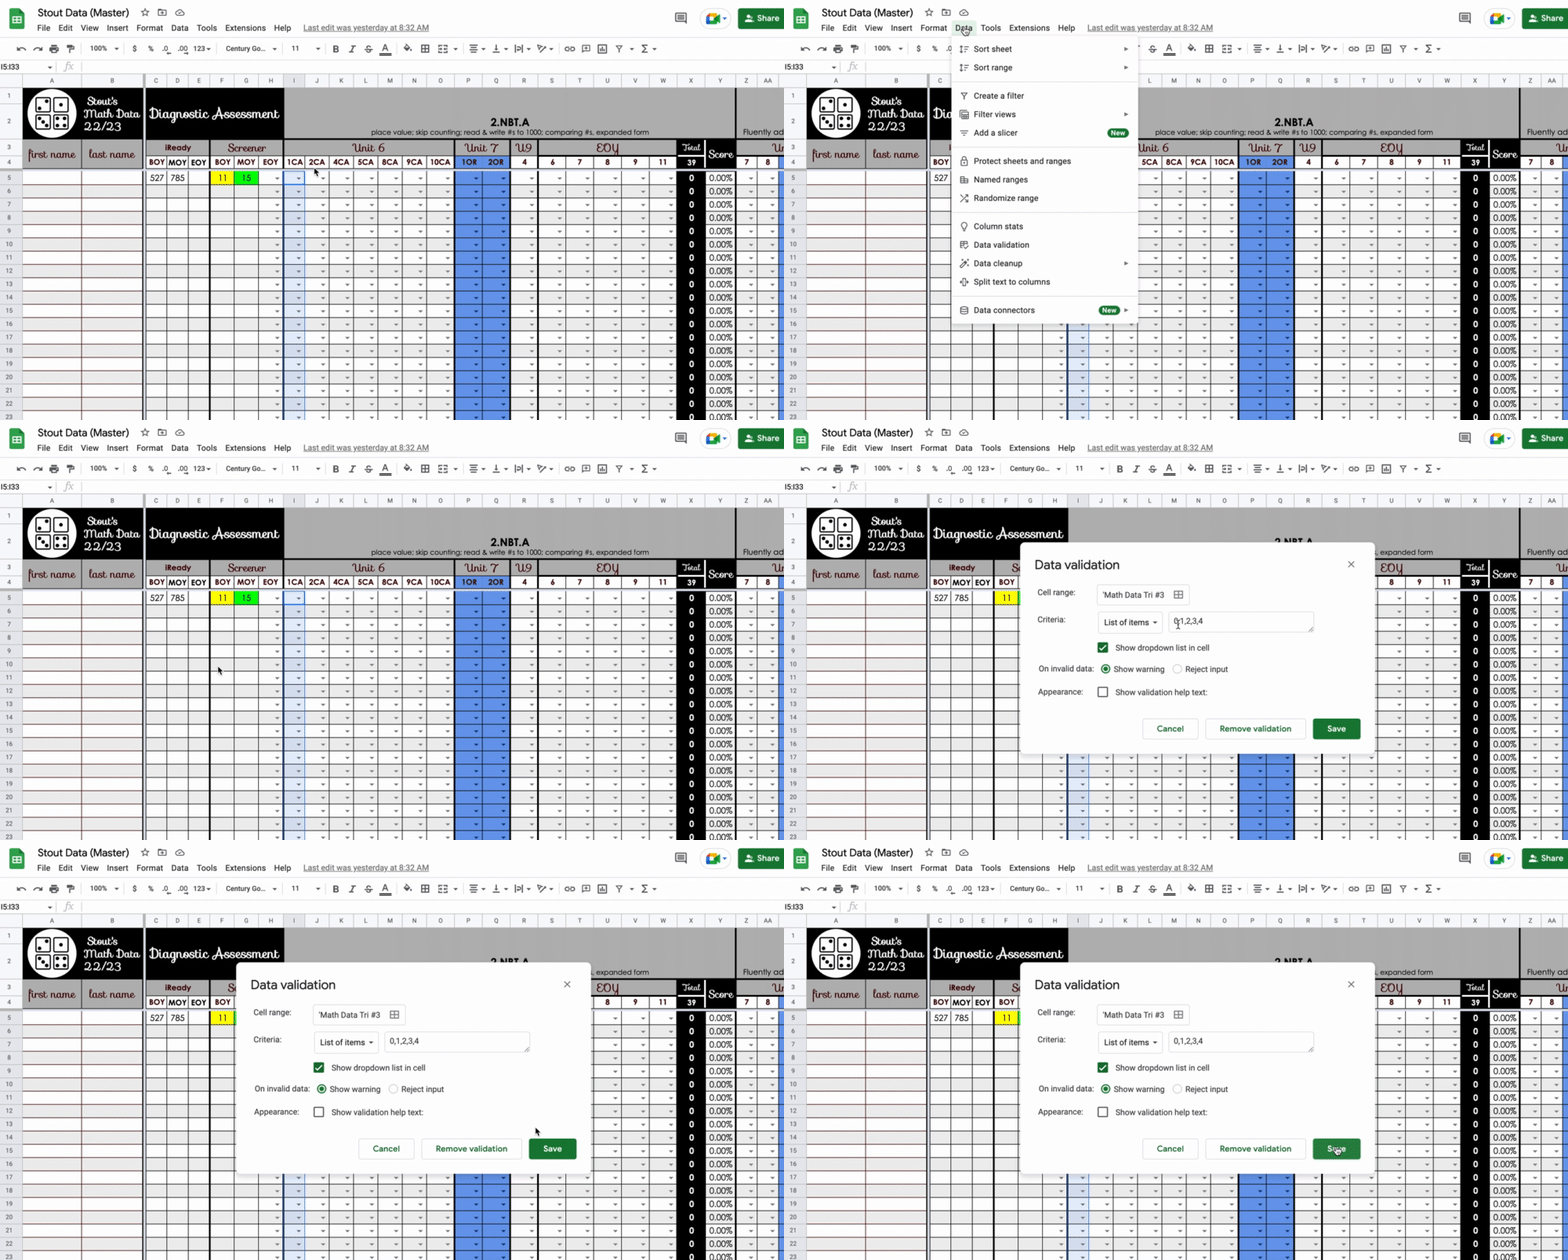
Image from Gyazo

This shortcut became a time saver for me because I am assigning a different value or weight to different test questions within a single test. The math program we use at my school tests a bunch of different standards on one test––not just one strand at a time. I have to figure out which standard correlates to each individual problem on the test and record them under a separate standard in my grade book (rather than one score for the whole test). So problem #1 which tests standard 2.NBT.1, for example, might have 3 parts (a, b, c), so I want it to be worth 3 points. But problem #2, which tests 2.OA.2, might only be worth 1 point. Using a drop down menu helps me remember how heavily I weighted each test question when I'm recording the grade so I stay consistent. To make a drop down menu, highlight the whole column, and go to Data––data validation––list of items. I always use 'list of items' and then list the numbers possible separating them with a comma like this: 1, 2, 3. I like it because it puts the number choices in the drop down menu for you to choose. Then click on the arrow to choose one of those numbers.


3. Color Code the Data
Format––conditional formatting–format rules–"is equal to"–change the default color with the paint bucket
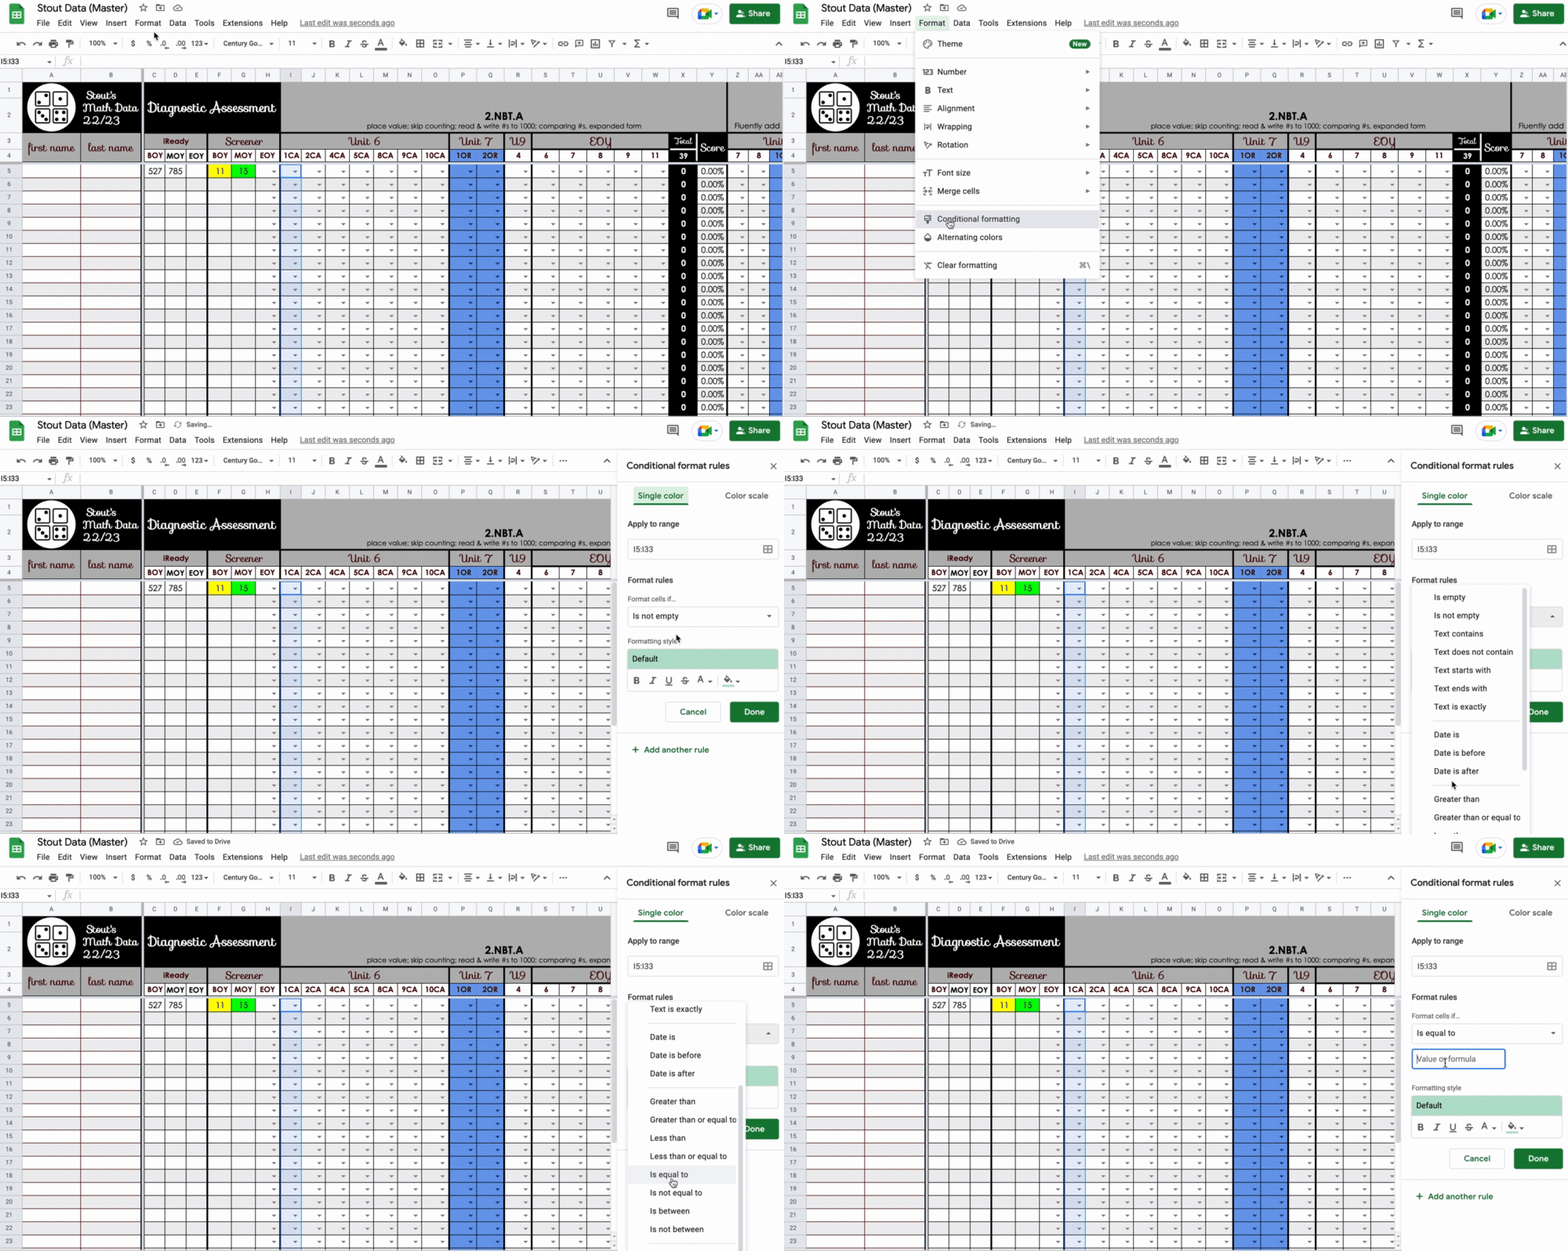
Image from Gyazo 

This shortcut has made the biggest difference for me! I like to see a data page color coded so I can get a sense of whether a student (or my whole class) is passing a standard at a glance. For example, if I have a problem worth 3 points, I can make 1 out of 3 points unsatisfactory and color code it red; 2 out of 3 points would be partially proficient and I would color it yellow; and 3 out of 3 points would be proficient and I would color it green. Then at a glance I can see if a lot of kids missed a certain question by the colors I see going down that column. I was color coding my data before, but I would highlight and change the color in each individual box. Conditional formatting has revolutionized my data analysis! I can set a whole column at one time to change the color of the box when I put the score in. Just highlight the column or row that you want to color code using the same data parameters. Go to Format––conditional formatting–format rules–"is equal to"–change the default color with the paint bucket. Now when you type in a number or choose a number from the drop down menu, it will automatically change the color based on the rules you set. 


4. Average the Score:

=(click in the box of the student total)/(click in box of the total possible) 

Going back to my math test example, I have random test questions across several units that fall under one standard. We use standards-based grading, so I average all of those individual test questions over several different units to determine how the student is doing on that one standard. To do this, first I have a total column at the end of each standard, and I have the spreadsheet automatically add up the total number of points the student earned for that standard (see the blog post Create Your Own Auto-Filling Data Spreadsheet With These 4 Tips for directions on automatically adding totals). For example, if unit 6 had five test questions for standard 2.NBT.B, and unit 7 had four test questions for 2.NBT.B, I have a box at the top of the spreadsheet with the total number of points possible––in this example 24––and then the spreadsheet calculates the total number that student earned. In the "Score" column, I have the spreadsheet average the score and turn it into a percent. To do this, click in the "Score" box for the first student and type =. Then click on that student's "total" box and it will add it to the formula. Next hit the / (which means divided by) and click on the box that has the total number of points possible. My formula for this example looks like this: =X5/X4
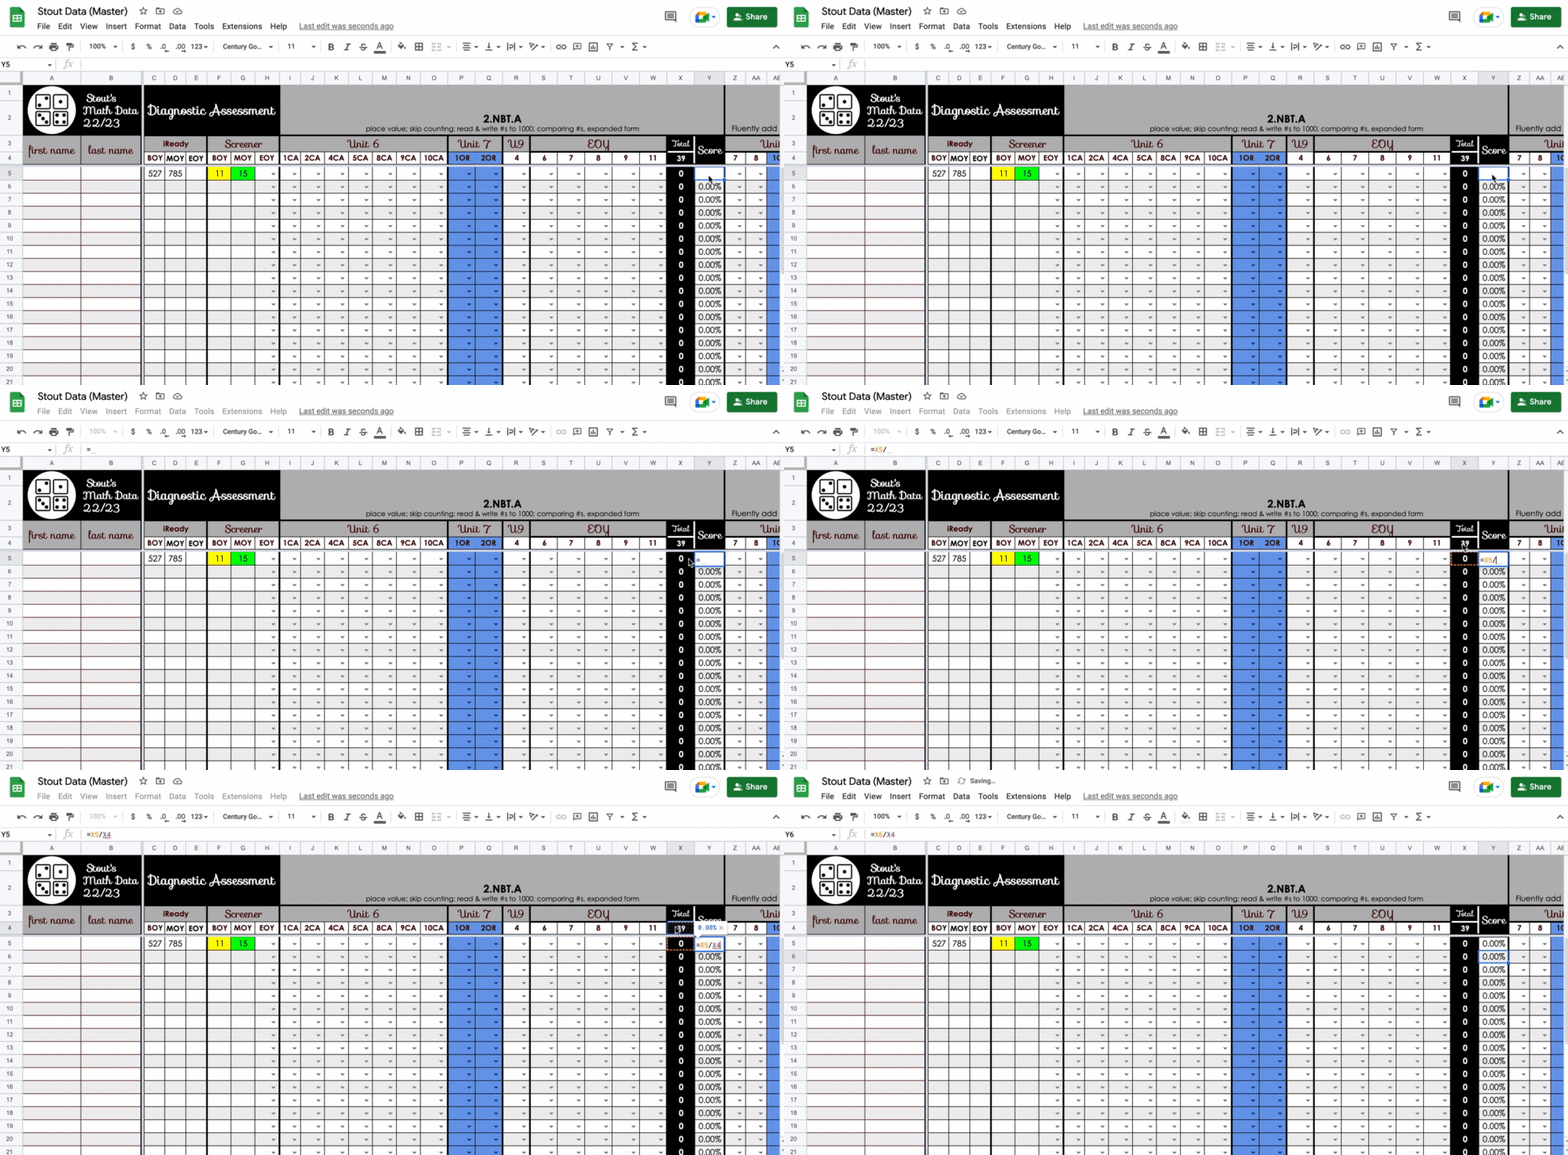

Image from Gyazo

To make sure the score is shown as a percentage, highlight the whole score column and click on the picture of the % on the toolbar across the top. Now at a glance you can see which students are passing the standard over time.

I also have a blog post that I published a few years ago called Create Your Own Auto-Filling Data Spreadsheet With These 4 Tips. It shows you how to freeze rows and columns, automatically add totals, automatically populate data on a shared page, and create pivot tables to analyze data. You should check it out for ways to make your data tracker even more legit.

I hope you find these tips helpful in saving you time during your data collecting! 


0

The #classroombookaday Challenge: How to Share Your Class's Reading Progress


I'm so excited to join the #classroombookaday challenge! It is so important to read thought-provoking, engaging literature to our students everyday, especially for our students who may not get that opportunity at home.

I attended an IRLA (Independent Reading Level Assessment) training recently, and they talked about the importance of reading engagement. The first stage in their book leveling system is called 'Read to Me (RTM).' It states, "The RTM level represents the 2,000 hours of reading experiences (being read to, interactions with books) that is typical of the successful readiness reader to build the vocabulary, background knowledge, language experience, reading identity, attention span, genre exposure, and phonemic awareness to be ready to use the print on the page to read (iv)."

If students need 2,000 hours of experience with books to develop the readiness skills they need to understand how books work and begin to form their reading identity, then we need to be intentional  about making time for that in our classrooms. If students miss that foundational step, and instead we jump right into teaching students HOW to read the print on the page, we may end up teaching kids to hate reading because they have not yet had enough life experience to understand the purpose or enjoyment of reading.

The #classroombookaday challenge is a perfect opportunity to intentionally build that foundation, no matter what grade level you teach. "#classroombookaday was started by Jillian Heise (@heisereads) during the 2014-2015 school year, inspired by Donalyn Miller's (@donalynbooks) #bookaday challenge. With a goal to read aloud a picture book every day of the school year for a #bookaday with her 7th & 8th grade students, 180 complete texts were shared that grew classroom community and reading engagement." Click here for even more information about the #classroombookaday challenge.

I've already started collecting books for the challenge, and I'm compiling a list of book recommendations using wakelet (check it out on the bottom of this post). I'll continue adding to it, so feel free to follow me on wakelet @estout and Instagram @teacherstuff4U if you want to see my collection of recommendations.

I've seen teachers post different variations of huge wall displays in which they make copies of the book covers they read and hang them on the wall to share what they are reading for the #classroombookaday challenge. While it looks really cute, that seems like A LOT of work for the teacher! I'd like to make it easier to share and give the students more buy-in by having them do more of the work. 😉

First, my plan is to have the student with the classroom job "photographer" take a picture of the book we read each day and post it on SeeSaw. I have enabled the SeeSaw classroom blog so we can collaborate with other students and talk about books. Please comment below if you are a SeeSaw user and you'd like to connect with my class through the SeeSaw blog this year and talk about books! Here are some quick resources on how to use the SeeSaw blog:


I'm sure some people are still thinking: But what about the students and adults walking by my classroom? I want them to see what we are reading too. I have a plan for that! I attended a training about innovation with guest speakers John Spencer, author of LAUNCH, and Dr. Robert Dillon, author of The Space: A Guide For Educators. Dr. Dillon talked about the power of the whole learning process, not just the products created by students. Gone are the days of showing off "perfect" products as proof of student learning. The real learning happens when students are problem solving, thinking critically, and iterating. He encouraged us to add pictures of those steps on bulletin boards so we are valuing the learning that happened through the work being done. That gave me the idea to use a digital picture frame!

I got a skylight digital picture frame for Christmas, and I'm going to hang it in the hallway this year to share the awesome work students are doing AND to share the books we are reading for our challenge! The skylight frame seemed like the perfect tool for the job because it is so easy to add new pictures. With this frame, you set up an email account through skylight and just email the pictures or videos that you want added to the digital picture frame. It's as easy as that! No uploading with thumb drives or cords. In fact, I shouldn't have to touch the picture frame at all to add new photos. I can't wait to give it a try!

So I'm ready to start our #classroombookaday challenge on the first day of school AND share our progress! I can't wait to see who else is going to take on this challenge this school year! 
0

Create Your Own Auto-filling Data Spreadsheet With These 4 Tips


This summer I became Level 1 and Level 2 Google Certified. Woot woot! I even got to visit the Google faciity in Boulder which was AMAZING! Some of the things that I learned make analyzing team data much easier. For example, the kindergarten team at my school assesses students with the Literacy Skills Assessment 3 times a year. They wanted an easy way to compile the data from all of their classes to analyze how all students in kindergarten are performing.

First, I created a google sheet that had a page for each individual teacher on the team and one page for the whole grade level called the Team Data Wall. 

1. Freeze Rows

Image from Gyazo
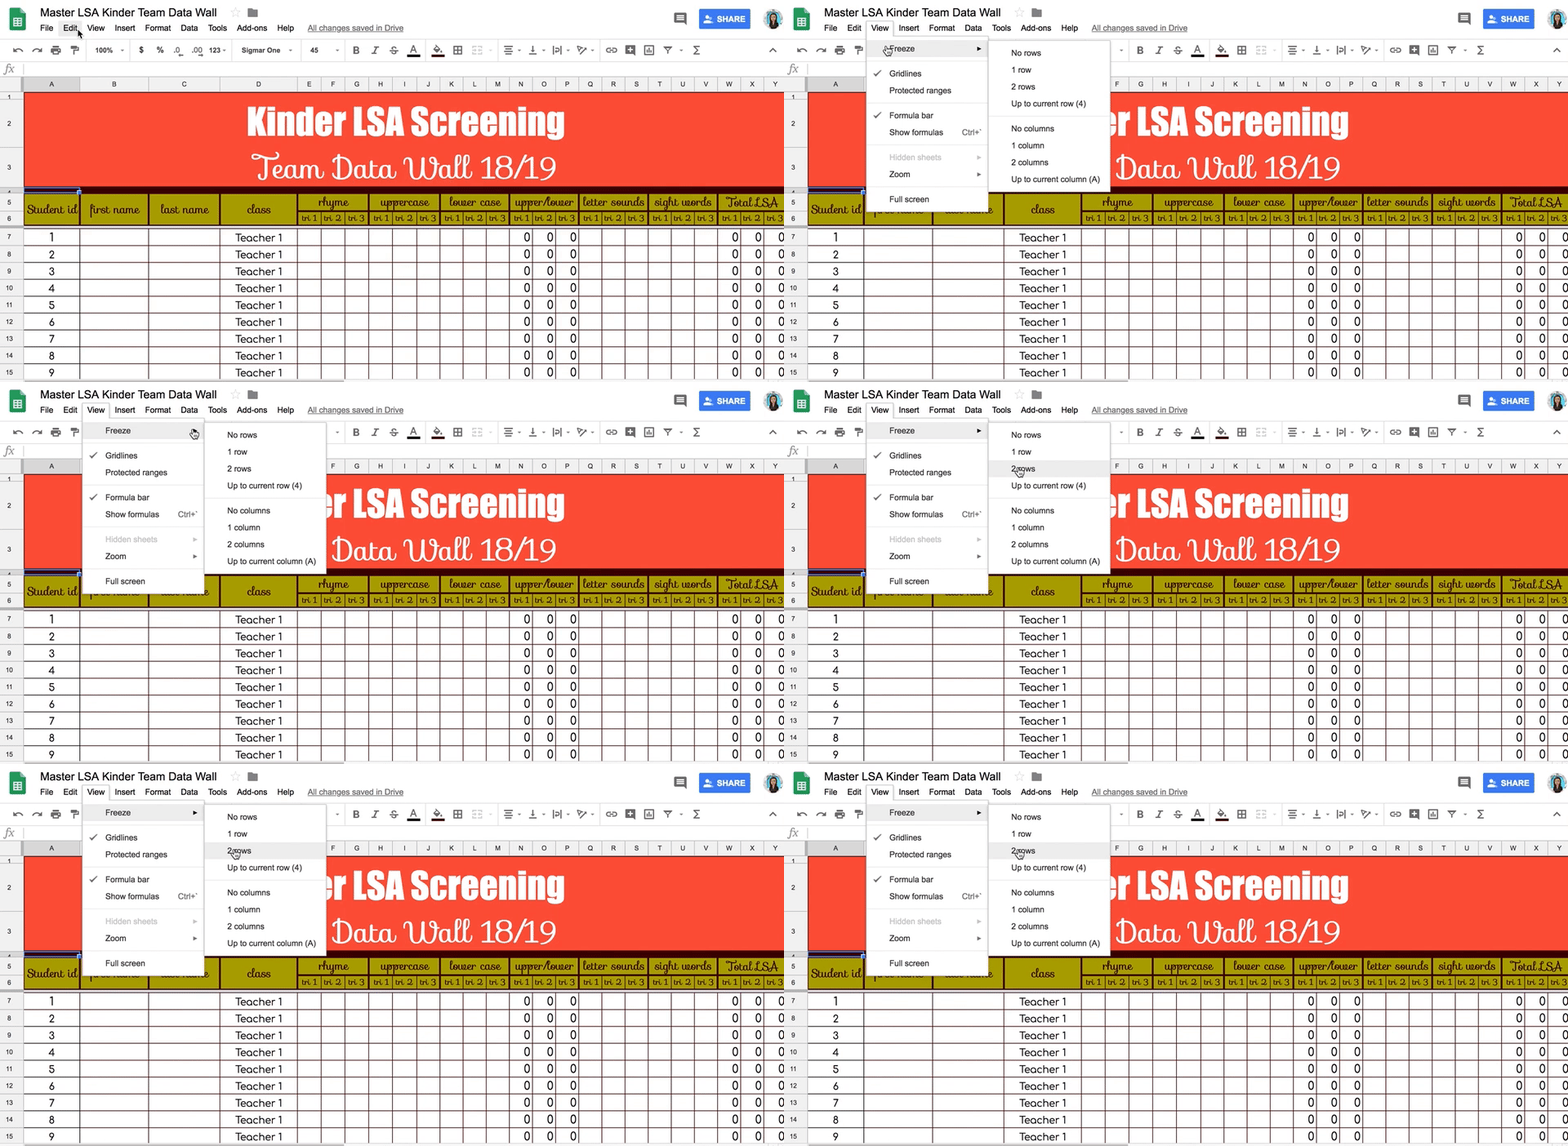
This is simple, but important! You want to freeze your headers or titles so that when you sort data, it doesn't move the headers into your data. Go to View–Freeze–2 rows. I needed more than 2 rows frozen because I have a big header. A line shows up to show you which rows are frozen. You can just grab the line and pull it down to freeze more rows. 

2. Automatically Add Totals

Image from Gyazo
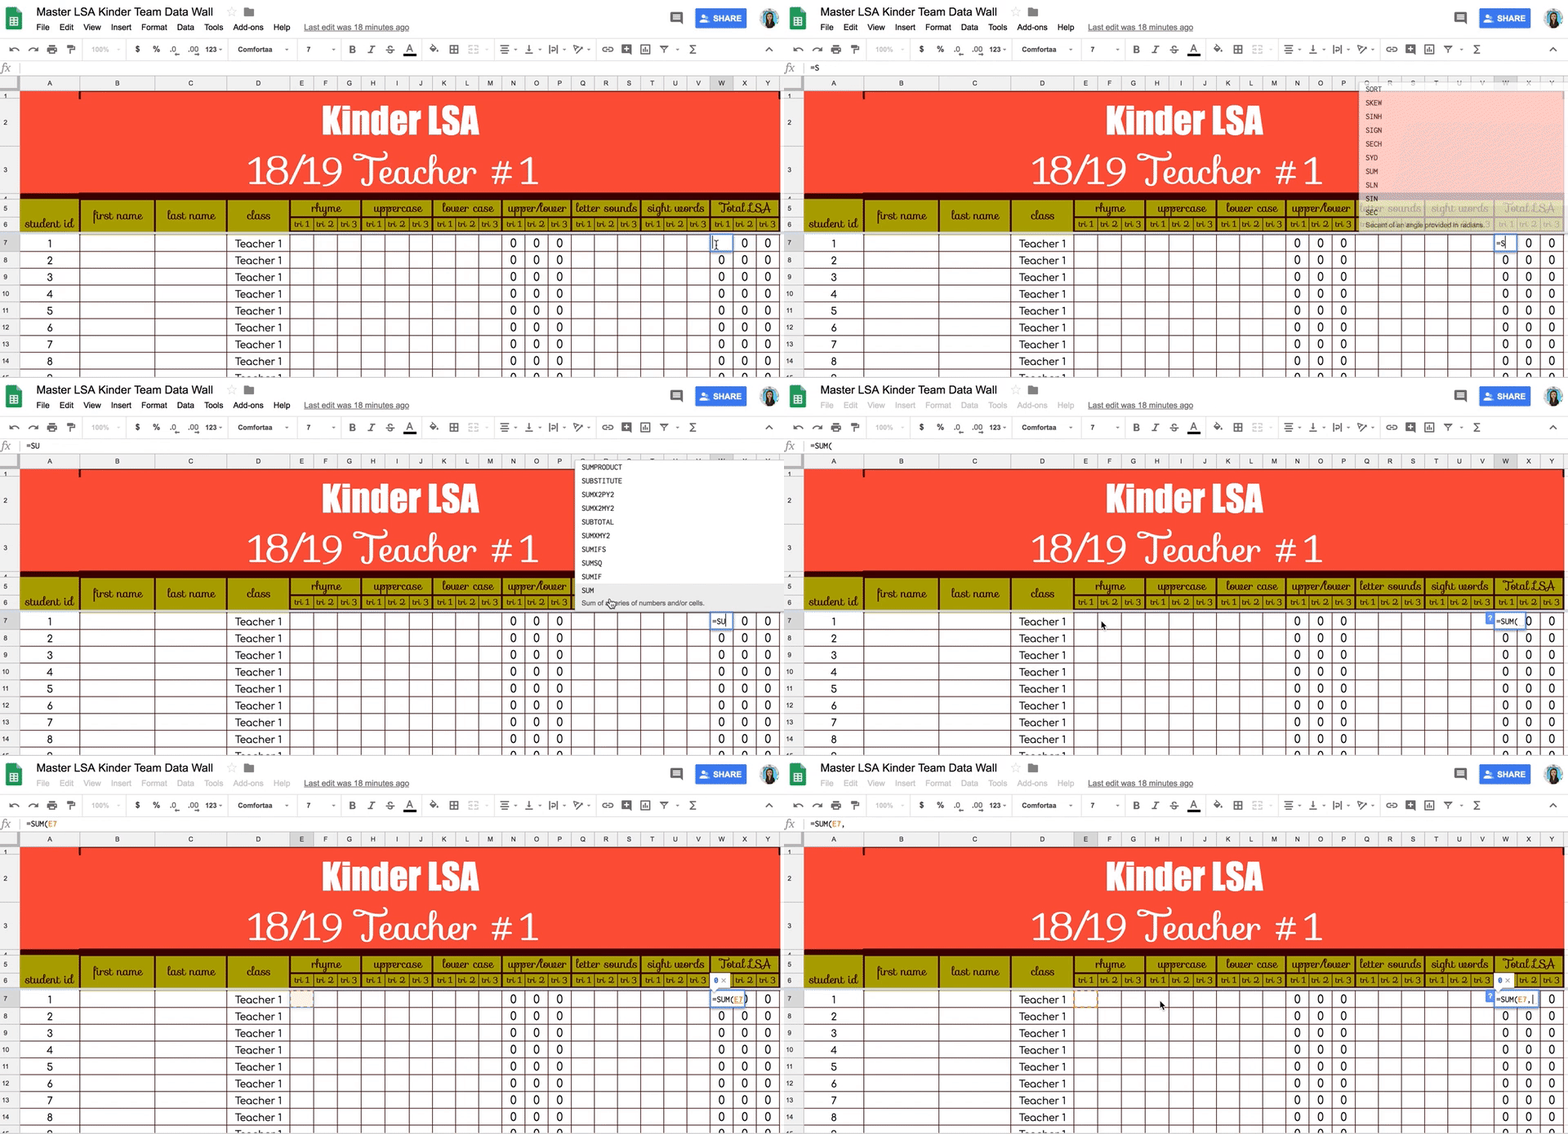
Another simple but time-saving trick is to make sure your spreadsheet does the math for you. On this google sheet, there is a column called upper/lower that calculates the total number of upper and lower case letters that the student knows. The total LSA score is all the data added together. These columns are set up to automatically add the total scores for each trimester. To do this, click in the box you want to calculate the total and type =SUM. Next, click in the boxes that you want added together with a comma between the numbers. My code in the example is =SUM(E7,N7,Q7,T7). Once you create the command for one box, you can copy and paste in another box. It will automatically adjust to fit the numbers in that row.

3. Automatically Populate Data on a Shared Page

This gets a little more sophisticated, but it's one of the features I'm most excited about! I found the video above which does a nice job walking you through each step of combining data onto a new page. The problem we had when analyzing this data before was that the teachers wanted to see their individual classroom data, but they also wanted to see the data as a whole grade level. That meant they were typing the info in more than one place, which was a waste of time. This feature let's teachers type in the names of students and data on their individual classroom page, and it automatically shows up on the Team Data Wall. This is the function I added to do this on my Team Data Wall: 
=QUERY({'Teacher #1'!A7:Y;'Teacher #2'!A7:Y;'Teacher #3'!A7:Y;'Teacher #4'!A7:Y;'Teacher #5'!A7:Y},"select * where Col1 is not null",0). 

The information from every classroom is automatically entered. Such a time-saver! The downside is that you cannot sort the data on the Team Data Wall itself. You can only sort it on the original page, but that is where pivot charts come in handy. 

4. Create Pivot Tables to Analyze the Data


Pivot tables let you analyze a large set of data in different ways. For example, this sample pivot table shows us column A is the number of rhyming words students knew, and you can see how many students in each class knew that number of rhyming words by following the columns across the top. Therefore, 2 students in Teacher 1's class and 2 students in Teacher 2's class knew 0 rhyming words.  It also gives a grand total of students in kindergarten that knew 0 rhyming words. Just move down the rows in column A and follow the data across to see how many students knew 1 - 10 rhyming words. These pivot tables do live updates, so as soon as the data changes, so does the chart. 

Creating pivot tables on my spreadsheet makes me feel like a real coder! It seems really fancy, and while this is the most difficult tip in this post, it is really not that hard to do once you get the hang of it.  The video above is a little long, but it shows you how to create different kinds of pivot tables in your google sheet. You really need to watch the video to understand the logistics of how to create and code your pivot table, but here is the data I used to create the example pivot table on rhyming words.


These tips can help you analyze your grade level data much more efficiently! You can also download a copy of my LSA Kinder Team Data Wall here on Teacher Sherpa if you don't want to make your own. Happy analyzing!


0

New School Year Resolution: Organizing Parent Communication Tutorial


It's summer time, and that means it is time for teacher's to make their New School Year's Resolution! We do it every summer . . . we say, "Now that I have time to do it, THIS year I'm going to . . . " and for me, the end of that sentence usually has something to do with organization. 

As a technology specialist, I want to give you some ways that technology can help you get more organized than ever and save you a ton of time in the process! Who doesn't need to save time?! At the beginning of the year, there is a lot of information we need to collect from parents. I've created some pretty lists for you in a few different color schemes:
If you are afraid of technology and you are perfectly happy printing out your word doc and sticking it in a binder, you can download these as a word doc. I have a set of each of these lists that you can choose in all of these colors, and while it's nice to have a pretty checklist, that doesn't exactly save you a lot of time or paper and ink. 

When you download these lists, there are also links available that allow you to make your own copy as a google doc. Google docs will save automatically and allow you to share the lists with subs or other staff members. They can see all the changes live, so no need to send a new copy when you have to add a new student to list. Google docs also give you the option of going paperless. No need to upload, download and upload again to save your changes and print them out. Seriously. You can stop doing all of those extra steps!

Google forms is the trick that will save you the most time. By sending a google form to parents, THEY do all of the work for you! They fill out all of their information, and everything is automatically saved on one google spreadsheet. 
Here is how to see the responses:

1. When you click on the link included in the download, it will ask you to make a copy of the form.
2. Click on "responses" on the top, and you will see the responses from all parents when they have filled out the form.
3. If you click on the little picture of the spreadsheet in the corner, it will put all the responses on a google spreadsheet for you. It's not as pretty as the form I created, but it is a quick way to get all the info you need in one place!

The picture below shows you how to do it step by step:


I've created the forms for you and included them in the download as well, so all you have to do is share it with the parents and you're done! 

Not sure how to get these forms to parents? There are 2 easy ways. 

First, you can email it to parents. 
1. Click on send
2. Click on the link icon in the middle.
3. I usually click on the url shortener in the corner so that the link is shorter.
4. Click "copy" and paste the link into an email. Although you can send it as an email straight from the form, you have to type in each email by hand. If I copy the link, I can send it to the group I have set up in my email. 

The picture below shows you how to do it step by step.


But what if you don't have an email list for parents set up yet?

Make a QR code! That might sound a little scary, but it's not. I promise! After you copy the link following the steps above, go to qrstuff.com.
1. Paste the link in the box. It will automatically create a QR code on the right hand side.
2. Click on "download QR code." You don't even have to set up an account to do it!
3. Now print the QR code. During open house, ask parents to scan the form and fill it out. Done!


The forms included in Organizing Parent Communication ask for parent email addresses, phone numbers, and a detailed volunteer questionnaire of how parents might like to offer their help from donating supplies for the classroom to volunteering every week. There is also a form for parents to sign up for helping with classroom parties. You can send the spreadsheet of responses to your room parent with the names, email addresses, and phone numbers of the parents who would like to help and what they are willing to bring. Another task crossed off the list!

You can find all of these docs and forms as a free download here on Teacher Sherpa.

Happy New School Year! Enjoy!


You may also like Notes from the Staff Meeting:


0

The Top 5 Tech tools you need to begin the school year


If you are in the midst of planning for back–to–school, or even if you've already started, your house probably has books, papers, and teacher "stuff" piled in corners and stacked on the floor. That's what back–to–school looks like for teachers!

There are practical tools to help you tackle those piles and keep you organized in the excitement of all the new things that you want to try this school year. As you make yourself those promises that this year you will try that new thing you learned in the class you took this summer, and this year you will stay more organized, try these tech tools to help you keep that promise to yourself:
(Click the titles of each tool for a review from Common Sense Media. Included in each review is a link to the tool.)


1. Common Curriculum 
This digital plan book has everything you might need to plan for the school year. I started by going in and marking which days we had no school throughout the year so that I could plan around breaks and professional development days. Then I put in all of my big units using my favorite feature, the unit planner (which is the view you see in the first picture). Have you ever just run out of time at the end of the year? You can create your long range plan for the year and make sure that you fit every unit that you want to teach on the calendar. On my unit planner, I included standards, essential questions, and assessments into those big units so I have that guiding, overarching idea and outcome outlined for each unit in the year. Then I went back to the first weeks of school and planned the specifics of what each day would look like. I included notes on what I need to do to set up for that unit, vocabulary they will need to know, and accommodations and extensions. I put in links to videos, attached rubrics, and shared it with my teammates, the instructional coach, and co-teaching partners like interventionists and ELL teachers. It's completely customizable to fit your needs, and it allows you to integrate that long range plan with day to day teaching. It's flexible, so it can adjust for those days there is an assembly and you didn't get to finish a lesson. You can just bump that lesson to the next day. There are so many features, it truly changes the way you plan!


Is your bookmark bar holding hundreds of links you don't want to lose, but because there are so many, you can't actually find them in that tiny list when you need them? Or your computer crashes, and all the hours you spent bookmarking the perfect website, video, or lesson plan is gone? I've been there! This bookmarking tool has literally saved me hours during the school year. Each square or tile you see in the picture above is a link to something that I have bookmarked. I can color code it, add a picture, and group them together or in folders to make them easier to find. You can even bookmark a google doc!  I can make as many pages as I want (for free), so there is literally no limit to how many things I can bookmark. I have a Symbaloo page just for videos that I use to teach throughout the year, a page for links to my favorite fonts, and I have a Symbaloo page just for students. The best part is that it lives in the cloud! That means it is not attached to one computer or device. You can open it on any device anywhere and your bookmarks will be there. It means that if your computer dies, your bookmarks will live on! You'll never lose them again! You can set Symbaloo as your home page, so when you log onto the internet, it will be the first page to pop up. You can embed symbaloo into a website or blog, so you can share the page with students, parents, and teachers. SymbalooEDU is a must-have organizational tool for teachers.


3. Class Dojo
There is definitely controversy in the educational world about whether the classroom management systems we have in place are intrinsically teaching our students to be good citizens. If you have been reading the buzz, you may have asked yourself whether treasure box rewards are being used as a tool for the teacher to evaluate student behavior rather than the student evaluating their own behavior. You may have asked yourself whether the red, yellow, green clip system makes students feel like something is being done to them vs. the result of the choices that they made. Whether you are contemplating ditching the treasure box and sticker charts this year or not, Class Dojo can make your classroom management system more efficient. You can digitally add each student to Class Dojo and connect parents to their child's account and other teachers to classes that you share. It allows you to award points to individual students or the whole class when you catch students doing the right thing or take points away. Students, parents, and teachers can see it all instantly so you can have a team approach to positive and negative behaviors happening in class. You can add pictures, links,  and messages about what you are doing in class, and parents can see it, ask questions, and make comments. It's a great way to keep teachers, parents, and students connected.


4. Pear Deck
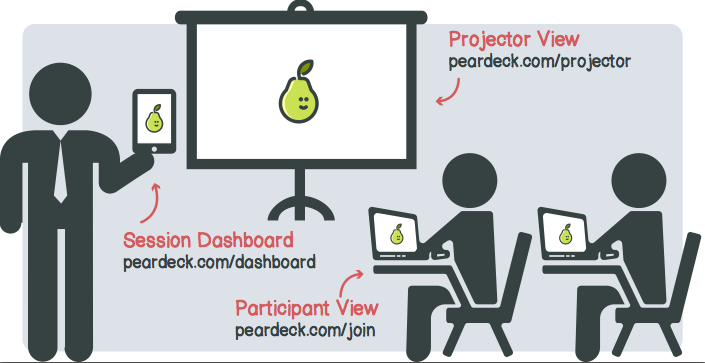
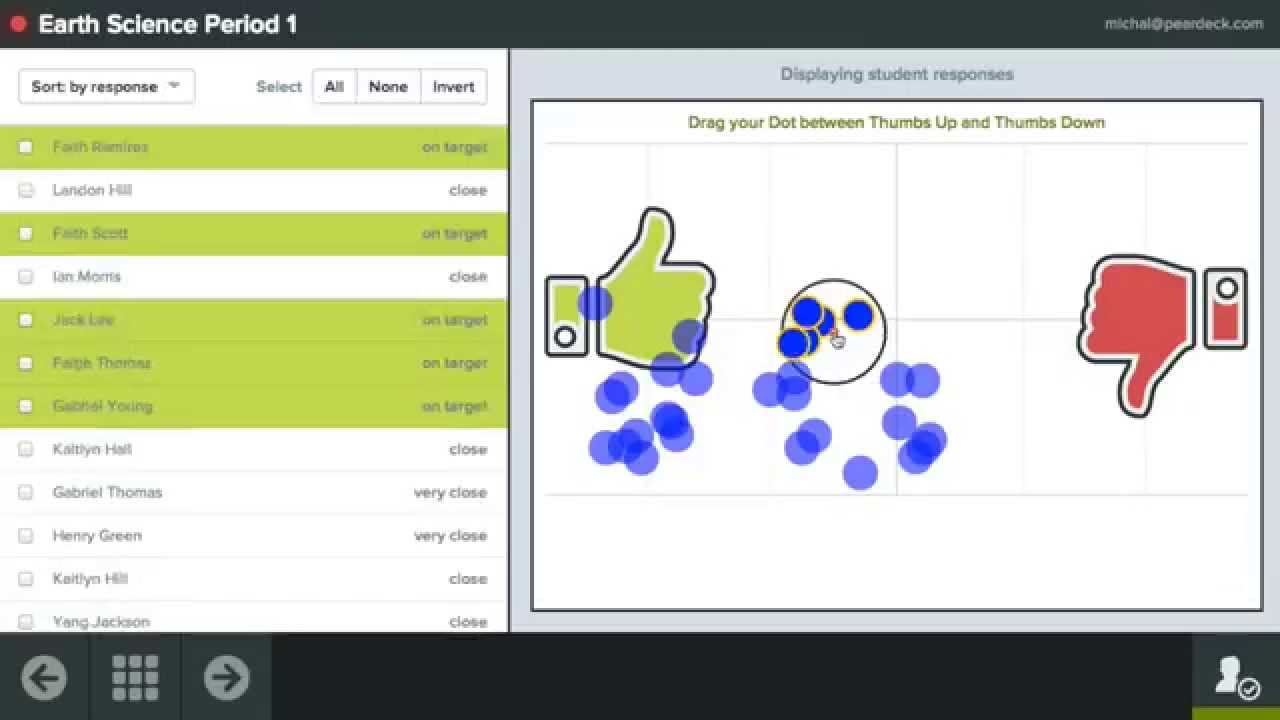
Pear Deck is one of those tools that is changing the way we teach! Sometimes it is necessary for teachers to present new information to the whole class, but it no longer has to be sit-and-get! With Pear Deck, each student can see the presentation on their screen at the same time and interact with it. At the beginning of the year, we have a lot of students that are too shy and nervous to speak up in front of the whole class, and now they don't have too! You can ask open-ended questions where students type a response, they can answer multiple choice questions, draw a picture, or drag a dot to a picture like thumbs up and thumbs down. You can see all answers live and share them with the class during the presentation or keep them private. At the end, students get a copy of the presentation and all of their answers in their google drive. Pear Deck now has the student pace option where they can work through it at their own pace rather than everyone being on the same page at the same time. That makes it a great formative assessment tool as well! For the beginning of year,  try creating a "getting to know you" presentation and try it out!


5. Google Apps Tools (Drive, Docs, Sheets, etc.)
I saved google apps until the end because I'm assuming that it's not new and you've probably used it at least a little. If you have not made the switch to google drive, google docs, etc., what are you waiting for? By uploading all your digital stuff into google drive, everything is backed up and you can access it on any computer anywhere. You don't have to carry a bunch of papers and notebooks home with you if students use it too. You can organize your drive into color-coded folders, share with others, and you never have to worry about who has the correct version of what you are working on or whether the alignment will come out right when you download it and open it. You can download google drive to your computer, so there is no more reason to save to your desktop. You can save straight to google drive and it is always backed up! It will save you several steps–I promise! There is really no reason not to use it, so please, stop using Word. Seriously.

Good luck with you back to school planning!

0