Teacher Stuff: CCSS

Showing posts with label CCSS. Show all posts

Turning Worksheets Digital #distancelearning


As we say goodbye to our students virtually, the possibility of beginning next year the same way is a real one. As districts contemplate solutions to the social distancing issue in schools, we are looking at the possibility of half the students in-person and half the students online switching throughout the week, or continuing remote learning only. Whatever the outcome (and the problems that will come along with it), the one thing we know for sure is that schools will not look the same in August. So it's time to start planning ahead. The good news is, we don't have to start from scratch. Many of the things we were already using in our classrooms can make the switch to a virtual setting pretty easily. 
Right now, I'm focusing on worksheets that I used for students' independent practice. If we have a hybrid of in-person and remote learning time next year, I want to have a bank of independent activities for the students to do virtually. Then in-class time can be spent on formative assessments, reteaching, and small group or one on one conferencing. I already have worksheets that I used for independent practice to reinforce skills I taught in the classroom. Those are still great resources, and you don't need to ask parents to print them out at home. All you need to do is turn that worksheet into a picture, and then you can assign it through online platforms like Seesaw or Google Classroom. Are your worksheets all pdfs? Don't worry–just take a screen shot to turn it into a picture. (How to take a screen shot on a mac. How to take a screen shot on a PC. Just make sure you bought the product before snapping screen shots of copyrighted material!) Students can write on top of it, record their voice (in Seesaw) and turn it in to you. You can give them feedback virtually, and if they have any problems with the assignment, you can address it when you see them in person. During distance learning, I created multimedia video instructions on Seesaw so the students could see how to do it, then use the template provided to work on the assignment themselves. So this summer, I'm going to work on turning those worksheets into pictures that I can assign! Here are some of my favorite worksheets for independent practice online:
  • Read and Find Blends & Digraphs from Mrs. Thompson's Treasures - she has several of these that are fun for the kids to do online. Like 'I Spy' books, students read the targeted word and then find and color the picture of that word. 
  • 120 Chart Mystery Pictures from Mrs. Thompson's Treasures - she also has several versions of these – even superheroes! Students color numbers on the 120 chart that make fun pictures. Great practice for identifying numbers up to 120.
  • Color by Number Worksheets - Addition to 12 by Shanon Juneau - she has several versions of these as well. Students have to find the answer to each math problem and color the sum of the math facts a certain color to reveal the picture. 
  • Color by Code from Creating 4 the Classroom - You can also create your own color by code with these blank pictures divided into sections. You can make them math facts, sight words, etc. There are a lot of options! 
  • Differentiated Number Mazes for Each Decade (from 20 - 120) by Maria Gavin – these are fun for the kids and easy to do online. It is kind of like a cross between a maze and connect the dots. Students have to follow the numbers in order to the target number.
  • I Spy Word Search by Teacher Stuff - I have several of these as well. It is a word search modified for early emergent readers. They have to find and circle the same word 6 times on the word search game board to practice a specific sight word. There are also I spy options for a little bit more advanced readers with 6 words they must find on one game board. I found that traditional word searches were too overwhelming for my first graders, especially at the beginning of the year or if they were struggling readers. However, the practice of reading their sight words and attending to each letter was good practice, so I made the game board smaller and was very strategic in choosing sight words they needed to practice. 
  • Cooking in the Classroom by Teacher Stuff - these recipes are easy for kids to make and require no actual cooking on the stove or in the oven. While they can be done in the classroom, I have a feeling this will be a fun at-home assignment next year. Students get experience with measuring, language, and creating a hands-on healthy-ish snack, but the main learning objective is for students to write how-to directions for something that they made. There are several recipes with a how-to writing template. 
None of these resources were created for distance learning, but these are a few of my favorites that are easy to convert into digital assignments. I know there are many more that would easily convert to distance learning independent practice, so please share them in the comments! Let's work smarter, not harder, and we can use what we already have to make this work!


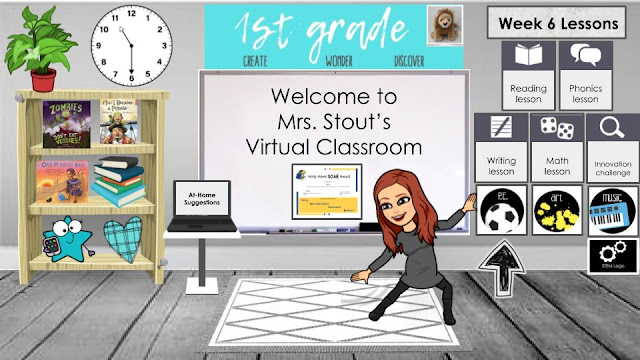
Now we have to organize all these assignments. I'm loving all the virtual bitmoji classrooms out there, so I had to try my own! It really is fun to make, and it's easy to link assignments, lessons, and resources. The visual platform for students to navigate assignments is going to be a game changer, especially for our little learners. They will learn quickly how to access everything they need with a well laid-out virtual classroom. One thing that became abundantly clear as a parent and a teacher during remote learning – we need kids to do their online learning with some level of independence.  Parents cannot walk them through every lesson all day, so if we have huge amounts of text for our kinder, first, and even second graders to navigate, it's not going to be independent. A virtual classroom is what I'm going to use to organize the assignments and lessons I give to students online. Even our non-readers can have some independence this way once they know the routine. The pictures will allow them to navigate the assignments and directions if we record the lesson. 

In my virtual classroom above, a video lesson for each subject is linked to each "poster" on the wall. The morning announcements are linked on the board; each book on the bookshelf is a book that supports a lesson. The star on the bookshelf is a website for independent practice created by our interventionists; the heart on the bookshelf is a social-emotional lesson created by our school mental health team; and the computer on the little table is a pdf with links to websites for independent practice, directions, and passwords. Even the clock shows the time for our daily zoom meetings, and it is a link to our zoom meeting. If you click on my bitmoji, it is a video that shows you how to navigate the virtual classroom. These cool virtual classrooms are a great way to organize assignments on any platform you are using. Here are some great tutorials on how to set up your own virtual classroom: Interactive Bitmoji tutorial | Google Classroom and Seesaw, Bitmoji Classroom Scenes & Virtual Classroom Backgrounds

These are only a few small pieces that go into distance learning, but it's a good place to start planning this summer! How are you preparing for what may come next year? 


1

10 ideas for Zoom Classroom Meetings #RemoteLearning


I think we can all agree–remote learning is hard! But one of my favorite things during remote learning is meeting with my students during zoom calls. I miss them, and I love seeing their sweet little faces! But as much as I love meeting with them everyday, we need some novelty in our meetings.

In our district, we do not teach live during zoom calls. Not all kids can attend at the same time (especially if there are multiple kids in the house and not enough devices for everyone), so we record our lessons and our zoom calls are reserved for community meetings. That's why it needs to be fun, engaging, and build classroom community while we're apart.

Here are 10 ideas to keep things engaging and novel. The first 5 are easy, no-prep ideas. The next 5 include game boards you can download from me for free.


  1. Show and Tell: If your class is anything like mine, this happens whether you like it or not! You are essentially in their home, and they love showing you around and showing you their favorite toys. Go with it!
  2. Scavenger Hunt: I've seen this one all over the internet! It's very popular and fun for the kids. Ask them to go and find something in their house that is red, something that is small, something that is soft, something that they sleep with, something that they love, etc. I give them a time limit of 30 seconds or 1 minute, otherwise we end up sitting awkwardly waiting for everyone to come back! Just be cognizant to ask neutral questions that are culturally responsive. Not everyone has the same things in their house, so keep it open-ended.
  3. Joke Day: Ask students to tell a joke. This one is really fun! Try telling them ahead of time so they can find a good joke. I assigned them joke books to read on Epic and MyOn, and most kids came prepared with a joke!
  4. I Spy: This is a fun and easy way to choose who gets to speak next. I keep the clues about the students–I spy a girl; I spy someone who is wearing pink; I spy someone with brown hair, etc. The student who has been "spied" gets to give clues about the next person. When it is their turn, they get to share something. 
  5. Read Aloud: I did a read aloud with my students everyday when our learning was in-person, so why not virtually? I choose a chapter book with short chapters and read them a chapter each day. I like to combine this with one of the other games as well.                                                                                       
  6. Pictionary: This is a lot of fun! First, share the word with the student who will be drawing by sending a private chat message. Then have that student share his/her screen and choose "whiteboard." I choose 1 - 3 other students to unmute and guess the picture so it is easier to hear and everyone gets a turn. I set a timer on my phone for 45 seconds. If they do not guess the picture in 45 seconds, I let other students guess too. I came up with words and categories that were related to the standards and easy to draw. You can get my list of words here with more detailed directions. I played this with my students on zoom. I'm not sure if it will work on all virtual meeting platforms.                                                                                                                                                   
  7. Sweet Sight Word Shoppe: This game is played like hangman if you remember that old classic! There is a hidden sight word on each slide, and each letter in the word is covered with a box. If students guess the wrong letter, they must ‘eat’ a sweet treat (the teacher deletes a treat across the top). To win, students must guess all the letters in the word correctly before they run out of treats and get a stomachache! This is a great way to practice sight words, and you can sneak in a teaching point about syllables and that there is at least one vowel in each syllable. It helps them with strategy in the game, and it's a first grade standard! Use knowledge that every syllable must have a vowel sound to determine the number of syllables in a printed word. (CCSS: RF.1.3d) Know and apply grade-level phonics and word analysis skills in decoding words. (CCSS: RF.1.3)                                                                                                             
  8. 4 Strikes and You're Out: This is another game that is played like hangman, but with math! There is a hidden number sentence on each slide, and each digit is covered with a box. If students guess the wrong digit, they get a strike. To win the game, students must guess all the digits correctly before they get 4 strikes and they’re out. This game builds number sense and computational fluency, including missing addends. More specific directions can be found in the download.  Understand that the two digits of a two-digit number represent amounts of tens and ones. (CCSS: 1.NBT.B.2) Add and subtract within 20, demonstrating fluency for addition and subtraction within 10. (CCSS: 1.OA.C.6)                                                                                      
  9. Math Bingo: This is another classic game that is fun to play on zoom!  Students find the sum of the math facts and cross out those numbers on their game board. The one who gets 3 in a row first wins! You could also play blackout and keep going until all the numbers on the board are full.  I have students draw a game board on a piece of paper at home and randomly fill in numbers that are between 1 and 20. This was definitely harder for my first graders than I thought, so we needed a lot of time just to set up our game boards! Once their game boards are made, draw a math fact and solve it together as a class. If that number is on their game board, they cross it out. This game gets easier the more you play it, but I recommend having an extra adult or 2 on hand when playing this game with young kids!    Add and subtract within 20, demonstrating fluency for addition and subtraction within 10. (CCSS: 1.OA.C.6)                                                  
  10. Memory: This game is just what it sounds like--memory. Match the Memory is a free website that lets you create memory games with words, pictures, or both. I created a sight word game (which you can find here) that has a sight word on each card that students have to match to the same word. Reading the same word over and over is great practice! I also created a math memory game (which you can find here) that has numbers up to 120 that students have to identify and match.  I also created a Math 2D Shape Memory Game with pictures (which you can find here). These memory games are easy to create and play, so you can try making one with your own content too. During a zoom meeting, I share my screen and click on the waffle with 9 squares in the right hand corner. This labels the cards with a number for the column and a letter for the row allowing students to tell you which 2 cards to flip over. Unfortunately, when you share your screen on a zoom call, you are the only one that can touch your screen, so students can guess, but they can't actually flip the cards over. But it's still a fun game to do as a class! Read grade-appropriate irregularly spelled words. (adapted from CCSS: RF.1.3g),* Count to 120, starting at any number less than 120. In this range, read and write numerals and represent a number of objects with a written numeral. (CCSS: 1.NBT.A.1), Distinguish between defining attributes (e.g., triangles are closed and three-sided) versus non-defining attributes (e.g., color, orientation, overall size); build and draw shapes to possess defining attributes. (CCSS: 1.G.A.1)


What do you do during your classroom zoom meetings? Whatever you choose to do, enjoy that time with your students!

0

How Fast Should a Student Be Able to Type?


 How fast should students be able to type? 

There is no universal answer to this question, but it is a question that we have to start addressing in elementary school. We don't want keyboarding fluency to get in the way of students sharing what they know. We want them to have transcription efficiency with keyboarding so working memory and cognitive resources are freed up for ideas. This is especially important when they are taking a test on the computer. In my district, every student beginning in kindergarten has to take a test on the computer within the first 30 days of school to determine if they need to be put on a READ plan. But then we have to wonder; are we putting some students on a READ plan simply because they don't know how to type/navigate a computer? The high stakes testing that begins in 3rd grade is also done on the computer, so keyboarding fluency is an issue that we have to start addressing in elementary school.

Unfortunately, there is no exact word-per-minute count that everyone agrees upon. Most keyboarding research is focused on middle school, and it's more than 10 years old. Technology has changed a lot in the last 10 years! If you check the Common Core State Standards, the expectation for typing begins in 4th grade, but there is no exact number attached to it:

CCSS.ELA-LITERACY.W.4.6
With some guidance and support from adults, use technology, including the Internet, to produce and publish writing as well as to interact and collaborate with others; demonstrate sufficient command of keyboarding skills to type a minimum of one page in a single sitting.

The CCSS do not become more specific for older students. Here is the standard for 11th - 12th grade:

CCSS.ELA-LITERACY.W.11-12.6
Use technology, including the Internet, to produce, publish, and update individual or shared writing products in response to ongoing feedback, including new arguments or information.

So how do we know if our students are college and career ready with the fundamental concepts of technology operations and troubleshooting skills they will need to be successful? 

That's a tough question to answer.  It's a question that we have been wrestling with at my school for years, so we decided to do our own action research. We started with the end in mind. We began with this question:

How fast should an adult be able to type? 

If you check the internet you'll see claims that the average typing speed for an adult is anywhere between 40 - 65 wpm. I did find some recent research called Observations on Typing from 136 Million Keystrokes that states, "Typing speed of an average professional typist is usually from 50 to 90 wpm, and some advanced typists work at speeds above 120 wpm." 

If we want our high school graduates to be equipped for a job as a typing professional, they should be able to type at least 50 - 60 wpm with 80% accuracy or better, so we made that our goal for a 12th grader. We worked backwards from there creating a reasonable expectation for each grade level, then we monitored our students to see if this fit our expectation for students in the classroom. We are continuing to monitor our students keyboarding progress, but so far, the rate on this chart seems like a good measure of their success. 

Testing season is upon us, and we monitoring whether or not we think our students are ready for that high stakes test online. Based on our action research so far, we found that if 3rd graders' typing fluency is at least 10 wpm with 80% accuracy or better by March/April, they're going to be in a good place to focus on the content of the test, and not the typing. The same has been true for 4th grade (15 wpm with at least 80% accuracy) and 5th grade (20 wpm with at least 80% accuracy). 

The reason I shared this process of identifying typing speed with you is because THESE NUMBERS ARE NOT AN OFFICIAL KEYBOARDING FLUENCY RATE. There is no official keyboarding fluency rate at this time, but this is a reasonable guideline based on what we know and what we see in the classroom. I created the keyboarding fluency infographic, graph, and SMART goal page that you can download here on Teacher Sherpa. I also like to use these pages in SeeSaw so students can upload their progress and record their goals.

How fast should students and adults be able to type in your experience? Do you know how fast you type? If you check out this research page, it has a place where you can take a test to see how fast you type! Observations on Typing from 136 Million Keystrokes Let us know your score!
4

Literacy + STEAM= Design Sprints: What If . . .

This post contains affiliate links for your convenience, but at no cost to you. Thank you for your support!

When you combine literacy, STEAM, and the opportunity to apply design thinking, you have the perfect recipe for creating your own design sprint! A design sprint is a question or problem to solve in a specific amount of time. I recently learned about design sprints from my friend Kristen at innovationinfirst.wordpress.com during the #InnEdCO18 conference. You've probably heard the term design thinking–it is the all the rage right now. Design thinking is a process for creative problem solving. The ISTE Standards for Students defines the deliberate design process as: A methodology for problem-solving; a series of steps used to solve a problem and design a solution. For example, human-centered design process, project-based learning, engineering design processes, scientific method. According to Jonathan Courtney, "Design Sprints use the philosophy of Design Thinking as a foundation, a philosophy, a toolkit for innovation . . . But the Design Sprint is one great way of systematically executing all of it."  

This 4 part Design Sprint series will focus on a book, a design thinking strategy, and a STEAM challenge, so check back to read all 4 posts. Bonus: Many of the featured books in this series star women, people of color, and people from different countries as the main characters!

What If . . . by Samantha Berger


This beautiful new book (published in April 2018) inspires kids to create! It begins, "With a pencil and paper, I write and draw art to create many stories that come from my heart." And if she didn't have a pencil or paper she'd use the table, the wall paper, and the floorboards to create. She would sculpt with leaves and snow, or use her voice and her body to sing and dance out her stories. At the end there is a note from the author and artist about the inspiration for this book. A flood forced the author, Samantha Berger, to evacuate her apartment and she lost everything. She writes, "After the flood hit, I had nothing to work with at all: no paints, no brushes, no markers, no nothing. It was then that I started to realize anything could be used as an art supply–the pinecones on the trees, the paper in the recycling bin, the kibble in my dog's dish–and I used them all! When I understood that everything could be used to express myself, it made me see the world in a whole new way." 

This book is geared toward primary classrooms, and it's a great beginning-of-year read aloud to introduce the concept of a maker space and STEAM challenges. 


Science + Art + Literacy= Maker Space Stories

The last line of the book What if . . .  says, "As long as I live, I will always create." What a perfect introduction to begin your own maker space in your classroom! If you emphasize that this story is about creating stories, you can begin writer's workshop by getting your students passionate about creating stories of their own using the materials in your maker space. They can use many different mediums to create illustrations and inspiration for their stories, which is what a maker space is all about. The book Rain Fish by Lois Ehlert is a great example of using maker space materials to create illustrations in a story. In this book, the narrator sees debris in the shape of fish float by after it rains. Connect this idea to the science concept of reduce, reuse, and recycle, and students can create art with trash and reuse items that they collect out on the playground. In the style of Rain Fish, students can find pictures in the debris and turn it into a story. Even better, they can embed important science concepts in their story to show their learning like the book Sea Bones by Bob Barner. Use a tool like book creatorshadow puppet edu, or pic collage to publish a story with their recycled pictures as the illustrations for their book. You could even use the app Faces iMake to create the illustrations if you didn't have the materials you needed to create pictures with the real items. Lois Ehlert and Bob Barber have other books that would be great introductions to the concept of maker space illustrations in stories:


Leo Lionni is another author that can inspire stories with maker space art. I used this idea when I was a classroom teacher and wrote about it in this blog post (Fairytales and Fables) many years ago. I still love the idea of students writing and illustrating stories in the style of Leo Lionni, but I would update this idea by adding stop motion animation.  
HUE Animation Studio (Green)
During the #InnEdCO18 conference, I won an animation studio from Hue! I was excited to give it a try, so my son and I created a short video to retell part of the story Alexander and the Wind-up Mouse by Leo Lionni. We created the characters using the directions in the video above. Then we used the background from the animation studio to record.


The animation studio had some handy features such as a shadow that showed the last spot you placed objects to make it easier to create your motion. It also had a camera with a stand and bendable neck that positioned the camera (although I think the pictures came out a little distorted). To be honest, I don't think I would buy more of the animation studios. I had trouble setting things up in the beginning, and although I got it to work and my son was SO excited about creating movies, we have made stop motion videos that were just as good with the free iPad app stop motion.  Especially if you want to have access to more than one camera at a time in a classroom, I would definitely stick with iPads. However, I will continue to use the camera with their software since I have it. 

There are a lot of creative opportunities when you let students' imaginations soar. Just give them a few materials and a platform to publish and you will be amazed at what they can write!

CCSS: W.K.2, W.K.3, W.K.6, W.K.8, W.1.2, W.1.3, W.1.6, W.1.8, W.2.2, W.2.3, W.2.6, W.2.8, W.3.2, W.3.3, W.3.6, W.3.8


Math + Art = Origami Frogs 

The girl in this story folds paper into origami characters, which is a great opportunity to do some art and math. One of my favorite origami activities to do in the classroom is a frog jumping contest! Students make origami frogs and measure how far their frogs can jump. It's a great opportunity to have students measure with different tools (rulers, yard sticks, and non-standard measuring tools like cubes and string). I originally got this idea from the resource book Origami Math (above) many years ago. It includes written instructions for folding origami shapes, including the origami frog. I would update this lesson by creating a design sprint for students.

The Engineering Design Process is the methodology I would use to help students create their origami frogs.

How do I create an origami frog? The video above is a great resource. As students iterate this process, they may ask: How can I make my frog jump farther? Higher?


How big/small should I make my frog? What kind of paper should I use? 


Have different materials available for students such as card stock, construction paper, tissue paper, and paper that has been laminated so students can create a plan with the materials that you have available. 


Collect data: Create a graph to keep track of how far/high different types of frogs jump. 
Experiment: How does the size of the frog effect how far it jumps? How does the type of paper effect how far the frog can jump? 


My students decided to improve the design of the back legs, the aerodynamics of the head, as well as the size and type of paper they used. You'll be amazed at their creativity and thinking!

CCSS: 1.MD.A.2, 1.MD.C.4, 2.MD.A.1, 2.MD.A.4, 2.MD.D.9, 2.MD.D.10, 3.MD.B.3, 3.MD.B.4

Don't forget to check back for more ideas in the series Literacy + STEAM= Design Thinking Sprints!
The next featured book will be:


0

Top 3 Folktales that Integrate STEAM

This post contains affiliate links for your convenience, and at no cost to you. 

Long ago (back in 2011), when I was a second grade teacher, I wrote this post called Fairytales and Fables Unit.  In this post I focused on how to teach students the structure of fairytales and fables so that they could understand how those stories worked and use the structure to write their own fairytale or fable. It included lots of great mentor texts, ideas for aligning literacy centers, and a celebration to wrap it up–a fairytale ball! While that post is a bit dated, the idea of teaching the structural elements of these stories is still a good one that aligns with Common Core State Standards. Folktales are still a focus of the CCSS in 2nd and 3rd grade:
RL.2.2 Recount stories, including fables and folktales from diverse cultures, and determine their central message, lesson, or moral. 
RL.3.2 Recount stories, including fables, folktales, and myths from diverse cultures; determine the central message, lesson, or moral and explain how it is conveyed through key details in the text. 

Studying the structural elements of a story is also a standard in 2nd, 4th, and 5th grade:
RL2.5 Describe the overall structure of a story, including describing how the beginning introduces the story and the ending concludes the action. 
RL.4.5 Explain major differences between poems, drama, and prose, and refer to the structural elements of poems (e.g. verse, rhythm, meter) and drama (eg. casts of characters, settings, descriptions, dialogue, stage directions) when writing or speaking about a text.
RL5.5 Explain how a series of chapters, scenes, or stanzas fits together to provide the overall structure of a particular story, drama, or poem.

I love connecting STEAM (science, technology, engineering, art, math) and literacy in the classroom, so I'm going to use some of the same teaching points as the original post I wrote in 2011 with some modern updates using 3 of the best fractured folktales I have come across that highlight engineering and the design process.


VS. 


1. The Little Red Fort by Brenda Maier

This story is based on the classic fable The Little Red Hen, but in this story, Ruby is a little girl who wants to build a fort. She asks her brothers for help, but they laugh at her and tell her she can't build. Just like the original fable, Ruby works through the steps it takes to build her fort (following most of the steps in the engineering design process) while asking her brothers for help each step of the way, but they're always too busy, or just not interested until they see the fort that she made herself. 
I love that this story has diverse characters and an emphasis on STEAM! 

ELA lesson: Linda Dorn outlined the structures of different kinds of texts in her book Teaching For Deep Comprehension: A Reading Workshop Approach. Fill out the Structures of a Fable text map based on Linda Dorn's work after reading the original version of The Little Red Hen with your class. Next read The Little Red Fort. The google doc above is an example of how you might fill out the Structures of  a Fable text map for this book.

https://gyazo.com/c15d7c6dee2e87e469cb2d4f385c253d https://gyazo.com/886f5ded8e754873a2a8c7139e722e9b

Studying fractured fables, different versions of a classic fable, gives students a great opportunity to compare and contrast texts by analyzing stories with the same structure:
RL.2.9 Compare and contrast two or more versions of the same story (e.g., Cinderella stories) by different authors or from different cultures.
RL.3.9 Compare and contrast the themes, settings, and plots of stories written by the same author about the same or similar characters (e.g., in books from a series).
RL.4.9 Compare and contrast the treatment of similar themes and topics (e.g., opposition of good and evil) and patterns of events (e.g., the quest) in stories, myths, and traditional literature from different cultures.
RL.5.9 Compare and contrast stories in the same genre (e.g., mysteries and adventure stories) on their approaches to similar themes and topics.
Using the digital interactive notebook pages shown above, you can show students that the characters, the problem, and the solution are different, or fractured in The Little Red Fort. Instead of using animals, the main characters are human. Instead of baking bread, Ruby wants to build a fort. In the end, Ruby doesn't let her brothers play in the fort since they didn't help, but the story doesn't end there. Instead, they find ways to improve the fort, and Ruby lets them join her for a celebration inside. You can compare and contrast these stories with a double bubble map if you use Thinking Maps, or a Venn Diagram.


Engineering: This book is a great example for modeling how the Engineering Design Process works, which aligns with ISTE standard 4a: Students know and use a deliberate design process for generating ideas, testing theories, creating innovative artifacts or solving authentic problems.
According to Engineering in Elementary, to solve engineering problems, engineers follow a series of steps called the "Engineering Design Process."

ASK: What is the problem? How have others approached it? What are your constraints?
IMAGINE: What are some solutions? Brainstorm ideas. Choose the best one.
PLAN: Draw a diagram. Make lists of materials you will need.
CREATE: Follow your plan and create something. Test it out!
IMPROVE: What works? What doesn't? What could work better? Modify your design to make it better. Test it out!
In this story, Ruby asks herself and her brothers what she can build using the boards she finds (the constraints). Her brothers also tell her that she doesn't know how to build anything so she learns how (answering the question, how have others approached it?). We have to infer that she went through the imagine stage when she decided to build a fort because it is not directly stated. She plans her fort and creates it all by herself. Her brothers help her improve her fort by adding a mailbox, flowers, and painting it fire-engine red. At the end of the story, there are suggestions for building a fort of their own: a sofa fort, a kitchen chair fort, a snow fort, or a bunk-bed fort. Have students use the Engineering Design Process sheet to build a fort as homework. Using a program like Seesaw, students could even add pictures, video, and voice to illustrate how they used the Engineering Design Process to build their own fort at home.


 VS. 

2. The Three Little Pigs: An Architectural Tale by Steven Guarnaccia

This fractured folktale is a version of the classic Three Little Pigs, but their homes are made of scraps, glass, and stone and concrete. The house designs are inspired by 3 famous architects: Frank Gehry, Phillip Johnson, and Frank Lloyd Wright. Many more world-renowned designers' work is featured throughout the story, which makes this a perfect book to make a STEAM connection.


ELA lesson: This is another great story to compare and contrast to the original version of the Three Little Pigs. The Structures of a Folktale text map (above) is an example of what the structure of The Three Little Pigs: An Architectural Tale might look like. The digital interactive notebook pages show how students might compare the structures of these folktales.


This story also gives students a great opportunity for research on the 3 famous architects highlighted in this story: Frank Gehry, Phillip Johnson, and Frank Lloyd Wright. By researching the type of structures these architects create, students can get a sense for the design and artistry behind thearchitecture. 

Engineering: Now it's the students' turn to build! Using the engineering design process, have students become an architect that was hired to design a house for the three little pigs. Students must begin the Engineering Design Process by asking themselves: What will be strong enough to keep the big bad wolf from blowing it down? Is it beautiful? Using the influence of the architect they like best, students must make a plan and  create a model of their design. Give them a variety of materials to use such as cardboard, plastic cardboard screws, clear plastic bottles, and legos. Let students know that just because the concrete house in the story was the one the wolf couldn't blow down, it doesn't mean that it is the one they have to build. If they build it well, it will remain standing.


 VS.  

3. The 3 Pigs and the Scientific Wolf by Mary Fetzner

This fractured folktale is about the daughters of the 3 Little Pigs and the Big Bad Wolf's son. "He, like most children, was sure he was wiser and more clever than his father. He just knew that he could figure out an easier way to catch those delightful piglets." So the scientific wolf tries to use simple machines to catch the 3 little pigs. At the first house made of straw, he uses a pulley to try to get in. At the second house made of sticks, he tries riding a bicycle up an incline plane, and at the third house made of bricks he uses a crowbar as a lever. When that doesn't work he tries lifting the house with a corkscrew jack. He never figures out a way to get into the pigs' houses, so he decides to become a vegetarian. 

Disclaimer: I think it's important to know that this book is not a traditional book. The pictures inside the book are not in color, and pages 32 - 64 are student activity pages that outline a unit about simple machines. This book was published in 2000, and the activities at the end are not rigorous enough or hands-on enough for me, personally. I loved the idea of the wolf using simple machines so much, however, that I thought it was worth it to have the story! It opens the door for some great STEAM possibilities!

ELA lesson: Like the first two stories, fill out the Structures of a Folktale text map for this story and compare and contrast it to the original Three Little Pigs using the double bubble map or the Venn Diagram from the digital interactive notebook pages.

Engineering: Using this story and The Three Little Pigs: An Architectural Tale would be a great opportunity to create PBL unit about simple machines. 

Pulleys


Levers


Inclined Planes


Wheels and Axles


Simple Machine: The Screw

Once students have learned about simple machines, they will be hired as part of a security team to make sure that the houses they designed for the Three Little Pigs (created in The Three Little Pigs: An Architectural Tale) are safe from the scientific wolf. Their job is to try to break into their model house using simple machines just like the scientific wolf.  They will make improvements to their design until it is safe from at least 3 different attacks by the wolf. Then they will create a presentation for the 3 pigs that shows how they secured the house from 3 different simple machines that the wolf might use to get into the house. When creating their presentations, they could use iMovie, the Doink Green Screen app, or the Stop Motion Animation app. There are a lot of possibilities!

Another great connection to a simple machines unit is St. Patrick's Day STEM Challenge: Build a Leprechaun Trap with Simple Machines

After your students have designed and engineered forts, houses, and simple machines, they can use the Structures of a Fable or Folktale to create their own fractured story that includes some engineering! Maybe Jack can use simple machines to break into the giant's house, or Goldilocks gets community service for breaking into the 3 bears house, and she has to redesign the inside of their house like an episode of Fixer Upper. With lots of opportunities for hands-on learning, I'm sure the students creativity will amaze you!

The text maps, digital interactive notebooks, engineering design process sheet, and all the movies embedded in this post are available for download here on Teacher Sherpa
Enjoy!

3

Introducing Close Reading Strategies at the Beginning of the Year

This post contains affiliate links for your convenience, for which I do receive commissions if a purchase is made, but at no cost to you.

According to Beth Burke, NBCT, “Close reading is thoughtful, critical analysis of a text that focuses on significant details or patterns in order to develop a deep, precise understanding of the text’s form, craft, meanings, etc. It is a key requirement of the Common Core State Standards and directs the reader’s attention to the text itself.”  She also says that texts used for close readings should be short, they should be discussed in large or small groups, and they need to be deliberately reread at least 3 times. 
With those key points in mind, short films and wordless picture books are a great way to introduce the strategies involved in close reading. Like wordless picture books, there are short films that have no words, but the content is definitely discussion worthy. Taking out the decoding to focus on the content and thoughtful discussion will allow every student to be able to access the content and practice the strategies involved in close reading. 

The short film For the Birds by Pixar is a great place to start. It addresses the subject of bullying, which is a great discussion to have at the beginning of the year. 

First Read
When doing a close read, students focus on what the text says first by identifying what the story is mostly about. They can look for the main idea, summarize, or find the theme. If your students are identifying a theme, remember that the subject and the theme aren't the same thing. Bullying, for example, is not a theme. it's a subject.  A universal theme about bullying might be Overcoming Adversity; someone overcomes the problems they face with bullies. Another common theme might include Man vs. Society. The reason someone might bully another person could be from peer pressure, and they are trying to fit in by joining in the bullying. Students can come up with their own theme too by giving an opinion about the subject, such as: bullies always get their pay backs. This video helps introduce how to find a theme:

Second Read
On the second read, students focus on how the text works by looking at text
structures and text features. They might also focus on the author's craft or
what the text says by looking at vocabulary or word choice. 

Still using the short film For the Birds, have students think about what words
they would use to describe the birds. Have them use evidence from the film to 
support their thinking. Here is the video again, but with comments embedded to
help students think about the birds character traits :


Third Read
Students focus on a deeper understanding of what the text means 
by inferring, analyzing, and evaluating the text on the third read. They might
compare it to another text or connect it to the larger world with text to self 
connections, text to text, text to media, or text to world connections. 


With this short film, on the third read have students make a connection to your
classroom. How can you address bullying in your classroom? You can also 
compare this short film to the wordless picture Bluebird by Bob Staake. Just like
the short film, this picture book has no words, but it is definitely discussion
worthy. Every student will be able to access the content and deep thinking, and 
this book is intense. The story is a very sad one that includes death, so you may
want to preview it first to make sure it is not too intense for your class. I am 
including the book trailer for this book, but a video does not do it justice, so 
you'll want to look at a copy of this powerful wordless picture book yourself. 


You can download this lesson on Teacher Sherpa. It includes QR codes and links to all the videos in this post so you can use it with iPads or laptops/chromebooks. It also includes the text dependent questions for the first read, the second read, and 2 options for the third read, along with blank pages to use with your own books and/or videos. 
 

How do you introduce close reading in your classroom? I hope you'll consider using short films and wordless picture books to kick it off in your classroom. They're a great tool that will allow you to have deep conversations regardless of a students' reading level. Enjoy!


0