
No one knows exactly what school will look like in August yet, but there are a few things that we can do to get organized in the meantime. This series of blog posts called, "Getting Organized for #DistanceLearning" is full of tips that will be useful whether you're teaching online or face to face. So be sure to check back for all the tips in this series!
Tip #1 was Password Saver
Here is tip #2 . . .
Lesson Plan Templates and Hyperlinks


 |
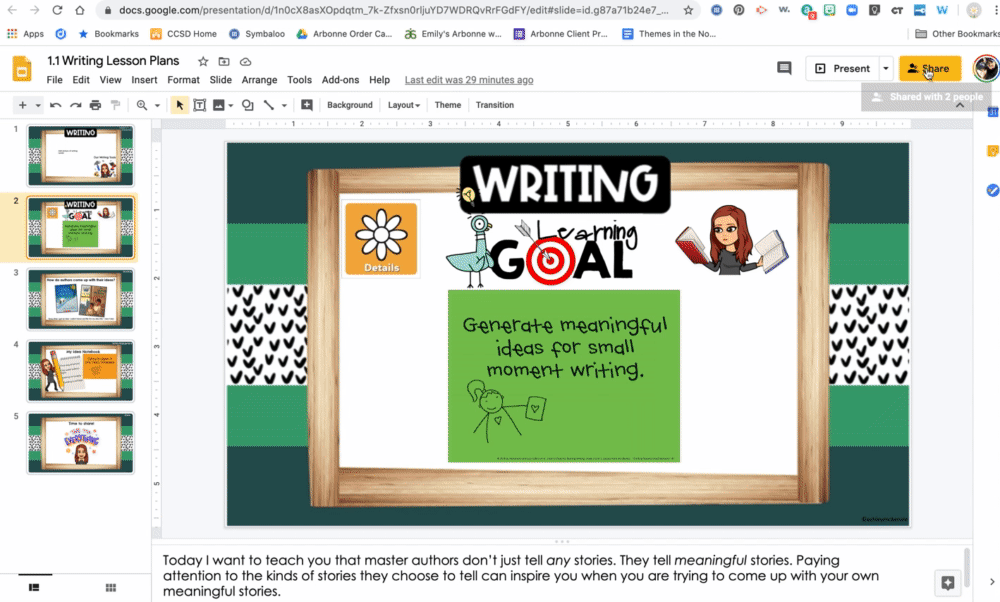
| Blank lesson plan template for writing |
Templates
I'm really excited to share with you this efficient way to organize and access lesson plans! Whether we are teaching face to face, online, or a combination of both, creating a lesson plan template for each subject is going to save you time and create a learning routine that is more predictable for kids. Every lesson usually has a similar format – a connection or hook, a teaching point, some modeling, guided practice, independent practice, and sharing. First, start by creating a blank template in google slides for each subject with at least one slide for each part of the lesson. You can see my blank template for writing above. This will make your lesson planning much quicker. Having a slide that names the teaching point in the same way each time (mine says "Learning Goal" and has the picture of the Pigeon) will help students tune into the teaching point when they know where to look for it. If you use Lucy Calkins Units of Study in any subject, your teaching point is the sticky note! You can see mine on the writing slide. Because the language she uses for her teaching point is usually so wordy, you can see I typed it into the notes section of the slide. That way I can still share her teaching point with fidelity, but I don't have to read it out of the book or have kids worry about a bunch of text on the slide. The sticky note focuses them on the teaching point while I still share the exact language. You can even get started on your lesson planning for the year this summer. If you have a curriculum you follow, you can make a slideshow for each lesson and plug in the teaching point or learning goal right now like in the examples above. Leave the rest blank for now so you can plan it as you go. You can even use the same slides each year and just make adjustments as needed. The big idea will already be there! I'm using the templates created by Ashley McKenzie called Scandi Mountains. She has a lot of cute designs! If you're looking for some free templates, there are a lot out there. Some of my favorite free templates are from Slides Carnival.
Hyperdocs
 |
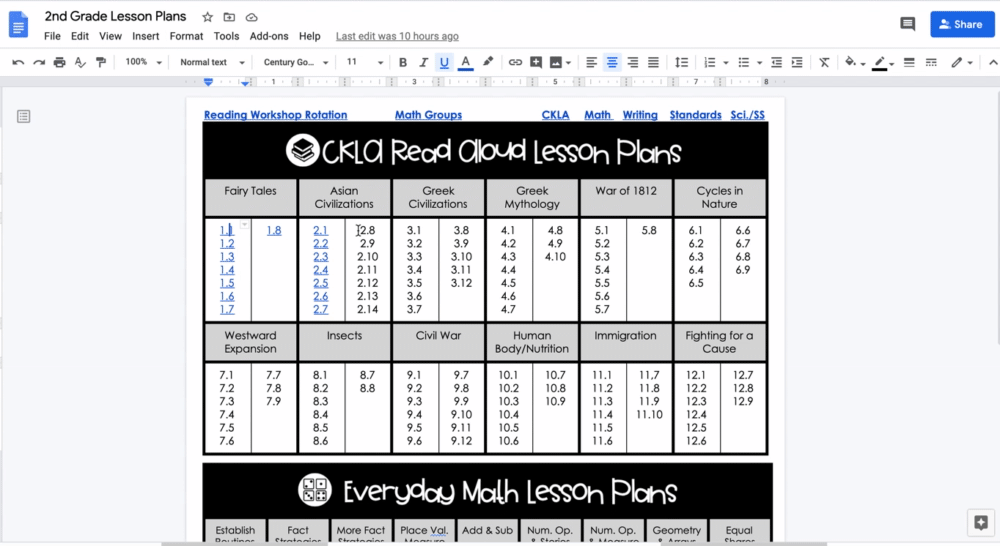
| Google doc hyperlink page |
 |
| How to copy the link from your google slide lesson plan: share–copy link |
 |
| How to add the link from your lesson plan to your google doc hyperlink: highlight the lesson plan number–click on the picture of the link–paste the link–apply |
Once you have a bunch of google slides lessons created, you need to be able to get to them quickly and efficiently. That's where hyperdocs come in! A hyperdoc is basically a google doc that holds a bunch of links that are part of a common theme. My school (which will be new for me next year) has a curriculum for reading, writing, and math. I created a google doc with each of those subjects (above), and I added the lesson number in each table. For example, 1.1 is unit 1, lesson 1. When I have a google slide lesson plan created, I link it to the correct lesson number. First click "share" on your google slide lesson plan and copy the link (see example above). Then highlight the lesson plan number on the google doc, click on the picture of the link, and paste the link you copied from the lesson (see the example above). That's it! Your lesson plans are now all in one place.
 |
| How to change a link so it automatically make a copy when you click on it: in the link, delete "edit" (and anything that comes after it)–type in "copy" |
I also linked the blank lesson plan template for each subject at the top of my google doc hyperlink page. This saves me time when I am ready to create a new lesson plan. I created the link to automatically make a copy of the blank lesson plan template when I click on it. To do this, just copy the link of the google slide template (see the hyperlinks example again) and change the last part of the url that begins with /edit to the word copy (see the example above), and paste the new link to your google doc hyperlink page. Then when you click on it, it will automatically make a copy of your blank lesson plan template so you can start working on your next lesson plan. Nice and efficient!


I also have my reader's workshop rotation and math groups on google slides, which I linked to my google doc hyperlink page too. I just project the groups and rotations during workshop time, and it's easy to change as needed when it's a google slide. I also linked the standards to my google doc hyperlink page because I often need to refer to them when I am planning. That makes everything I need for my lesson plan in one spot. Perfect!
Bookmarks
 |
| Symbaloo bookmark page |
Now that everything digital you need to teach your lessons all year is linked on one page, I still have one more shortcut that will make your life easier. Have you ever used Symbaloo? It is a free bookmark tool that is saved in the cloud, so you can access your bookmarks on any device. I have my computer set up so that when I log onto the internet, my symbaloo page (above) automatically pops up and all my bookmarks are automatically at my fingertips. You can choose the color and picture for each bookmark you save. One of the really convenient things about symbaloo is that you can also bookmark a google doc, a google slide, etc. That means I can copy the link to my google doc hyperlink page and create a bookmark that will open that doc for me. (tip: when creating that bookmark, save it as a website instead of embedding it in symbaloo, and it will open the whole doc.) The picture of the target on the picture above is my google doc hyperlink page. That means whether we're teaching face to face or remotely next year, with one click, I'm ready!
I hope you found this tip for Getting Organized for #DistanceLearning helpful! Check back next week for tips on organizing your google drive. If you haven't seen the other tips in this blog series yet, make sure to go back and check out tip #1: Password Saver.


No comments